|
| ryanalder |
|
||
|
hey guys how do i go about polishing my bbm .should i take it of the car or is there another way around it a step by step guide would be great
|
||
| Top | |
||
| KWIKXR |
|
|||
|
I hope you know what you are getting yourself into
Im guessing you only want to do the top half of the BBM? It would be best to remove it from the engine, i can't think of a way you could possibly do a decent job with it still bolted on Im not too familiar with the hoses on the intake side of things on the AU's (guessing your's is an AU going by what's under your username) as i think there are minor differences with where the breather hoses go and all that but its fairly similar to EF/EL models, anyway..... You'll need to remove your intake piping, throttle cable and cruise cable where fitted, remove any breather and vaccum hoses going to the top half of BBM, unbolt the ISC and throttlebody and then undo all the bolts holding down the top of the BBM. Remove it from the engine bay, put it down somewhere, crack open a cold one and get ready for the fun part Others may have a different method of polishing the BBM but this is how i went about it.. You may want to invest in a small die grinder of some sort with flapper wheels and different grade grinding discs. Depending on how bad the BBM casting is, you may need it to break down all the burrs and grind the surface back to remove deep pitting. With mine i started by using a fairly course file and started breaking down all the sharp edges and burrs that were sticking out. Next i got my grinder with some fairly rough grinding discs and started grinding down the entire BBM till most of the pitting was gone. It will look pretty uneven and scratched up at this stage but then next stages will smooth everything out. I got some course flapper wheels and started going over the entire thing to smooth out all the uneven bits. Once this is done, it will still have a fair few scuffs but it will be a bit more even, this is where i got to work with the sandpaper. I started off with 80 grit sandpaper IIRC and dry sanded (i.e. just sand normally with no water) the BBM to try and level out the scratches made by the grinder. With the sandpaper you can shape it to fit in between the runners and all the tricky bits to try and smooth out all the areas where the grinder can't reach. From the 80 grit i then went up to 100 grit and 150 grit dry until it was smooth all over and all or most of the deep scratches were gone. Next i went to 240 dry to level out the amount of scratches left by the earlier grades, then working my way up to 280 and 320. By the time you finish 320 grit dry the surface will appear to be fairly smooth, so this is where i started wet sanding. I started wet sanding with 320 again, going up to 400, 600 and then 800. The way i see it with polishing is the smoother the surface the better the polished result will turn out so i ended up going up from 800 grit to 1000, 1200 and finished with 1500 grit wet. Might of been a bit overkill but i didnt want to polish it up too early only to have to go back to sanding it more. Last of all is the polishing stage. Get some Autosol metal polish, some rags (i used some old towels which worked pretty well) and start rubbing it into the BBM, use seperate rags for applying the polish and buffing as the metal polish builds up on the rag real good. Go over it at leat 4 or 5 times to get a decent finish or until your happy with it. You will most likely get a nice shine if you have a buffing wheel attachment on a die grinder so if you can get one give that a go Hopefully that covers it.. Thats one s**t load of typing i cannot be bothered reading through I did mine over a dew days lol, it's quite a big job but if you take your time and get a good result it'll all pay off. Mine isn't perfect as i sort of ran out of patience but it turned out half decent and brightened up the engine bay a great deal.. Best of luck with it 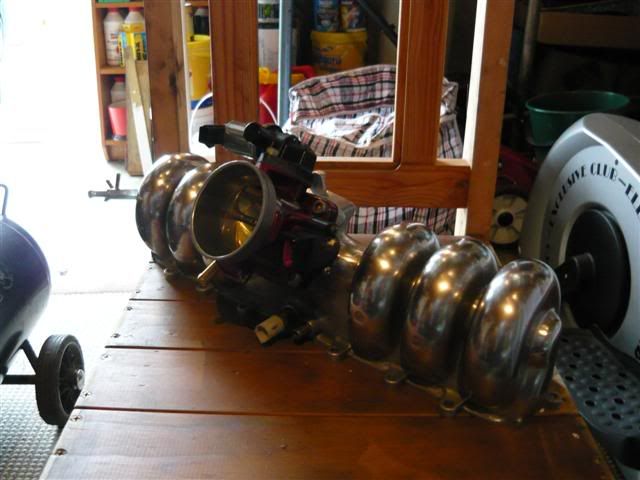
|
|||
| Top | |
|||
| fordfreak ef |
|
|||
|
definaatly take it out of the engine bay... way better finish and no back pains leaning into the engine bay for hours...
|
|||
| Top | |
|||
| Bug |
|
|||
|
KWIKXR - you got a big pic of your sig? It's a pretty cool lookin engine bay
_________________ EL XR6 5spd |
|||
| Top | |
|||
| KWIKXR |
|
|||
|
Bug wrote: KWIKXR - you got a big pic of your sig? It's a pretty cool lookin engine bay Check my build thread (click the red link in my sig).. Should be heaps of pictures in there |
|||
| Top | |
|||
| Who is online |
|---|
Users browsing this forum: No registered users and 24 guests |


