|
| phongus |
|
|||
|
Krytox wrote: I think the filter basket are standard sized o-rings.
The thin one would be for the inner bolt and largest for the retainer (non stock items?) I've always used stag on the tensioner to seal, or even RTV Blue. I noticed you never mentioned lock-tite of any sort on the cam nut, or any other. Also would be good for people to 'clean' the headbolt holes in the block with a modified old head bolt. (vertical cut from an angle grinder) Thanks for that krytox. I'll go and buy myself some standard O-rings...hopefully they'll do the job. Now I need to know how to get the old O-rings off...they seem to be stuck in there pretty nicely I haven't mentioned the loctite on the cam nut because I haven't actually tightened it yet, I just bolted it on there to hold the sprocket for now. Won't be tightening it until I get the tensioner parts sorted. I am unsure as to where else loctite should be used. I was following the steps according to the Gregory's manual. Though if there was meant to be loctite somewhere...it's a bit late now Yes, the head bolts need to be cleaned as well as the head bolt holes. I used degreaser and compressed air to remove all the gunk in the head bolt holes. I cleaned the new head bolts with some kerosene and then oiled them up again...lightly only, though I am unsure as to how lightly is light I might actually write a doco up if I can be bothered and can be placed in the Tech Docos section for everyone to read. phong =P~
_________________ phongus = Post whore 2006 |
|||
| Top | |
|||
| FordFairmont |
|
||
Posts: 6113 Joined: 8th May 2007 |
phongus wrote: I was told not to put retainers when putting 2 shims in due to the tappet getting stuck and getting the annoying tappet ticking noise. who said this? Ive got the same setup and does not make a sound. Retainers just hold the hla's in place and make it easier to fit. Quote: and then the timing chain tensioner...which I might need help with.
phong =P~ a little write up about refitting the tensioner would be great as im going to be fitting a vernier gear soon and have no idea bout that side of things. also would it be possible to fit the cam sprocket onto the cam first, then push the chain over the teeth? Or do you have to fit the sprocket onto the chain, then push onto the cam? |
||
| Top | |
||
| phongus |
|
|||
|
FordFairmont wrote: phongus wrote: I was told not to put retainers when putting 2 shims in due to the tappet getting stuck and getting the annoying tappet ticking noise. who said this? Ive got the same setup and does not make a sound. Retainers just hold the hla's in place and make it easier to fit. Quote: and then the timing chain tensioner...which I might need help with. phong =P~ a little write up about refitting the tensioner would be great as im going to be fitting a vernier gear soon and have no idea bout that side of things. also would it be possible to fit the cam sprocket onto the cam first, then push the chain over the teeth? Or do you have to fit the sprocket onto the chain, then push onto the cam? Well you can either have it with or without retainers I believe. Yes it would make it easier to install that's for sure, rather then resorting to masking tape as I have. I was told the retainers aren't necessary and is one of the problems to some people having ticking noises after installing the shims in. See how things go when the engine runs, if it runs. I reckon it would be easier to put the chain on the sprocket first, then on the cam. I am not a professional at it but I would do it that way. I reckon it would be harder to put the chain onto the sprocket once the sprocket is already on the cam and can't move around. Just me though. With the timing chain tensioner, I will do a write up and take pictures as I go. I surely would want to get this step right, or else the motor just ends up at s**t creek again. Though I am unsure as to when I will be doing the tensioner, since I am at a loss and require the O-rings. phong =P~
_________________ phongus = Post whore 2006 |
|||
| Top | |
|||
| teveo |
|
|||
|
Does anything else need changing with that cam? ie exhaust?...
will it increase fuel consumption? is it good for prodomanant highway use? phongus wrote: Okay everyone. An update on what's going on here...and hopefully I can get the engine back together by the end of this year, that's if I can get off my a** and finish it off.
Anyways I got the head back a while back but didn't take any pictures of it or anything, been busy with work and getting lazier by the minute. Since I picked up my camshaft on Friday, I thought I'd take a couple of pictures of the camshaft and resurfaced and tested head. 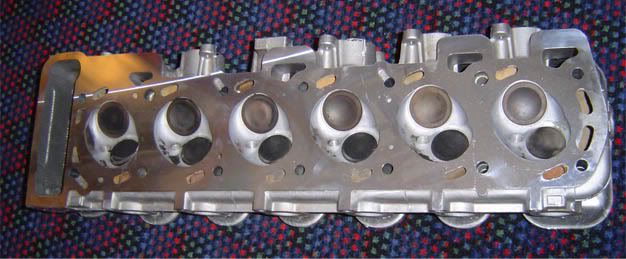 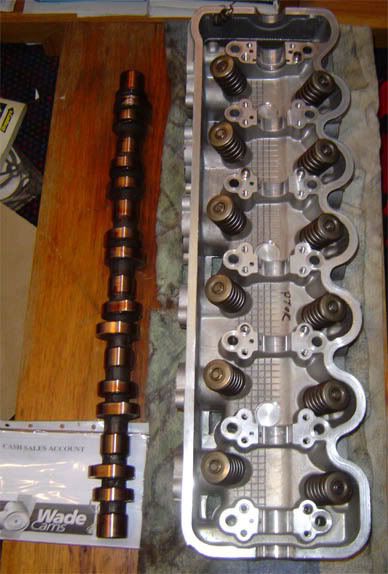 The head was found to be in really good condition. Only a little bit was taken off the head to get it straight and valve seals and the lot are all in good condition with without any leaks, so thumbs up so far for the head...though contemplating on getting it port/polished, though not sure if it is worth it at the moment. I decided to go with a regrind camshaft rather then billet, due to the price differences. I got a WadeCam 1673 grind and hopefully it will give me the oomph I am after. I also got new TopGun leads and some gaskets so far. Still got to get VRS kit, AU headgasket, new head bolts and water pump. Contemplating on getting a new alternator or reusing the one in my car as well as trying to remove the steel water pump pulley off the old pump and putting it on the new one, don't want a nice chromed pulley go to waste Hopefully I can start on it once Christmas holidays start. phong =P~
_________________ <a href="http://s154.photobucket.com/albums/s278/stephen351/?action=view¤t=resize2.jpg" target="_blank"><img src="http://i154.photobucket.com/albums/s278/stephen351/resize2.jpg" border="0" alt="resize"></a> |
|||
| Top | |
|||
| phongus |
|
|||
|
If you plan on putting in a mild cam, it is advised to a set of extractors and better exhaust system. You don't necessarily require a hi-flow cat if yours is still working fine, just get it modified to fit a 2.5" exhaust if you plan on getting a performance exhaust.
Only other thing you would need are shims for the rocker arms only if you decide to get a regrinded cam. Billet cams are plug-n-play but are much dearer. Fuel consumption depends on driving style as well as current condition of engine and mods. Some people get better fuel economy and some don't. I think if you drive it normally there may be a slight improvement in fuel economy. It won't affect highway driving, it might even improve economy during highway driving, though diff gears and transmission will usually determine highway fuel usage. So nothing wrong with having a cam and highway driving. Hope that helped...though don't quote me. If anyone else could fill in blanks that would be great. phong =P~
_________________ phongus = Post whore 2006 |
|||
| Top | |
|||
| phongus |
|
|||
|
Ooops. I forgot to update about the timing chain tensioner thing. It was a bit of a hassle because of the O-rings that needed replacing and fearing that it might be too tight or the piston wasn't in properly.
Anyways I took images and I'll have a description of what is what and what I ended up doing. First up is the Sprocket to Cam bolt. When you put the bolt back on, make sure you put some thread locker on the tip of it. I used a medium strength one, not sure if it is enough but that's what I've been using and it worked on the other motor 
To tighten up the sprocket bolt, I had to jam a T-bar between one of the sprocket holes and rocker gear assembly. This stops the movement of the cam which in turn rotates the pulley and thus the whole engine. I manage to jam the bar as seen below. Make sure that when you do jam a T-bar or something similar, that it don't touch any mating surfaces on the head or the head itself. 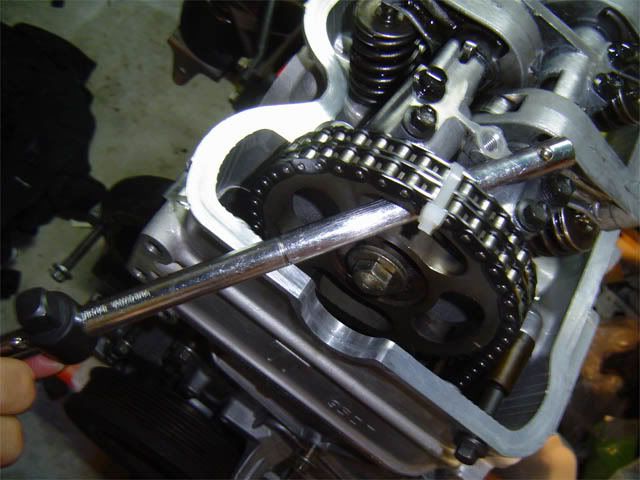
This is the hole in which the timing chain tensioner assembly sits in. You might be able to make out the chain guide at the end of the hole... 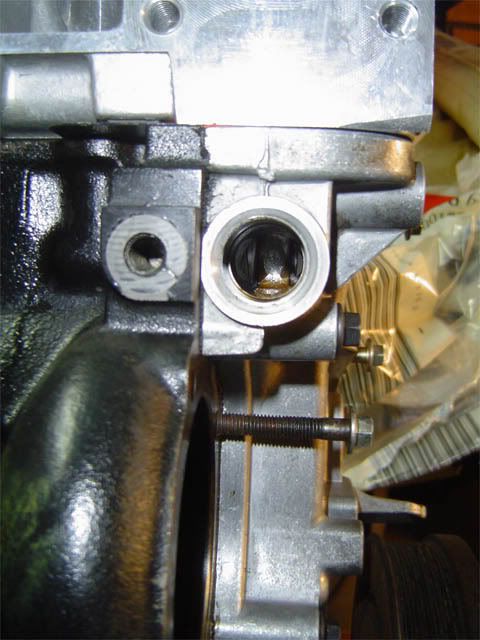
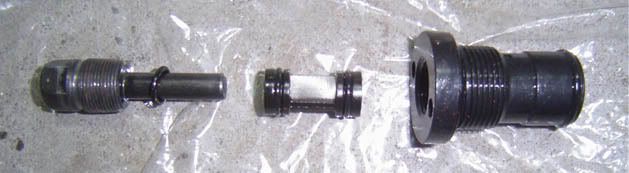
Below are images of the timing chain tensioner assembly. First one showing all the parts and the other 2 just closer shots. The parts from left to right are: Tensioner retainer plug, filter, retainer, tensioner sleeve, spring, piston plug and piston. Within the tensioner sleeve there is a small plug with a 3mm allen key hole in it. That plug does come off so make sure it is there when you put it back together. 

This shows the inner half of the tensioner assembly when it is in the released state. This is how the assembly sits when it is sitting in the tensioner hole. The spring pushes the piston into one of the timing chain guides which sets the timing. NOTE: In the image you can see that the piston is separated from the piston plug and spring, the piston plug and spring are meant to sit inside the piston with the spring extended. 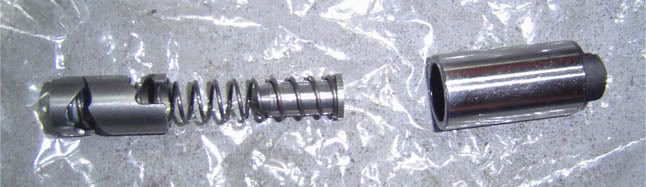
The other state that the inner assembly can be in is the locked state. When in the locked state, the tensioner sleeve locks inside the piston with the aid of a small dowel in the piston and hook on the sleeve. The assembly is only locked when you want to remove the tension on the chain, so that it is easier to change a cam, sprocket, chain etc. or when you remove and install the whole tensioner assembly from the timing case. NOTE: I just noticed that the image is facing the wrong way...so just imagine rotating the image 180 degrees so that the piston faces to the right and sleeve to the left. 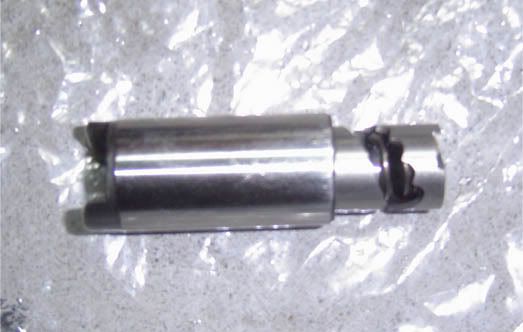
To remove the assembly, you will need either a pair of long nose pliers or a tool made specifically to fit in the 2 holes on the retainer. First you can undo the retainer plug bolt. You may notice that there is some rubber stuff around the thread of the plug. That is only gasket maker to stop oil leaking out of the plug. Sometimes due to this, when undoing the plug, the whole retainer rotates with it. If you plan on just removing the plug, use long nose pliers to hold the retainer back while undoing the plug bolt. If you plan on removing the whole lot, then just undo the whole retainer with the plug bolt in it's position, you can remove the plug later on. Though when doing this, the inner tension assembly is still in it's released state, so expect a springing action of the retainer when it is off the tensioner hole. The following paragraphs will tell you how you would remove the tensioner assembly one piece at a time, rather then a whole assembly at once (ie. plug stuck in retainer). Undo the plug and pulled it out. You will notice an o-ring at the end of the thread, replace if it is in crappy condition...example of crappy condition, it is hard and brittle. When you pull the plug out of the retainer, you might not have the filter attached to it, it is most likely still stuck in the retainer. Try to get it out without damaging it, should slide out since the plug is out. On the filter you will notice 2 o-rings on either end. I would advise to replace the o-rings (plug and filter) if they are hard as plastic...if they still have softness in them, there is no need to replace them, but if you have spare o-rings around, might as well. With the plug and filter out, you can see the 3mm allen key hole in the retainer. Insert a 3mm allen key with a bit of tubing around the long part of the key leaving about 5mm uncovered at the end of the allen key. Push it through the retainer and once you feel the key is locked into the hole, push the allen key and tubing in and rotate anti-clockwise. The sleeve will lock into the piston and now it is in a the locked state. When in the locked state you can remove the retainer without bits and pieces flying out. When you remove the retainer using a pair of long nose pliers or multi-grips, you will see 2 o-rings. One sits at the end of the plug in a designated groove about 1mm from the end of it. The other one is squashed flat on the stud end. Replace the squashed flat o-ring. You don't have to replace the other smaller o-ring unless it is in a non-serviceable condition, ie. hard plastic feel. With the retainer removed, you can see the end of the sleeve locked to the piston. Using a magnet you can pull the whole inner tensioner assembly out. There are no more o-rings in this part, so that's one less thing to worry about. Clean all the parts of the tensioner assembly. I cleaned my with kerosene...I actually let the parts sit in a cup of kerosene for a whole day while I was at work. Worked a charm Once all nice and clean, replace the o-rings that require replacement and oil up all the parts with clean motor oil. If there are parts which seem in non working condition (mainly spring and filter), then replace the items before it does any damages when putting it back in. Also clean the tensioner hole in the timing case cover to remove all the old oil and apply some clean oil in the hole to lubricate the walling. To reinstall the tensioner, you will need to put the inner tensioner assembly back to the locked state. Once done, push the inner tensioner assembly back through the hole with the piston facing the timing chain guide. Make sure that the piston is aligned with the timing chain guide. There are guides on the piston which fit to the timing chain guide. Once in, you can reinstall the retainer. If you want you can use thread locker at this stage or gasket maker to stop leakages. I didn't put anything and just tightened it. Double check that timing chain guide sits in the piston before putting the assembly in it's released state. When everything is good, insert the 3mm allen key with the tubing around it through the retainer. Push and rotate the key clockwise. You will feel the spring pushing on your hand meaning it is in the released state. At this point the chain shouldn't have much slack on it. If it does have slack, put the assembly back into locked mode and try again. Once set, you can put the plug back in. Make sure the filter is in working condition and that the o-rings were replaced. I got some gasket maker and smeared it at the front of the thread of the plug. This will help keep the oil at bay and thus no more leakages at that point. Tighten to the specified torque which I can't remember off the top of my head. That is basically it on how to set the timing chain. Not that hard once you understand how it works. Hopefully that helped a bit. phong =P~
_________________ phongus = Post whore 2006 |
|||
| Top | |
|||
| shnoza |
|
|||
|
Good work phong!
Now only if you wrote that like 2 months ago before i did my motor.
_________________ "Chuck Norris does not sleep. He waits."
|
|||
| Top | |
|||
| phongus |
|
|||
|
shnoza wrote: Good work phong!
Now only if you wrote that like 2 months ago before i did my motor. Thanks mate At the moment it is in the engine bay, just need to put the radiator back in, clean the overflow bottle (is brown looking now phong =P~
_________________ phongus = Post whore 2006 |
|||
| Top | |
|||
| fiftyone |
|
|||
|
loving the work phongus. awsome awsome job
_________________ ** For Sale ** http://www.fordmods.com/ford-parts-for-sale-f17/assorted-e-series-parts-t124697.html |
|||
| Top | |
|||
| phongus |
|
|||
|
oops forgot to update how the car went after all this.
After realizing I had placed the rear half of the inlet manifold gasket the wrong way and fixing up the timing a little bit, the car is running shweeet. So a success in putting everything back together. YAY Good luck to anyone else who wants to attempt this...it is easy and straight forward...just tedious. phong =P~
_________________ phongus = Post whore 2006 |
|||
| Top | |
|||
| arm79 |
|
|||
|
phongus wrote: After realizing I had placed the rear half of the inlet manifold gasket the wrong way
Ummmm... Aheem??? |
|||
| Top | |
|||
| phongus |
|
|||
|
arm79 wrote: phongus wrote: After realizing I had placed the rear half of the inlet manifold gasket the wrong way Ummmm... Aheem??? Oh oops missed this comment and forgot to reply...Adrian realized the rear half inlet manifold gasket was on the wrong way. The culprit being me lol. Thanks for the help good sir phong =P~
_________________ phongus = Post whore 2006 |
|||
| Top | |
|||
| Drakken |
|
||
|
Ok. I'm doing my head gasket but the engine is still in the car. Before I put the head back on, I would like to flush the whole thing so I don't have anything that I scrapped off the block in the oil and the coolant. Can someone please tell me how I do this.
Thanks |
||
| Top | |
||
| phongus |
|
|||
|
Drakken wrote: Ok. I'm doing my head gasket but the engine is still in the car. Before I put the head back on, I would like to flush the whole thing so I don't have anything that I scrapped off the block in the oil and the coolant. Can someone please tell me how I do this.
Thanks You can jam plastic or lint free cloth (I used shopping bags) in the oil galleries. I am unsure as to coolant holes, but I guess it can work the same as the oil galleries? phong =P~
_________________ phongus = Post whore 2006 |
|||
| Top | |
|||
| Drakken |
|
||
|
Ummmm...ok. Lets just say, for example, that the holes weren't covered and already have crap in them because I didn't think of that until later. What happens then. I just want to empty all the coolant, flush it and then put some new stuff in and do the same to the oil if possible.
|
||
| Top | |
||
| Who is online |
|---|
Users browsing this forum: No registered users and 5 guests |


