|
| CallumSmith |
|
|||
|
Well, this seems to be the thing to do so I figured I'd give it a go.
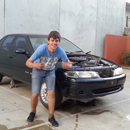
The journey began when my girlfriend got her P's, we needed a car. So the look began, we found a Green 1998 Ford Falcon AU for $700 only about 15 minutes away. Turns out they had sold it the day before, Bugger. So the search continued, we tried CarSales, TradingPost, even eBay. Nothing caught our attention. We had realised her neighbor's Heritage Green 1995 Ford Fairmont EF had been sitting in his driveway since she moved in a few months ago. It looked very neglected, Tires were flat, Moss all over it. I wanted it. So we marched around there, and politely asked what he's intentions were with the car and if he would be interested in selling it. He said he bought the car of his sister 6 years ago and the car has been sitting there ever since. We checked it out, besides needing a massive clean up and the broken windshield, it looked in very good shape. We weren't able to start it as the battery was flat after sitting for so long and the petrol wasn't going to be petrol anymore... We decided to sleep on it, really think it through. The next morning we bought it. He said he'd be happy with $200 because of the amount of work involved to get it roadworthy. It took us hours to get the car onto the trailer. Pumping up the tires would've helped, but we didn't have a portable pump. The center muffler was catching on the trailer so it now has a hole in it..  We took the car to a friends factory not too far away and began the massive clean up.  We decided it was best to do a service before trying to start it, just as a precaution. We changed the oil, oil filter and spark plugs. While we were changing the spark plugs I poured a little bit of transmission fluid into the cylinders in an attemp to lubricate the piston rings. We drained the petrol, you could call it that. It smelt like lacquer. I noticed the Throttle Position Sensor and the Air Control Valve was missing, the fuel pump was also pretty knackered.  Went to the local Wreckers and picked up a Throttle Position Sensor, Air Control Valve and a fuel pump for $45. Installed those then sprayed a heap of Start Ya Bastart into the Air Intake and attempted to start it, it took a few go's but we got there. We immediately noticed the Radiator was leaking. Got a secondhand radiator from the Wreckers that was in pretty good nick for $50.  Once the new radiator was in we took it for a spin around the block. It wasn't that great changing gears and sat in neutral for too long and also it was now leaking in a new spot, the heater core drain. So I came to my new favorite place, FordMods, where I was assisted by SWC and cjh.  Yesterday I decided to service the transmission as the oil was a browny-black and in the hopes if fixing my problem.  The shopping cart consisted of: 5 x 4 Litres of Castrol TQ 95 ($39.99) and a TransGold KFS085 service kit ($16.98), so about $220 worth. My local Supercheap Auto only had 2 bottles of TQ 95 and Auto Barn had 3, so that was lucky. Repco had it for $49.99.  Useful information: - 9 x 10mm bolts on the pan, 3 on the front, 3 on the back, 2 on the driver's side and 1 on the passenger's side - My pan only had one magnet - The transmission supply line is the top transmission line on the radiator, my fluid took a while to start pouring out - Took just under 20 Litres to get a delicious red colour - The clip is a pain in the a*** to install. Well that it for the moment, bye for now. Callum Smith |
|||
| Top | |
|||
| DOHCED |
|
|||
|
Nice man, good to see a Mont getting a rebirth, which I had kept mine and fix it up, watching this.
_________________ XG Ute - 3 Seater - Auto - Dual Fuel |
|||
| Top | |
|||
| Lowlane7 |
|
||
|
Good car to start with, Go hard young fella!
The thread is neat and straight to the point too. Keep it up and this will be an awesome build thread. Excellent start for a neat cruiser, seems like you got a good deal.
_________________ [color=#004080]Cheers, Jacob. |
||
| Top | |
||
| fiftyone |
|
|||
|
Maintain the rage, can't wait to see a finished build!
_________________ ** For Sale ** http://www.fordmods.com/ford-parts-for-sale-f17/assorted-e-series-parts-t124697.html |
|||
| Top | |
|||
| CallumSmith |
|
|||
|
So it's been a while since posts, been pretty busy at TAFE, working and just life in general. Nothing major has changed with car, although, I did have the exciting job of changing the heater bypass pipes though
It started when I noticed a tick tick tish noise coming from the engine bay, it sounded to me like it was something sizzling on the exhaust. https://www.youtube.com/watch?v=2N90hdfU4NU. So I stuck my head in the engine bay and sure enough, and sure enough coolant was dripping onto the exhaust. Turned out a portions of the heater bypass pipe had corroded away.    After (lightly) sticking a screw driver through the pipe   Yum  Sister pipe starting to give way  Now knowing the problem, I headed to the wreckers in search of a new pipe. Wasn't long before I came across an identical car to mine, which coincidentally looked like it had it's heater pipes replace not too long ago, score! I got to work with what felt like taking the engine apart.. The intake manifold (plenum chamber) had to be removed, which meant the injectors needed to be removed as well, along with the spark plugs and a whole lot of cabling. The exhaust manifold also needed removing.  I found wrecking the car at the wreckers first useful as this gave me an idea of what was involved. This was my first real repair on any car and I feel I handled it well. Can't remember how much they ended up charging me but it was only about $20. While I was there I got the sister pipe to this one, I figured if I'm gonna fix it, I'm gonna fix it right.  The shopping cart consisted of: A (wrong) thermostat, thermostat gasket, Thermostat housing base to head gasket, some rubber grease and to the far right; a fine piece of Ford Engineering, worth $10, without the o-ring. The majority of this wasn't required for the heater pipe, but I figured I had so much space for activities, I may as do some maintenance. Actually quite shattered I didn't change the oil pressure sender while I had all that room!  Everything I did at the wreckers had to now be replicated on mine, then in reverse. I would like to add that the pipe was secured to the bell housing, so one of the bolts (20 something mm) needed to be unscrewed a little.     After many hours; plenty of blood, sweat and tears the new pipe was in. The orange goo looking stuff is actually High-temp Red PTV silicone gasket maker.. it was all I had. It wasn't entirely necessary anyway.  Proof I got the thing back together.. lol   And that's the end of that story, if anyone has any questions on doing this, don't be afraid to ask. Also wanted to share this photo with you, this was the original fuel pump, the fuel had turned into some sort of varnish smelling sticky substance..  Anywho, thanks for reading and I hope you enjoyed Oh! and thanks everyone for the nice comments, I appreciate it Callum |
|||
| Top | |
|||
| Who is online |
|---|
Users browsing this forum: No registered users and 8 guests |