|
| BuNtEr |
|
||
|
Tools needed
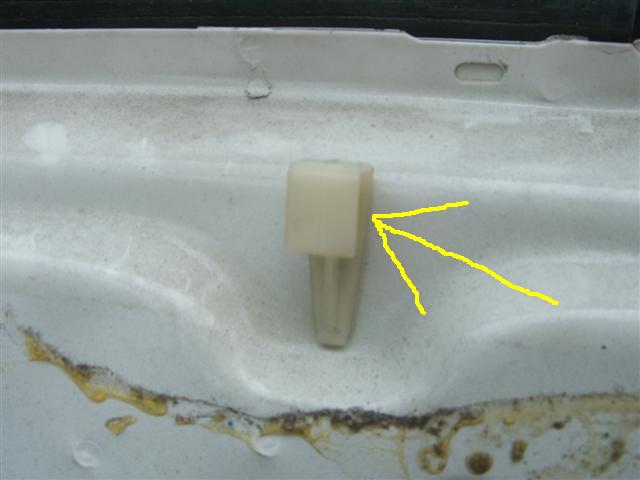
Drill Phillips head screw driver Flat head Screw driver 10 mil socket Ratchet 10 mil spanner 9/32 drill bit 4 mil drill bit T25 torx bit T30 torx bit Hammer Nail punch Parts needed 4 EF/EL Ghia door trims 4 Door handles 4 door handle rods from an EF/EL 4 foam backings for door trims from EF/EL 2 front triangles plastic to cover behind the mirrors from a EF/EL 24 outer edge door trim screws (if you can get them from the car you got the trims off. 4 inner door handle Phillip head screws (large) 8 large screws for door arm rests (use 8 of your old door handles the torx T25 head ones) 8 10mil bolts about half an inch long with nuts and spring washes Time to do this mod A day using 1 person. Remove front door trims First remove old door trims, remove the 7 screws using a Phillip head screw driver from around the outer edge of the front doors, and the 2 screws holding the plastic cover on the pas side and the 2 screws holding the mirror control on the drivers side then remove the 3 torx screws holding the door handle and when you remove the handle you need to twist it so you can slide the door rods off, then using a cloth and a pair of pliers lift of the sniper button 
Removing rear door trims First remove old door trims, remove the 7 screws using a Phillip head screw driver from around the outer edge, then remove the 3 torx screws holing the door handle using a T25 bit, and when you remove the handle you need to twist it so you can slide the door rods off, then using a cloth and a pair of pliers lift of the sniper button take the ashtray out and remove the 1 screw inside there as well, then remove the 3 screws holding the ¼ window garnish once you have done that grab the top edge of the garnish and pull it towards you don’t reef it just pull it slowly. Now bring the window down using the button on the trim, now using your fingers lift one edge of the weather strip with one hand and the other pushing from the bottom of the door trim that should lift the top of the trim on an angle so you can lift the trim away off the door, then before you take the trim off disconnect the window plug from the back of the switch on the trim. If you have done it right the top edge of were the windows clipped on should be white nothing clipped onto it, if you see a black strip with 4 clips holding it on you will need to remove it as it belongs to the door trim you will not be using this again. Using a flat head screw drive you can lift the clips off the edge of the window. 
Removing the plastic backing on the front doors Then use a Phillip head screw driver and undo the 3 black screws holing the speaker in the door ones you have done that (don’t have to unplug it just squeeze the speaker through the hole and remove the plastic backing, then screw the speaker back in. Do this for both front doors. 
Before you do this next lot of things make sure your windows are up Once you have done that you will need to remove the outer door handle & key barrel as well that the lock it self. To remove the door handle you will have to unclip the small door rod going from the door handle to the door latch, use a flat head screw driver and push open the plastic clip that holds the rod onto the door handle, once you have done that use the screw driver to push the small rod from the clip, then use a 10 mil socket and a long extension bar and undo the 2 10 mil nuts holding the door handle in place. 
Then remove the outer door handle, next thing to do is remove the key barrel, using the flat head screw driver push the C clip off the barrel and lift it out, as you lift it out turn it Sideways so the rod on the barrel will slide out. 
Now you will have to undo the 3 torx head screws holding the door lock in place and you will need to us the 10 mil socket to undo the bottom of the window rail. 

Now using a hammer and a nail punch knock the bits of the rivet that stick out, so you can now drill the 2 rivets holding the actuator in place at the bottom of the door. 
Now with that all undone you have to get the 2 rods from the key barrel and the door handle to go around the back of the window channel, once you have done that un hook the actuator and bring the door latch out and un hook the door handle rod, before you do that notice how the rod how it goes over the bolt in the door now put the EF rod under not over like the EB rod as they are bent differently, Shot showing EF rod going under the bracket in the front doors 
and make sure the end of the rod that connects to the inside door handle is facing up. Now you should have the EF rod connected like this on the latch 
All you have to do now is put the actuator back onto the latch then put latch back in its place by moving it back around the windows channel, tip make sure you have the outer door handle rod and the barrel rod up as you squeeze it back into place, one you have it back in place you need to put the 3 bolts back in the latch and tighten up with the T30 torx bit then bolt the window channel back on the door with the 10 mill bolt you removed before. Now get the door lock rod and have it poke out the lock hole and grab the lock and slide the rod on as you put the barrel back in than then put the outer door handle on and bolt that back on using the 2x10 mil bolts you took off it (if this is a Fairmont or Ghia put the switch plate back on before you bolt the door handle back on). Get the outer door handle road and clip it back onto the door handle (tip is push the rod down a little bit before you clip it back on to the back of the door handle) push the clip cover over the rod once you have the rod in place. Now the hard work is done for the front doors all you need to do now is if you wish to put the foam backing on the door, it should stick to your door as there should be enough of that glue on there from taking of the plastic EB cover off. Now put the front window down and now fit the front door trim, be careful putting it on as you could break the top of the trim, line it up on the top of the door and hit it not to hard with the palm of your hand till its clipped into place. Grab 3 outer edge door trim screws and put one on each outer corner of the trim so your lining it up and it will screw into the holes from your old door trims. Once you have done that line up the door handle on the EF door trim were it should sit best, now use a long thin Phillips head screw driver put it into were the screw will be going and get your hammer and hit the screw driver so you can make a mark to were you need to drill the hole, do that for the bottom hole in the inner door handle. Make sure you hold the handle up in the marks in the door trim as that’s the passion you need them to be to make the mark so they are right when you screw them in. Once you have make the 2 marks you need to drill remove the door trim and you should see the 2 marks you made., now before you drill put the window back up. 
Now using a 3 or 4 mil drill bit drill the 2 holes you need for the inner arm rest. 
Now put the window back down and put the door trim back on plug the window switch back on, put all the screws on around the outer part of the door trim do them up firm, Now get 2 of your old inner door handle screws the gold looking one with the big head and use a T25 torx bit to screw them both into the armrest don’t over tighten them as you strip out the hole. Now get the inner door handle and you will see a spike on the back of it is’s a locating lug 
Remove it as you don’t need to use it 
Now hook up the door handle to the EF rod you put in and sit the door handle into place, now you need to do the same thing to mark the location of the hole need for the door handle. Line the door handle in place you should see the marks on the door trim that will show you how the handle should be set. Now using the long thin screw driver and the hammer make the mark for the hole to be drilled. One you have done that you don’t have to remove the handle just move it out of the way wile its still connected to the rod (make sure your window is up before you drill). 

After you drill the hold push the handle into place and use the screws that you should have got from the car you got the trims and handles from should be a Philips head Scre the handle into place again don’t over tighten it make it very firm not lose. Now you could have the door done now put the window back down and close the door now open the door using the inside handle it should open the door. Also doing it using the EF door rods the inner door handles should sit flat, I have noticed people that bend the old EB rods end up with the door handle lifted up and that looks bad, now do the same as you have just done on this front door to your other front door. Now to do the back doors, you should have already taken of the door trims and you have to remove the sniper button rod and the plastic pivot and the small plastic guide As you don’t need these anymore 

Once you have removed them you will need to drill out the 2 rivets holing the actuator in place 
Then you will have to un bolt the latch using the T30 torx bit 
And also unclip the outer door handle rod, (you don’t have to remove the outer door handles leave them on), Un hook the actuators off the latch, now bring the latch out so you can unhook the old door rod and connect the new EF one. 


Now put the latch back in and clip the outer door handle rod back up to it again push the rod down just a little before you clip it onto the door handle. And hook up the actuator. And tighten the 3 T30 bolts up nice and tight. Get 2x 10 mil bolts with nuts and spring washes, and bolt the actuator back on the door, it will not be easy but you can do it. And tighten it up with the 10 mil socket nice and tight. 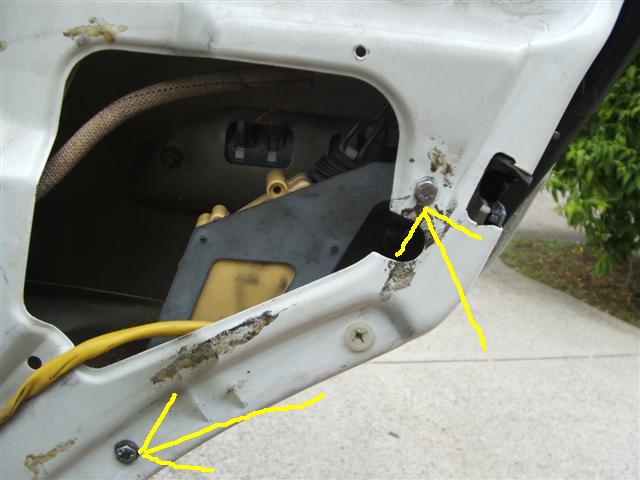
Put the window down and put the foam backing on and push the window switch plug and wiring in the slit of the foam backing. 
Now put the door trim on the same way you did the front door trims, line them up using a few screws, then using the screw driver and the hammer make the marks the same way you did the front trims Then take the trim back off, then put the window back up and drill the 2 holes needed for the arm rest. 
Put the trim back on and clip the window switch in the wiring harness on the door, put all the outer edge trim screws in and then put the 2 door handle screws in the same ones you used for the fronts, (your old inner door handle screws) using a T25 Torx bit. Now get the inner door handle and remove the spike on it like you did to the front one. Put the rod into the handle and put the handle into place on the door trim. Line it up the same way and make the mark on the door so you can drill the hole. Put the window back up and then move the handle out of the way and drill the hole, then put the door handle in place and screw it into place nice and firm now put the rear ¼ windows inner garnish back on and install the 3 screws that hold it into place.. Repeat this for the other rear door and you should have no problems at all if you follow this Docco this is how the trims should look in your boxcar 


Happy modding
_________________ BANNED |
||
| Top | |
||
| alfy |
|
|||
|
Excellent work there, well done!
the EF trims line up with the dash so much better than the EB ones too
_________________ 2021 V6 Manual Amarok - 245kw/750nm - many goodies |
|||
| Top | |
|||
| BuNtEr |
|
||
|
Benj and myself we have made a Docco for download with all the photos and info you see here.
You do not have the required permissions to view the files attached to this post.
_________________ BANNED |
||
| Top | |
||
| Paulmac |
|
||
|
Bill n Ben,
Just downloaded the doco and want to say great work, thanks. Paul
_________________ What goes around, comes around. |
||
| Top | |
||
| BenJ |
|
||
|
Awwwww, thanks buddy.
BenJ
_________________ {DESCRIPTION} - Current Ride |
||
| Top | |
||
| Paulmac |
|
||
|
Seriously, this was needed in the tech section, now everyone will do it and you both will have to think of something new. Keeps the creative juices flowing.
Paul
_________________ What goes around, comes around. |
||
| Top | |
||
| stalker |
|
||
|
wow this looks amazing, im guessing it will work in the ED too? do you have to swap the out side door handles? must you swap the rod's? im guessing they are different lengths? is it required to take the speakers out?
any way looks sweet, might give this a shot with mine
_________________
|
||
| Top | |
||
| BuNtEr |
|
||
|
{USERNAME} wrote: wow this looks amazing, im guessing it will work in the ED too? yes will work for EA EB & ED same door. {USERNAME} wrote: do you have to swap the out side door handles? No you dont have to you can use your ones you already have on the car. {USERNAME} wrote: must you swap the rod's? im guessing they are different lengths? Again no you dont have to they are diffrent in side but if you keep the eb rods you will have to bend them to fit, and you will find when you do bend the rods to fit you will have to keep ajusting it till you get it right. {USERNAME} wrote: is it required to take the speakers out?
only if you change the backing from the clear ones on the EA/EB/ED and use the foam ones from an EF/EL, i is only 3 screws and a plug, using the EF/EL foam backing helps keep the road noise down as its thicker and dense like me lol.
_________________ BANNED |
||
| Top | |
||
| BenJ |
|
||
|
{USERNAME} wrote: wow this looks amazing, im guessing it will work in the ED too? do you have to swap the out side door handles? must you swap the rod's? im guessing they are different lengths? is it required to take the speakers out?
any way looks sweet, might give this a shot with mine Yes it will work with the ED as the doors are the same as the EB. The outside door handles are not required to be changed. You can use the original rods, but it takes a lot of stuffing around bending them to get them right, and it's not exactly easy either. You have to take the speakers out, but you do put them back again. BenJ
_________________ {DESCRIPTION} - Current Ride |
||
| Top | |
||
| ixlrate |
|
|||
|
do u know if the window winders from ef/el r in the same position as the eb/ed as i don't have electric windows
_________________
|
|||
| Top | |
|||
| TROYMAN |
|
||
|
{USERNAME} wrote: do u know if the window winders from ef/el r in the same position as the eb/ed as i don't have electric windows
yea mate they are in the same position.. actually the door skins and window winders are the same from ea to el.. |
||
| Top | |
||
| PIMP_LTD |
|
||
|
Window winders sure are in the same place, i did this mod today on my gli, without p/w.
I just can't quite figure how to wire the ef mirror switch in?? Anyone know?? Andrew.
_________________ Commodore australia's favorite car??? What a load of s**t |
||
| Top | |
||
| Paulmac |
|
||
|
PIMP_LTD,
BenJ has posted how to do it I think, PM him for a link to the thread. Paul
_________________ What goes around, comes around. |
||
| Top | |
||
| TROYMAN |
|
||
|
here is a link to my one..
im using nl trims with the eb mirrors.. there is pics on the firs page the shows what wires join to what. http://www.fordmods.com/forums/troymans ... 55916.html and here is the link to benjs exterior mod and it shows how he is using the el mirrors on the eb. http://www.fordmods.com/forums/benj-s-e ... 60505.html |
||
| Top | |
||
| PIMP_LTD |
|
||
|
Thanks Troyman and Paulmac.
Andrew. EDIT: Just went and wired them up, works a treat, thanks guys.
_________________ Commodore australia's favorite car??? What a load of s**t Last edited by PIMP_LTD on Sun Apr 27, 2008 9:37 pm, edited 1 time in total. |
||
| Top | |
||
| Who is online |
|---|
Users browsing this forum: No registered users and 7 guests |


