|
| mitchell g |
|
||
|
{USERNAME} wrote: No!!!!!! wagon doors do not fit sedan!!! wagon doors will however fit fairlane.. the dooor skin is the same but the door frame is different.. learn something new everyday,i was under the impresion they did |
||
| Top | |
||
| huggiebear |
|
|||
|
no way are they close to fitting, the fronts are all identicle (apart from EA and EBI having 4" speaker holes.
the rears are a whole different kettle of fish. (not that i know anyone who keeps fish in a kettle) the reat doors from the window line down are the same so trims will fit, but the fixed glass section is different |
|||
| Top | |
|||
| BenJ |
|
||
|
Wrong Mitchell.
The rear doors on a Sedan WILL NOT fit a Wagon or a Fairlane. The doors on the rear of the Fairlane and Wagon are however the same and will interchange. The door trims on the rear doors will fit any door. Cheers BenJ
_________________ {DESCRIPTION} - Current Ride |
||
| Top | |
||
| ToranaGuy |
|
|||
|
So i was right in my thinking.
I found that out the hard way on a VK wagon. Door had been bashed in, so we tried to fit a sedan door. Couldn't fit it, and we couldn't get a wagon rear door either, so we cut the tops off & put the wagon top on a good sedan bottom & made one door out of the two. A real lot of screwing around, but it was only a bombadoor anyway. Cheers ToranaGuy
_________________ I am the ToranaGuy!|74 Lh Torana Turbo|78 Hz PanelVan|86 Mighty Boy Ute|93 EB2 Ghia,GT Mockup,5spd,LPGI,Full Leather|2 x EB Xr8 5spd's|{DESCRIPTION}|{DESCRIPTION}|{DESCRIPTION}| |
|||
| Top | |
|||
| SLO247 |
|
||
|
{USERNAME} wrote: {USERNAME} wrote: No!!!!!! wagon doors do not fit sedan!!! wagon doors will however fit fairlane.. the dooor skin is the same but the door frame is different.. learn something new everyday,i was under the impresion they did Please don't try and give out advice here. Your post whoring and filling the site with crap is enough. |
||
| Top | |
||
| Mad2 |
|
|||
|
{USERNAME} wrote: As you hopefully will have figured out, today was sunroof day. Before I continue, once again I must give a big THANK YOU to SWC for his assistance in cutting a big bloody hole in my roof, and for fabricating the brackets etc, and also thanks to Snap, MRE-50L and LP for their assistance, input and advice. So, just how do you install an electric sunroof into an E series? Step 1 - Remove all unwanted interior parts. Basically this means to pull out the hood lining, interior lights, sun visors, interior plastics and wiring that may get in the way. I also removed the middle roof brace. Step 2 - Work out the position for the sunroof to be in. This is a two step process, which involves looking at the aesthetics externally, and analysing the practical limitations of physically fitting the sunroof cassette. To achieve this I borrowed MRE-50Ls cut out from his sunroof install to visualise where I thought the best position would be from the outside. Then we used some strapping to hold the cassette up close to the roof and work out how much leeway we had. We found that the next brace back limited how far to the back of the wagon we could go, and after settling on a satisfactory position for the cassette inside, we then lined up the cutout on the outside to match the front of the opening. 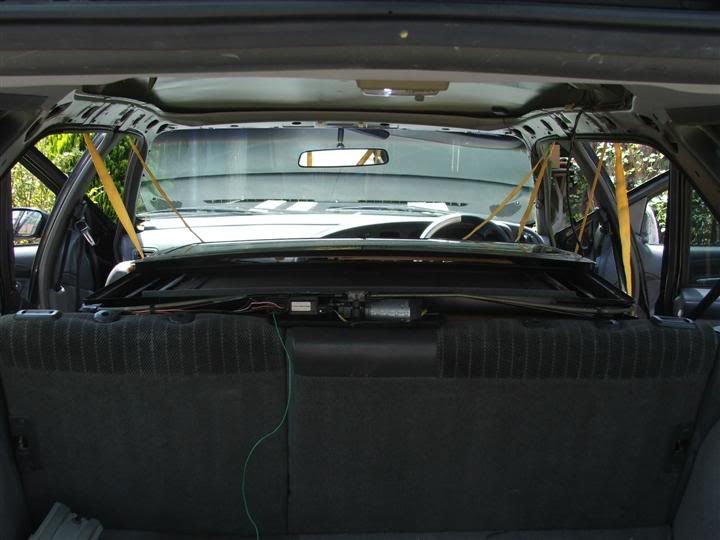 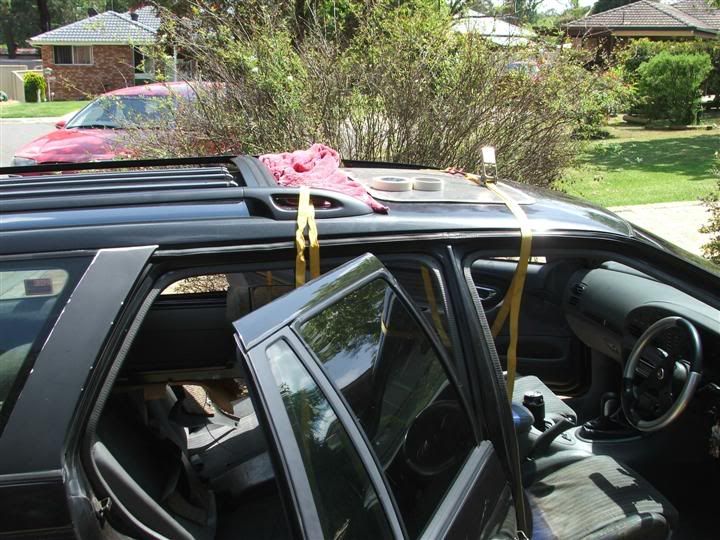 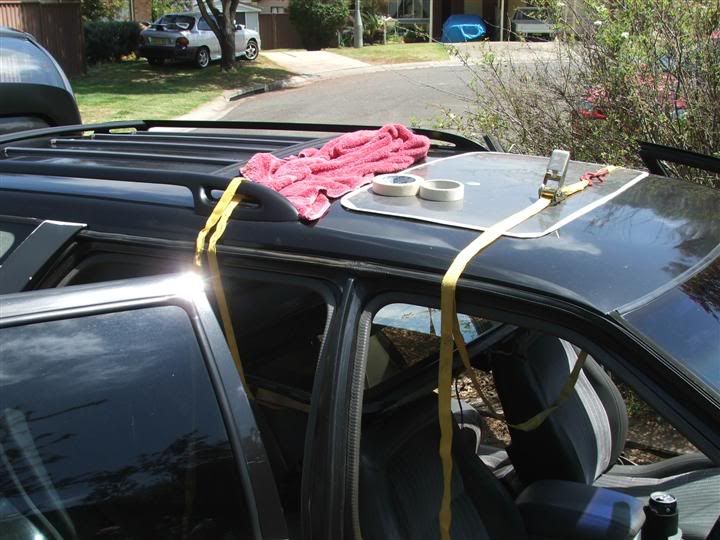 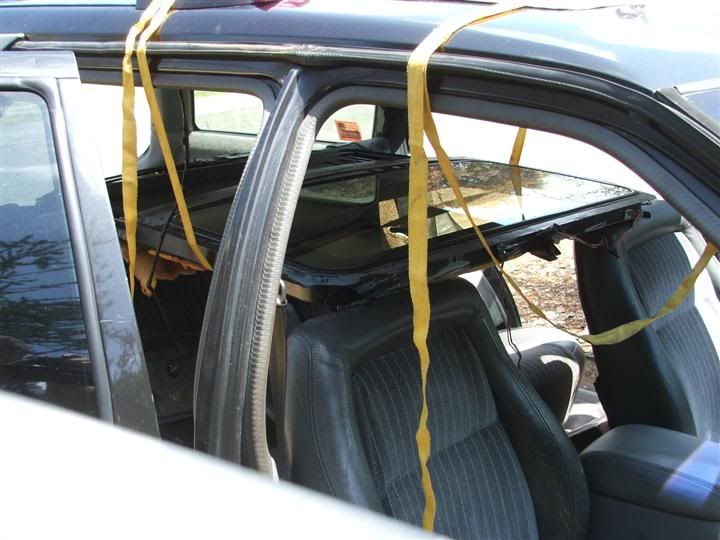 Step 3 - Mark the roof area to be cut. Once I was satisfied with the position of the cutout, we needed to make a template. This could be done using some cardboard and trace out the size of the opening or remove the glass and trace around it. In our situation, I grabbed the cutout from MRE-50L and sat it on the glass area, and found out it was almost perfect. TADA, a template. We then used the template to mark the roof. After measuring left and right, front and back to centre the template we then laid masking tape down before clearly marking the CUT line. 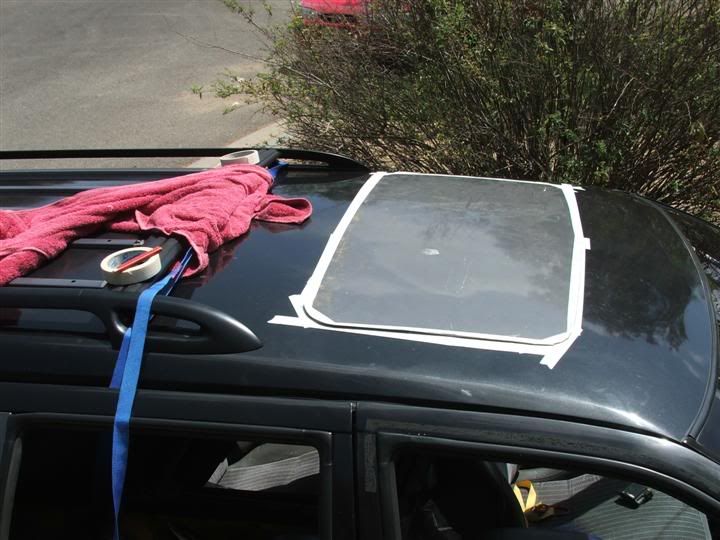 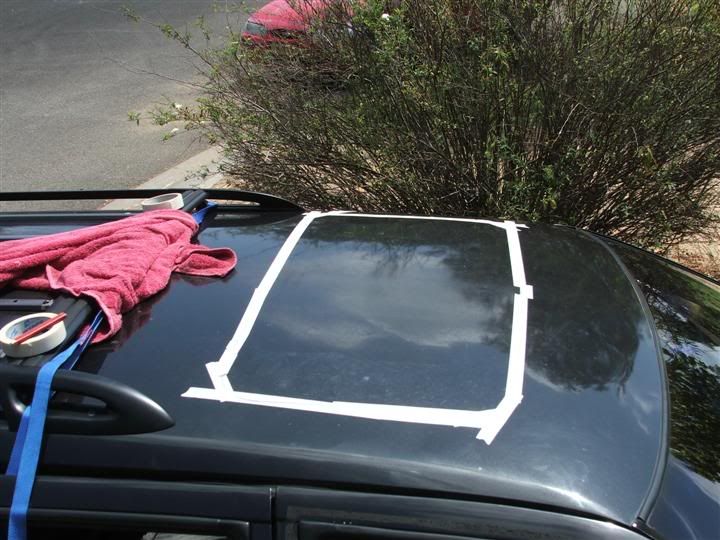 Step 4 - Cut a bloody big hole in the roof There are a variety of tools that can be used for this task. We had several discussions regarding this and settled on using a 4" Grinder with a 1mm cutting blade, and a jigsaw for the corners. SWC wanted to start with a corner, so a pilot hole was drilled, and the hacking commenced. SWC found the jigsaw was making easy work of it, and decided to do the complete cut with it. No turning back now!!! 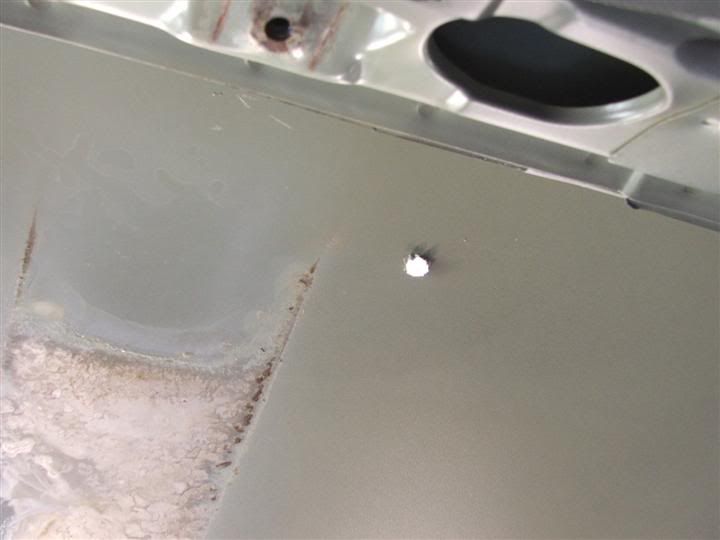 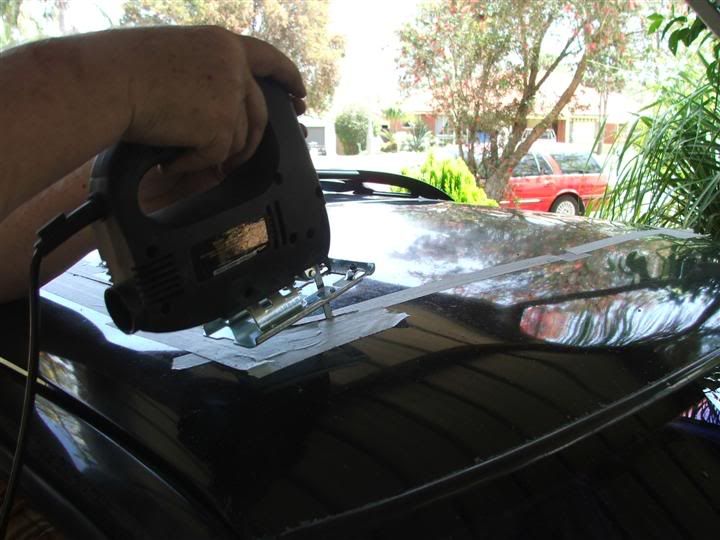 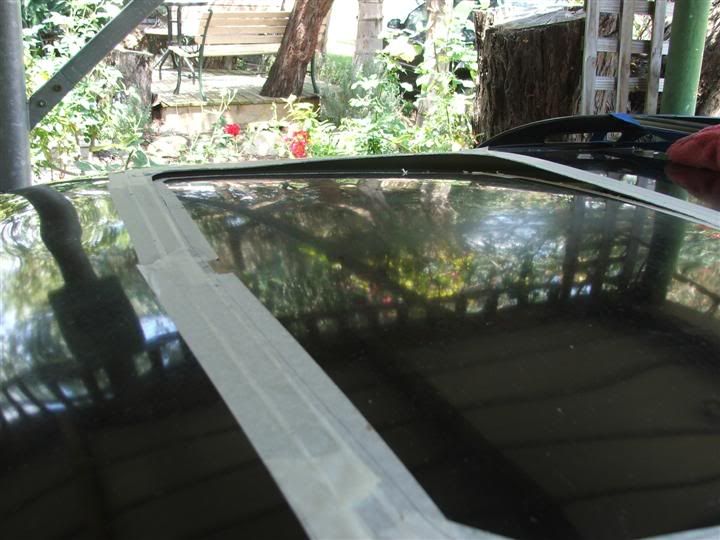 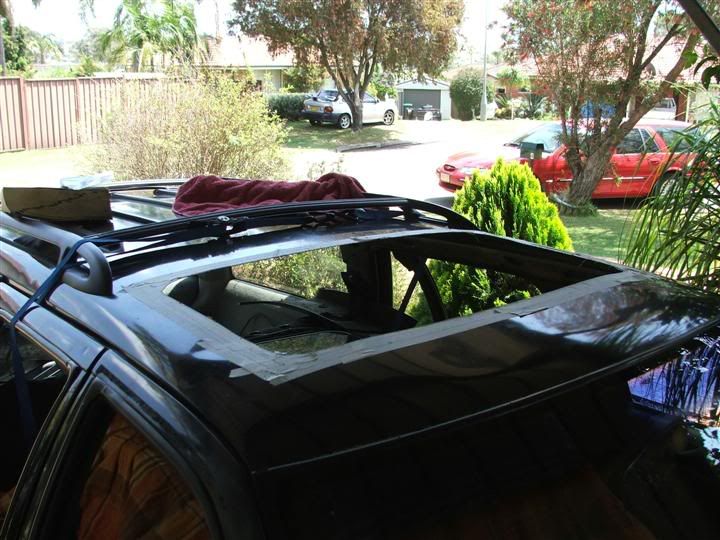 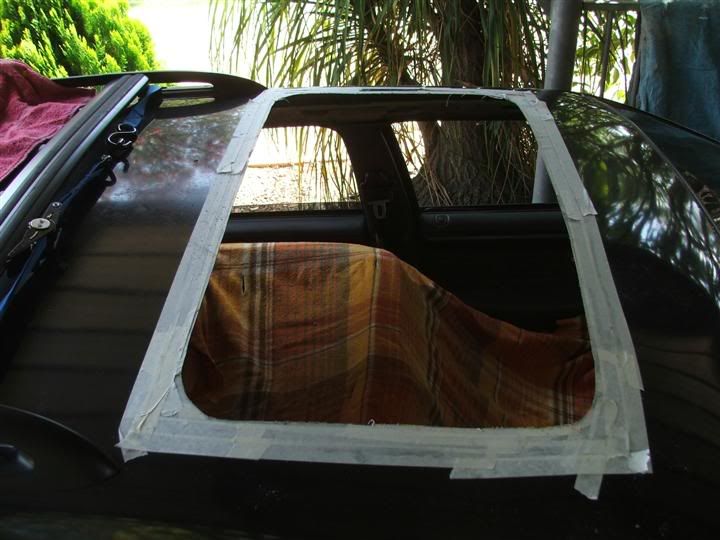 Step 5 - Make brackets to secure the cassette in place. As you may have noticed, Wagons have a higher roof line than the sedans or Fairlanes etc. This meant that any sunroof brackets I could have obtained from sedans would be the incorrect size and shape. The plan always had been to make brackets. To do this, we hoisted the cassette back up into place and then used a number of G-clamps to secure it in place. This allowed us to exactly position the cassette in position using the new hole. The rear of the cassette was supported with a length of PVC pipe Now that we have it locked in place, SWC made up the brackets for the rear of the cassette. This required the rear roof bracing to be notched in the corners to allow the cassette to sit flush with the roof. Then the new brackets were made and tek screws were used to fasten it together. Then the front brackets were fabricated, followed by a pair of middle brackets. We then powered up the sunroof and conducted a couple of tests to ensure that the hole was big enough. This identified a clearance issue, and a further 5-7mm was then cut out of the right hand edge of the hole as it was fouling on the glass as it tilted up. 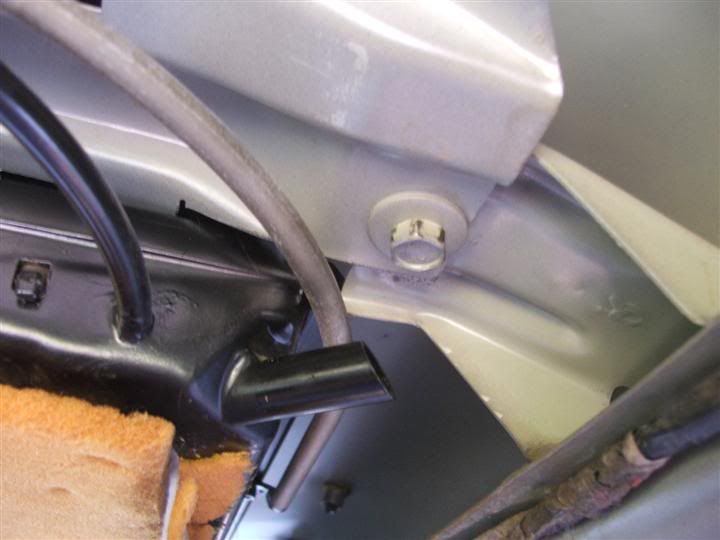 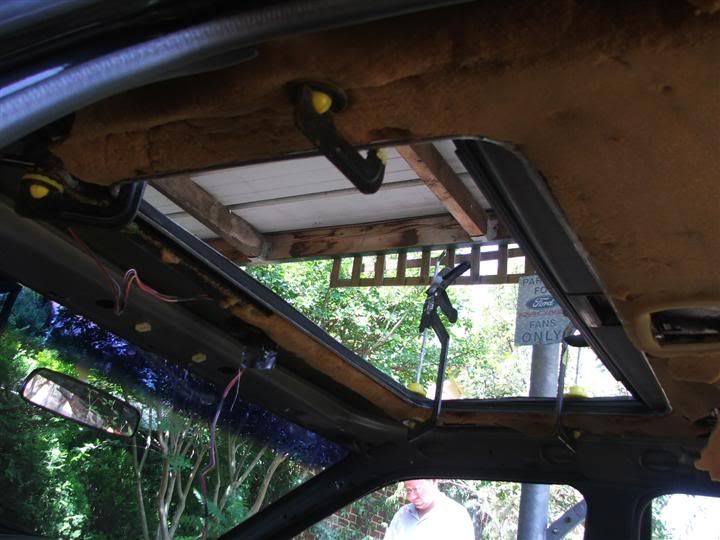 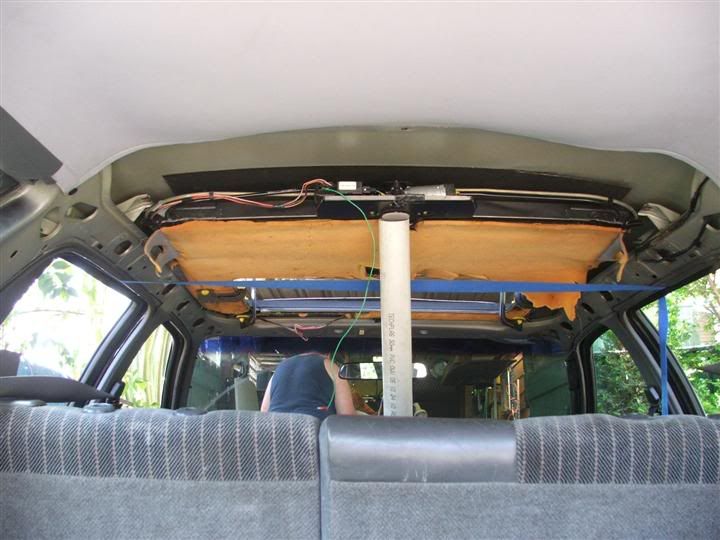 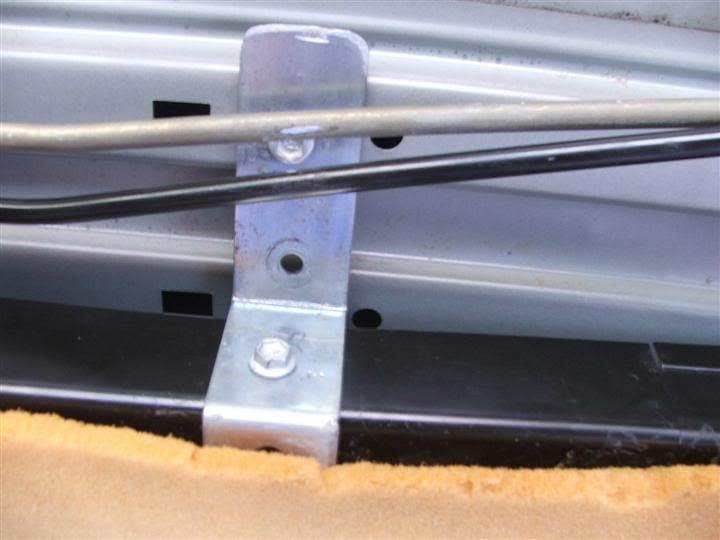  Step 6 - Glue the cassette in place Now that the cassette is can be firmly attached to the roof frame, the roof skin needs to be glued to the cassette skin. SWC recommended a Selleys product, Adhesive + Sealant, Polyurethane. This was liberally applied before the cassette was lifted up for the final time into place, and all the brackets tightened down. Clamps were again used around the hole opening to clamp the skin against the cassette while the adhesive cured. As this would take a while, SWC improvised and used some door flashing as a temporary clamp around the edge. This was left in place for the drive home. ************************************************************ There are a couple more steps which I will cover tomorrow, after I get pics of the the relevant areas. At this stage, I have partially wired up the sunroof so the Wagon can be secured, and Snap and LP ran the four drain tubes so if it rains the water will not fill up the car. Here is a couple of quick photos of the partially finished job. 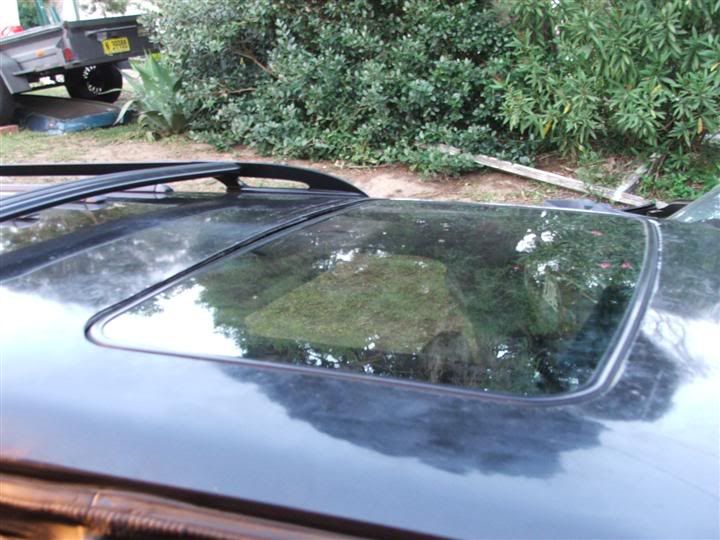 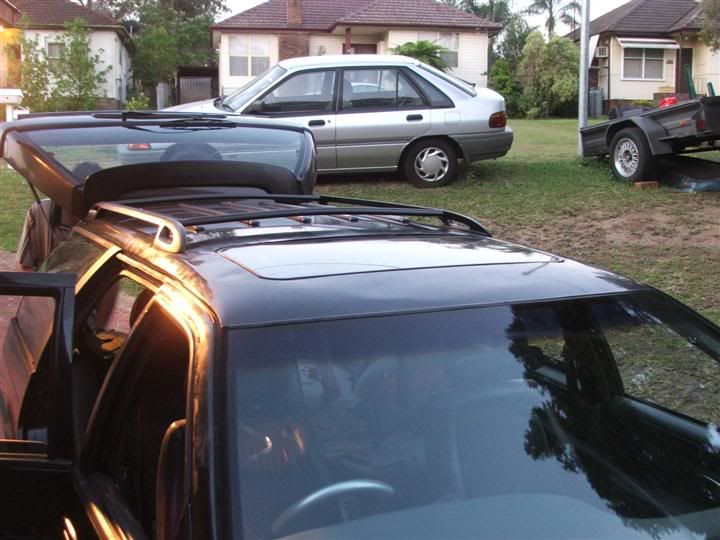 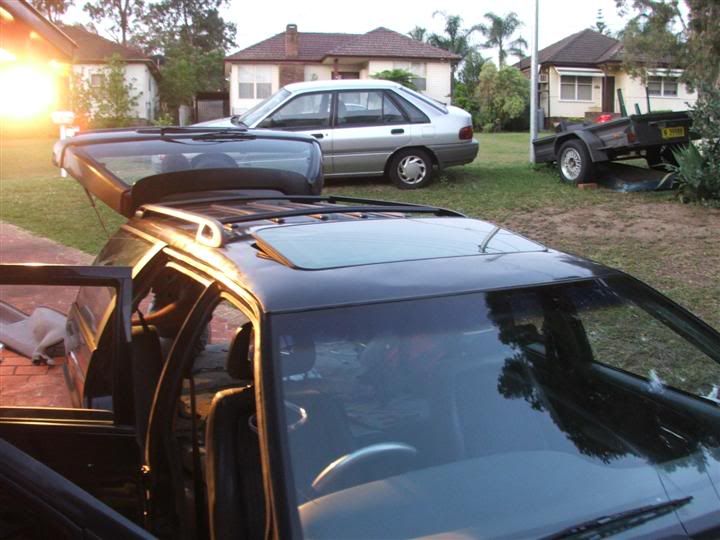 Cheers BenJ OK .... i will use yours ta help me make sense of mine just bought a EA with a 'supposed' same roof [factory electric] hmmmm & 5 EF wheels too  not the same as the ones on me EB wagoon tho  which may or may not be EF anyone know what models either were available & now we go back to BenJ's remodel/rebuild/rework [does look blooody good tho aye] please continue BenJ |
|||
| Top | |
|||
| Mad2 |
|
|||
|
{USERNAME} wrote: no way are they close to fitting, the fronts are all identicle (apart from EA and EBI having 4" speaker holes. the rears are a whole different kettle of fish. (not that i know anyone who keeps fish in a kettle) the reat doors from the window line down are the same so trims will fit, but the fixed glass section is different {USERNAME} wrote: Wrong Mitchell. The rear doors on a Sedan WILL NOT fit a Wagon or a Fairlane. The doors on the rear of the Fairlane and Wagon are however the same and will interchange. The door trims on the rear doors will fit any door. Cheers BenJ {USERNAME} wrote: Please don't try and give out advice here. Your post whoring and filling the site with crap is enough. hmmmm been called that before ..... dunno why good ta know about the trims tho |
|||
| Top | |
|||
| BenJ |
|
||
|
Hi Mad2
The first rim was released on the ED Futura, and was also on the EF Futura. Have seen them on some utes too. The second rim I believe is off an EF Fairmont. The Fairmont Ghia had different rims. Cheers BenJ
_________________ {DESCRIPTION} - Current Ride |
||
| Top | |
||
| Macca |
|
|||
|
{USERNAME} wrote: This is a EL Fairmont rim, the other rim came out in box cars first.
_________________ 93 Ford Maverick LWB automatic petrol guzzler (gets stuck where Deli doesn't, big pumpkins |
|||
| Top | |
|||
| SLO247 |
|
||
|
The first wheel was only used as standard on ED/F Classics. EF Futuras were standard with steel wheels and hubcaps, as were ED Futuras.
The second wheel was standard fitment on EL Fairmont. Trivial I know, I just thought I'd clear it up. BenJ, I'm very jealous of the sunroof. Always wanted one! The car has come a long way from when you got it, nice work. |
||
| Top | |
||
| ToranaGuy |
|
|||
|
It's nice to see the sunroof rehashed. Doesn't make it look too hard to fit! I still need to work out where to put my sunroof, EB Ghia or EB Xr8?
Cheers ToranaGuy
_________________ I am the ToranaGuy!|74 Lh Torana Turbo|78 Hz PanelVan|86 Mighty Boy Ute|93 EB2 Ghia,GT Mockup,5spd,LPGI,Full Leather|2 x EB Xr8 5spd's|{DESCRIPTION}|{DESCRIPTION}|{DESCRIPTION}| |
|||
| Top | |
|||
| FordFairmont |
|
||
Posts: 6113 Joined: 8th May 2007 |
in the mighty boy...
|
||
| Top | |
||
| Mad2 |
|
|||
|
{USERNAME} wrote: in the mighty boy... LOL |
|||
| Top | |
|||
| ToranaGuy |
|
|||
|
{USERNAME} wrote: in the mighty boy... I almost fell off my chair in the fit of laughter! Sorry man, the ford sunroof is way too big to fit in the mighty boy's roof... but a small pop up sunroof, now that's a possibility! There's even a couple of mighty boy's around with them..... Cheers ToranaGuy
_________________ I am the ToranaGuy!|74 Lh Torana Turbo|78 Hz PanelVan|86 Mighty Boy Ute|93 EB2 Ghia,GT Mockup,5spd,LPGI,Full Leather|2 x EB Xr8 5spd's|{DESCRIPTION}|{DESCRIPTION}|{DESCRIPTION}| |
|||
| Top | |
|||
| spac |
|
|||
|
How is your rear bumper coming along. I cant wait to see it.
|
|||
| Top | |
|||
| Who is online |
|---|
Users browsing this forum: No registered users and 10 guests |