|
| bry40l |
|
|||
|
{USERNAME} wrote: {USERNAME} wrote: thats pretty good and is there better economy with injectoion over the other restricive type gas setup Yes, the economy should be much improved over the carby style mixer. Snap has reported avg figures of around 13litres/100k on LPG, and down to 10litres/100k on the open road. So, quite close to petrol usage. I will certainly be reporting my findings. Cheers BenJ PS, progress update soon. well im keen as mustard to watch your progress and hear about how good it goes power and economy wise
_________________ BF XR6 |
|||
| Top | |
|||
| BenJ |
|
||
|
LPG Injection - Installation Part 1
Thursday After much looking, measuring and weighing up of a multitude of factors, function won out over my desire for a stealth install. Not only will accessibility be easier with the Injector Manifolds mounted above the BBM intake runners, more importantly, the injector hose length can be minimised. There also was much less room under the BBM than my poor memory believed. Now that I had decided where to mount the Injector Manifolds I had to fabricate some suitable mounts. A quick trip to Bunnings and I brought home a short length of 3mm x 20mm flat aluminium bar, and an assortment of bolts and nuts. A day later, interjected with much family related errands and outings, I had this. 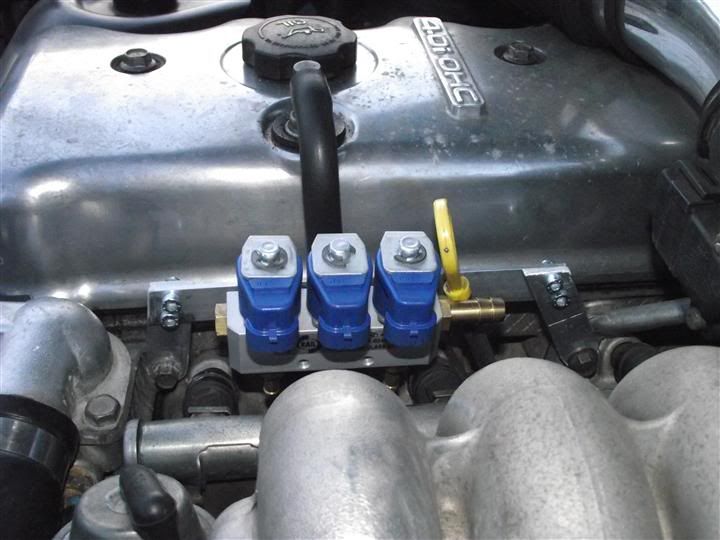 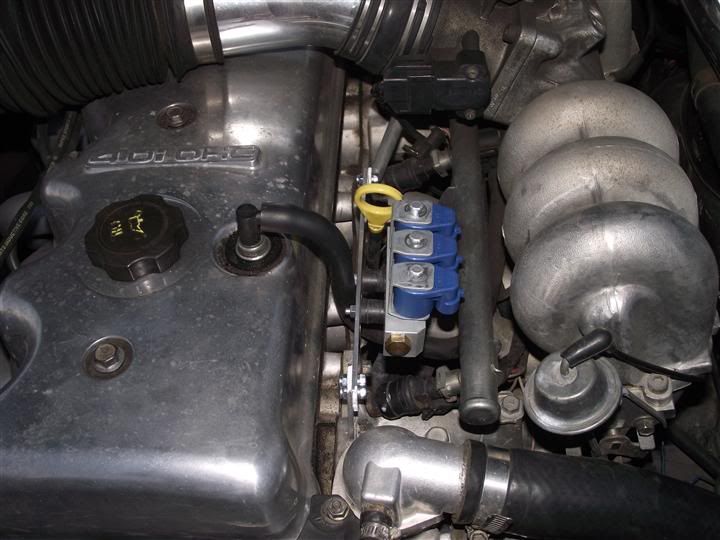 Functional, and also doesn't look too bad for a bit of home engineering either. I used Cap head bolts and some nylock nuts to prevent it rattling loose over time. 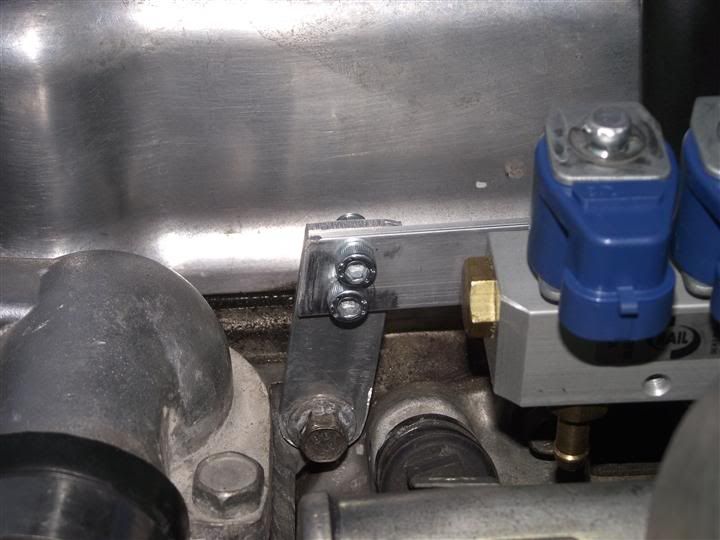 The front took a fair bit of juggling and trial and error to get right, and I had to slightly alter the position of the dip stick. Only just held in place now. I also had to consider where the jets under the Injector Manifolds were located to ensure adequate clearance for the injector tubing. 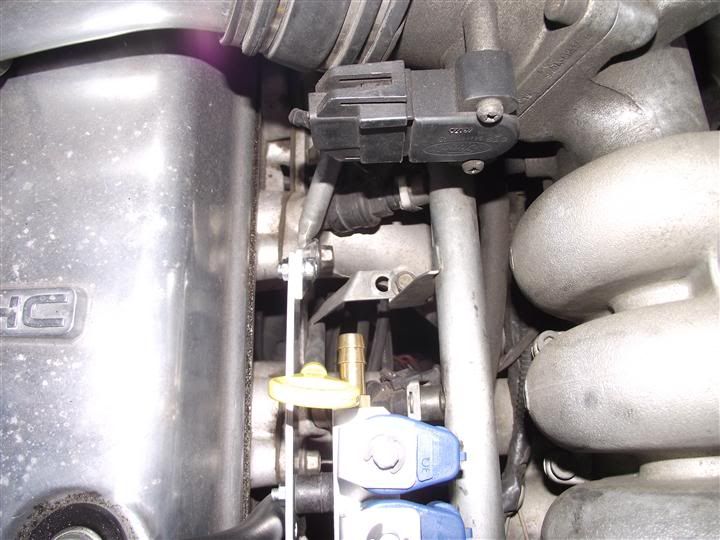 Friday - Saturday Snap is visiting once again and as he has done this all before, was kind enough to tackle the BBM modifications. The BBM needed six injector nozzles to be fitted, along with two vacuum fittings. Snap used a hand held drill with a bit of grease on the end to drill all of the holes. 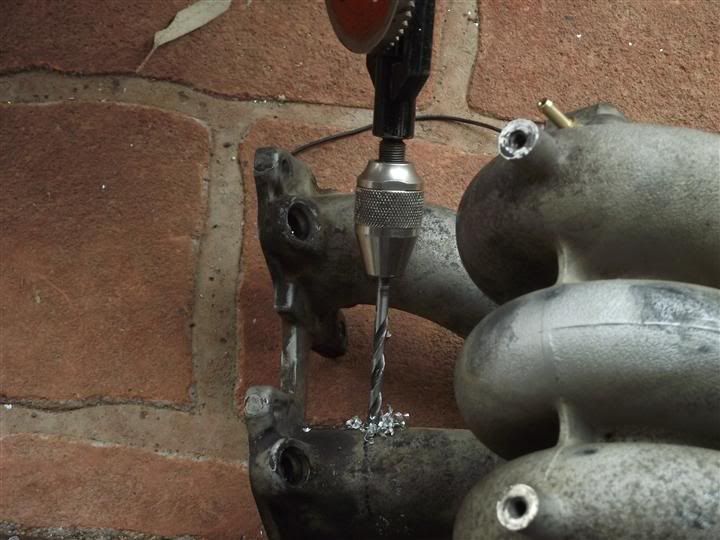 Then tapped each hole. 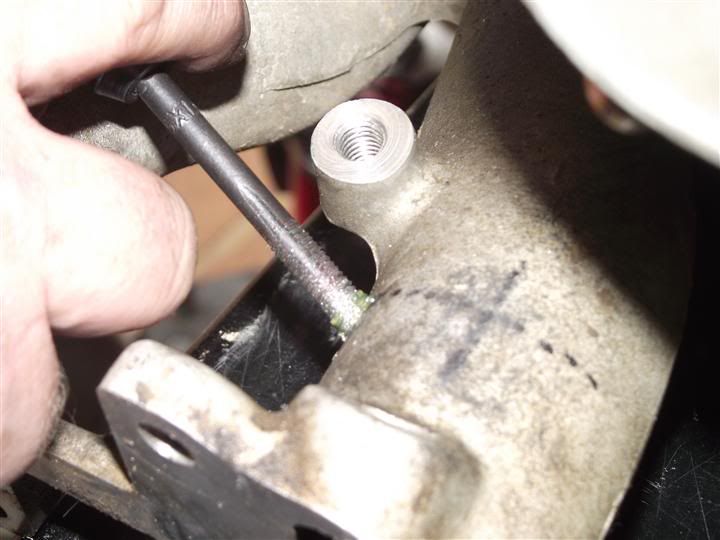 The positions of each of the injector nozzles takes a lot of thought and consideration. There are a lot of variables to take into account. Petrol injector location, manifold bolt holes, relationship between the injector jet and the relevant BBM runner, all to ensure the injector hose can be routed suitably while maintaining equal hose length across all six nozzles. Snap used a spare petrol fuel rail and injectors to trial fit everything before drilling any holes. The nozzles needed to be pointed slightly towards the head, and into the middle of the BBM runner. This photo shows how far the nozzle protrudes into the runner. This assists with mixing the LPG into the air. 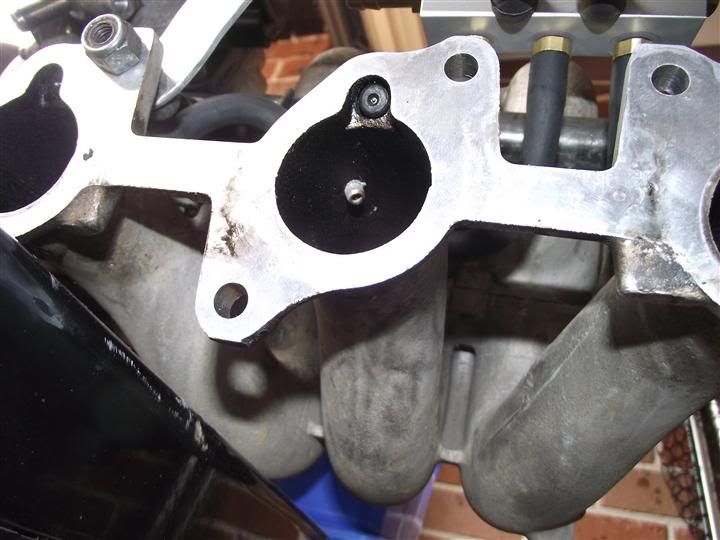 These three photos show how tight the space is, and the wiring is not yet present. 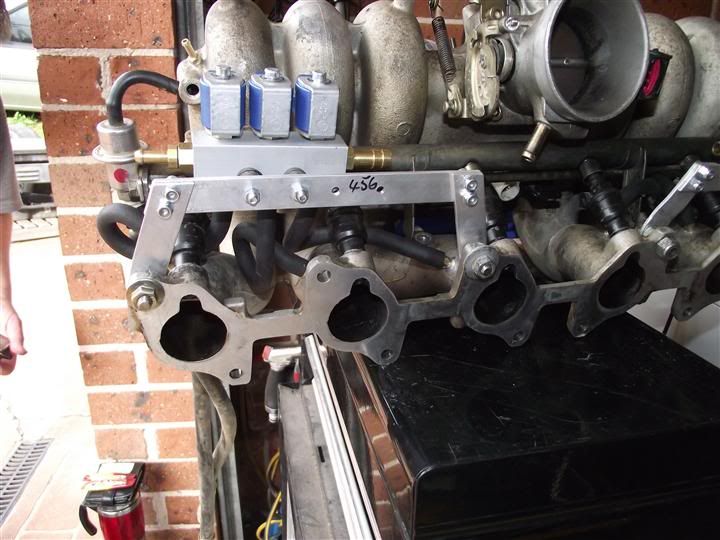 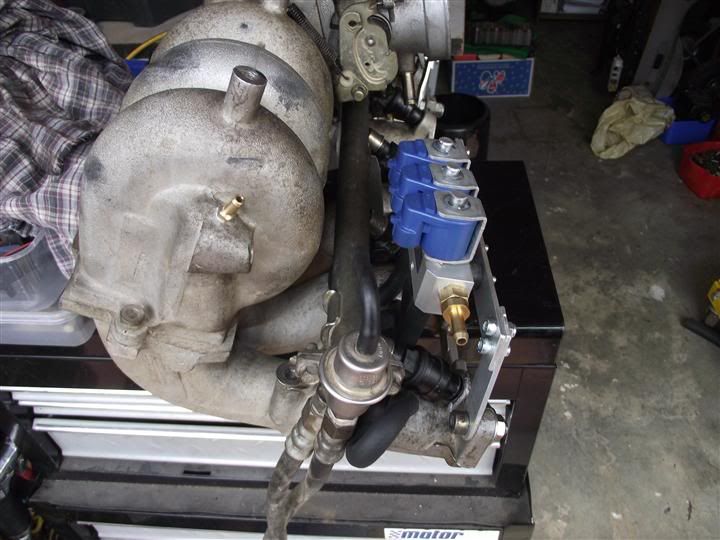 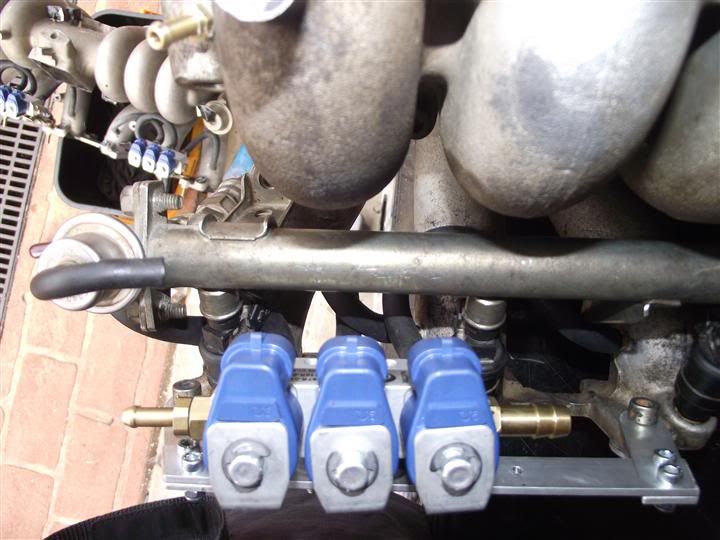 Here are a couple of shots without the petrol injector rail fitted to give a better idea of the injector hose placement. 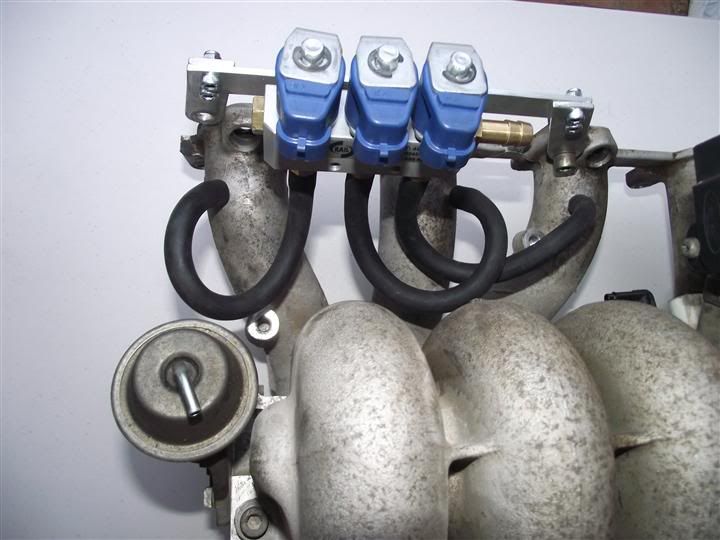 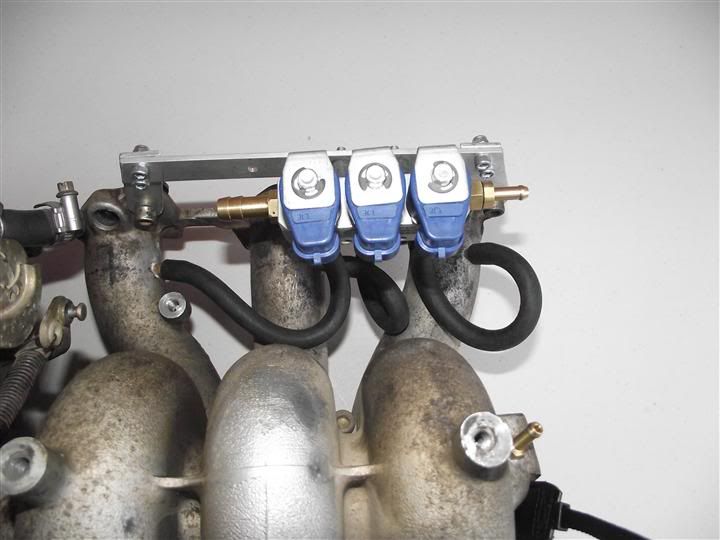 Here are the two added vacuum ports. One on the same outlet as the factory vacuum tree. 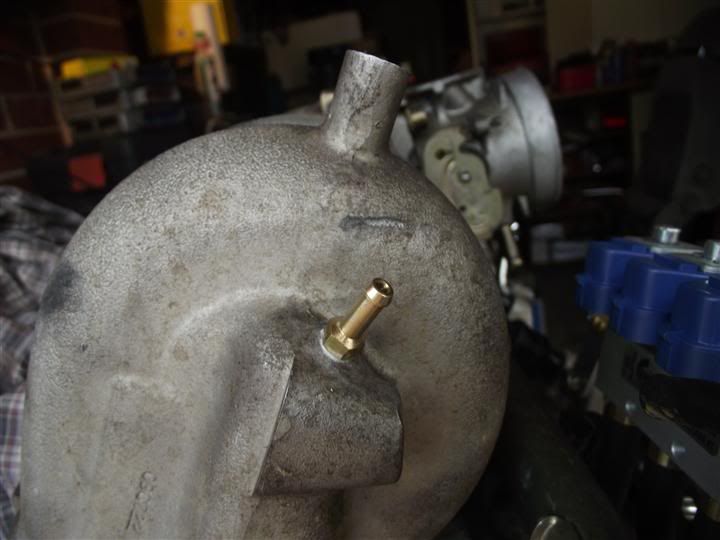 And the other above the Map Sensor vacuum line.  All fittings had LPG paste applied before final fitment. While Snap worked on the BBM, I fabricated the rear Injector Manifold mount, and then got to work on the car itself. I started by removing all of the existing LPG hardware, except for the supply line. 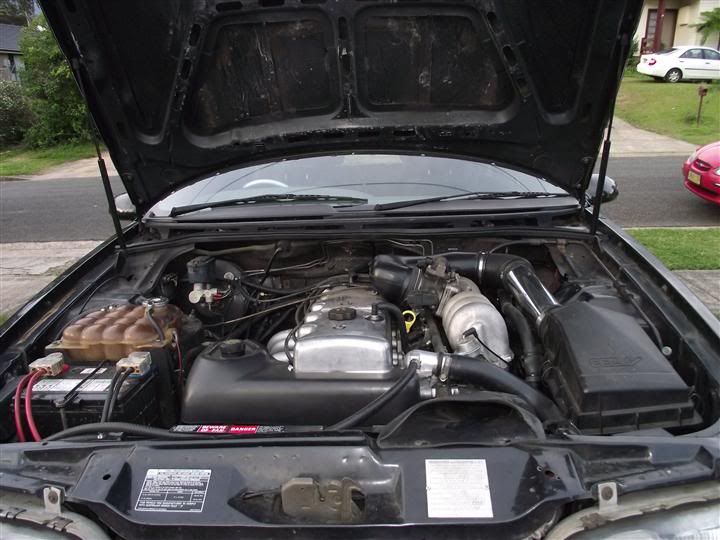 I drove the wagon to our regular Friday night meet in this configuration, and WOW, I just can't believe how much stronger the engine is without the mixer in the intake. I really hope it performs as well on the new injected lpg system. I jacked the wagon up and placed it on chassis stands. 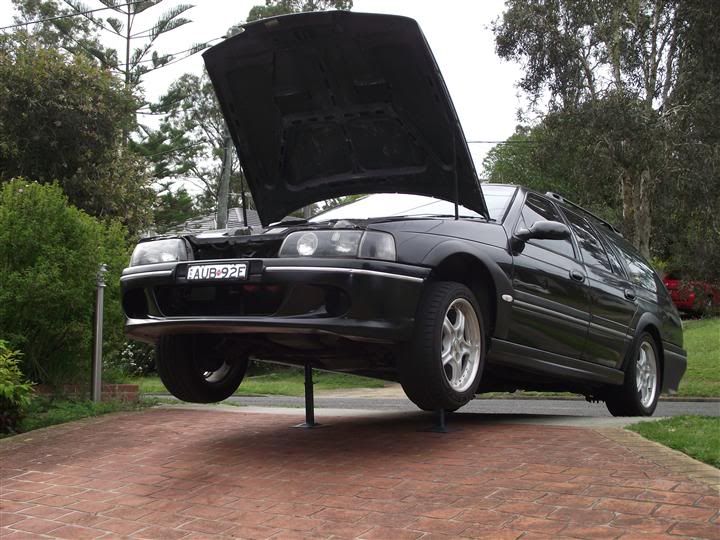 Then I spent the next couple of hours under the car working out where to place the Pressure Regulator and Lock Off Valve. Again, placement had to take into account a variety of things including supply line access, water hose access, vacuum line fitting and the LPG supply line to the Injector Manifolds, as well as free access to the pressure adjustment fitting on the top of the regulator. In addition to all of that I had to ensure there would be sufficient room to mount a second Pressure Regulator and Lock Off Valve in the future. I think I have succeeded. Then I had to make a bracket to mount the Pressure Regulator, and drill two holes in the top side of the passenger chassis rail. Not easy by any description. Here is the bracket mounted. The second photo gives a better idea of the location. 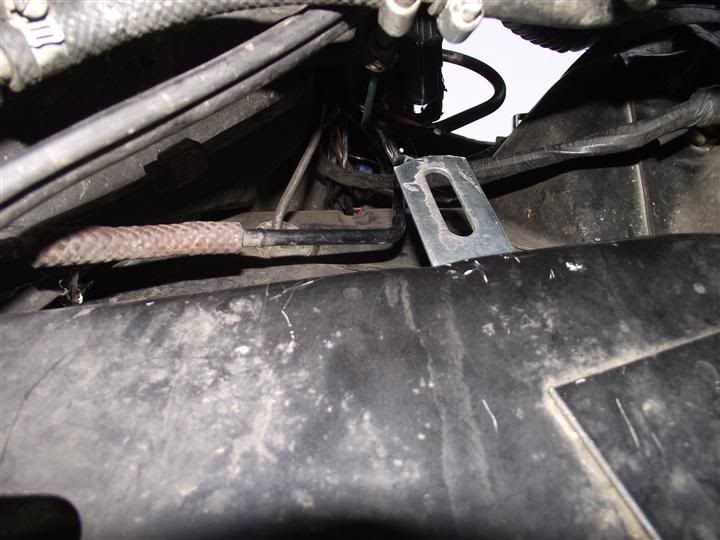 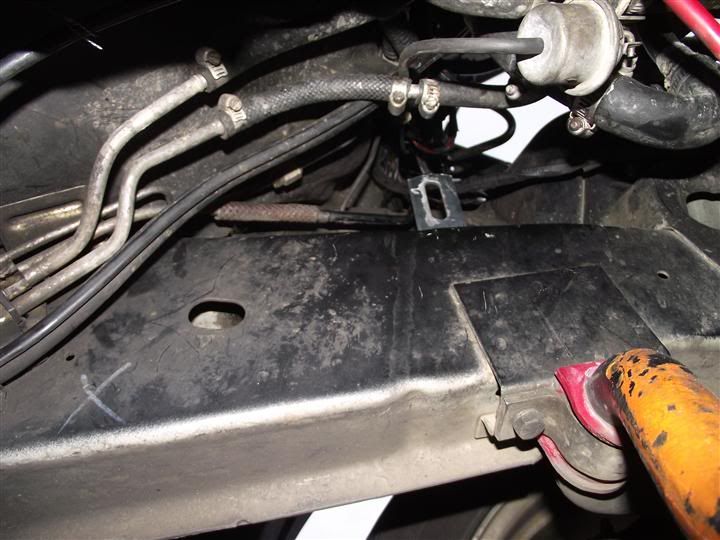 Tomorrow will hopefully see the BBM swapped in to place. Now that I think about it, it would have been MUCH easier to mount the Pressure Regulator bracket without the BBM in place! DOH! Will sort the heater hoses while it is off though, and possibly relocate the supply line then too. Still have to route all of the electrics, including some wires into the car through the firewall. Busy couple of days yet I think. Cheers BenJ
_________________ {DESCRIPTION} - Current Ride |
||
| Top | |
||
| BEAR80 |
|
|||
Age: 45 Posts: 683 Joined: 4th Mar 2010 Ride: BF Fairmont Ghia & TS Magna Location: central coast |
looking good Ben, should improve the old wagon substantially
|
|||
| Top | |
|||
| ToranaGuy |
|
|||
|
Nice work there BenJ! Yes injector bung placement is a big issue, get it wrong & it's a pita whenever the intake needs to come off, and being a ford OHC 6, it will need to come off somewhere along the line.
Keep at it. Cheers ToranaGuy
_________________ I am the ToranaGuy!|74 Lh Torana Turbo|78 Hz PanelVan|86 Mighty Boy Ute|93 EB2 Ghia,GT Mockup,5spd,LPGI,Full Leather|2 x EB Xr8 5spd's|{DESCRIPTION}|{DESCRIPTION}|{DESCRIPTION}| |
|||
| Top | |
|||
| KWIKXR |
|
|||
|
Nice work with the installation of the LPG injection setup, looks very tidy
|
|||
| Top | |
|||
| BenJ |
|
||
|
LPG Injection - Installation Part 2
Sunday Rain! Makes everything that much more difficult. But, still got a few things done. First job was to drill out the LPG Injector Jets to 4mm. I was supplied with four different jet sizes, 1.7mm, 2.25mm, 2.5mm and 2.7mm. A stock 4L auto falcon works great using the 2.7mm jets. But, for a manual, with a performance edge the recommendation is to drill out the jets to 4mm, which the ID of the Injector Hose and the Nozzles. Easy done with the bench drill press. I used the smallest 1.7mm jets to modify. 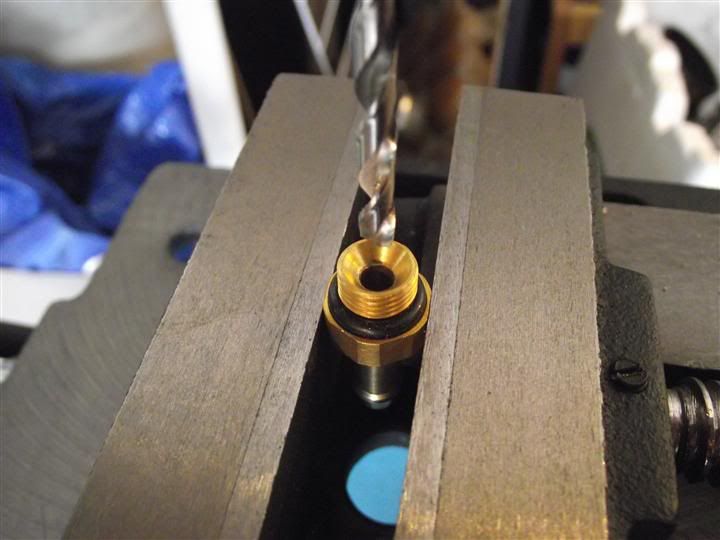 This photo shows the 2.7mm jet on the left, compared to the new enlarged 4mm jet on the right. 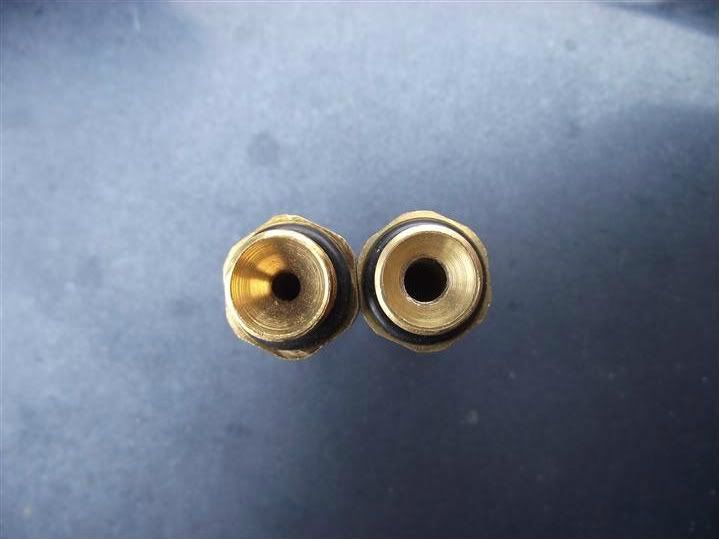 The 4mm jets were then mounted in the Injector Manifolds with smear of rubber grease on the o-rings. The Injector Hoses were then clamped into place on each injector. I had not used these type of hose clamps before. You use a pair of side cutters to squeeze the top together. This helps prevent over tightening of the clamp. Before 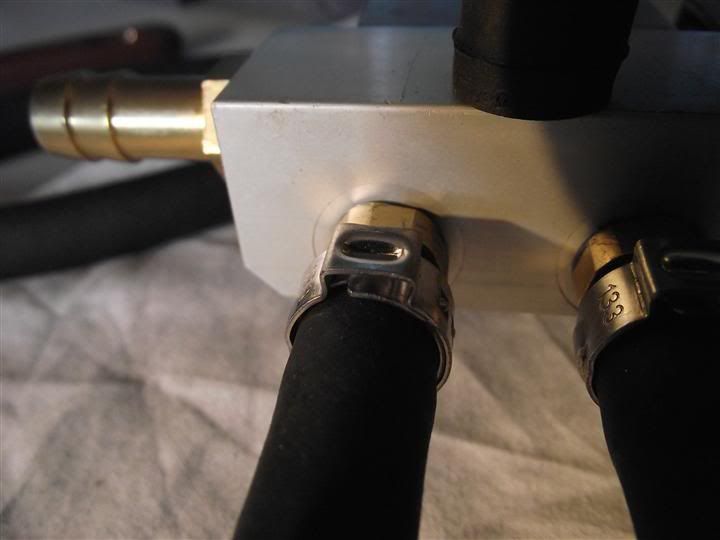 After 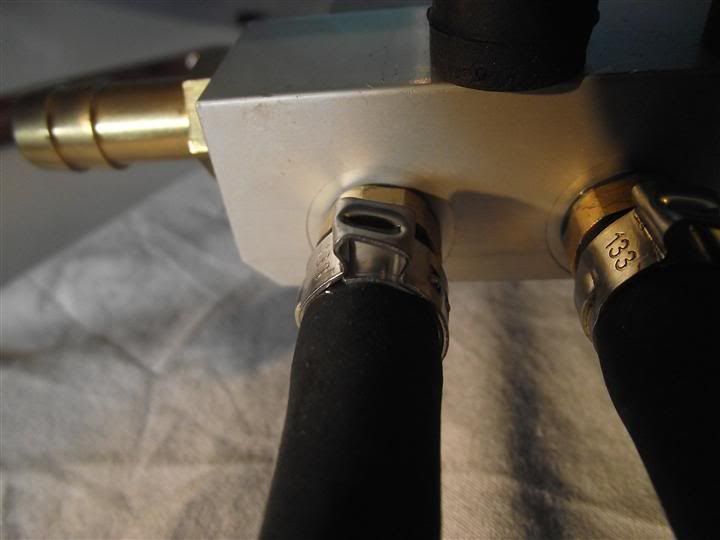 Next step is to mount the Injector Manifolds on to the BBM for the final time. The hoses were also clamped to the Nozzles in the BBM runners. I turned my attention to the wiring. I found a great location for the LPG ECU where the E-series washer bottle normally lives. I analysed where the various looms needed to reach and whether there was any excess length that needed to be dealt with. I also plugged in the LPG Injector looms, and ran the Petrol Injector intercept loom in the BBM. 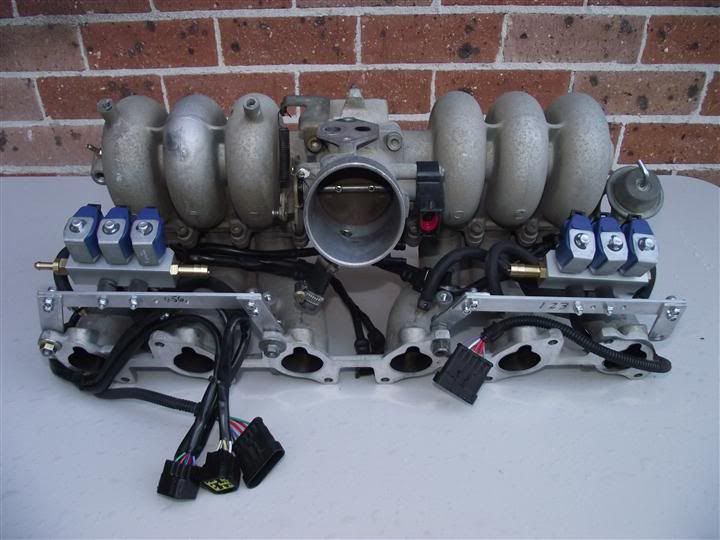 I then spent the short periods of sunshine routing the Laptop connection through to the glovebox, and shortening some of the LPG ECU looms. I also assembled the Lock Off Valve to the Pressure Regulator using some LPG Paste for the final time. First job for tomorrow will be removing the current BBM. Cheers BenJ
_________________ {DESCRIPTION} - Current Ride |
||
| Top | |
||
| ToranaGuy |
|
|||
|
Good stuff BenJ! I can't wait to see what sort of power you get with this setup.
Cheers ToranaGuy
_________________ I am the ToranaGuy!|74 Lh Torana Turbo|78 Hz PanelVan|86 Mighty Boy Ute|93 EB2 Ghia,GT Mockup,5spd,LPGI,Full Leather|2 x EB Xr8 5spd's|{DESCRIPTION}|{DESCRIPTION}|{DESCRIPTION}| |
|||
| Top | |
|||
| SWC |
|
||
|
Ahhhh Grasshopper, thought of you yesterday while it was pissing down. Good progress mate, (even if it is Gay
Glad you went away from the so called "stealth" install. |
||
| Top | |
||
| fordnut1988 |
|
||
|
hey benj just out of curiosity was it hard hooking up the cruise without the fairmont/xr wheel or is it an aftermarket cruise?
|
||
| Top | |
||
| MAD |
|
|||
|
That gas system looks great. I've been thinking about getting mine on to lpg in the not to distant future and this just might be the go.
Is there anything that can be done to this system for it to support more power? |
|||
| Top | |
|||
| TROYMAN |
|
||
|
so where is part 3 ben??? im waiting to hear " its up and running "
|
||
| Top | |
||
| bry40l |
|
|||
|
{USERNAME} wrote: so where is part 3 ben??? im waiting to hear " its up and running " +1
_________________ BF XR6 |
|||
| Top | |
|||
| BenJ |
|
||
|
It's running!
On petrol still. All the LPG Injection gear is installed but not tested. Ran out of time and I am at Fox Studios for the rest of the week. I will try and get some pics up one night along with an update. Cheers BenJ
_________________ {DESCRIPTION} - Current Ride |
||
| Top | |
||
| ToranaGuy |
|
|||
|
Sounds good, can't wait for pics.
Cheers ToranaGuy
_________________ I am the ToranaGuy!|74 Lh Torana Turbo|78 Hz PanelVan|86 Mighty Boy Ute|93 EB2 Ghia,GT Mockup,5spd,LPGI,Full Leather|2 x EB Xr8 5spd's|{DESCRIPTION}|{DESCRIPTION}|{DESCRIPTION}| |
|||
| Top | |
|||
| BenJ |
|
||
|
LPG Injection - Installation Part 3
Monday First thing Monday morning I began by removing the BBM from the wagon. For those that have done this before, you know what a PITA it is. I took about 1.5 hours, just plodding along before I had it on the bench next to the replacement BBM. Before I could get to work however, I needed to turn the car around so the bonnet faced my garage. The engine was a bit slow to turn over, but I didn't think much about it. The first task is to undo the fuel lines, so I put the car up on stands and crawled under the engine. At this point I could here this odd whirring noise from the back of the car. I got out from under the car, thinking the noise may have been coming from the house across the road, but to my surprise I discovered the noise was the fuel pump humming away happily. A quick check confirmed no keys in the ignition, so I quickly unplugged the fuel pump from in the wheel well. I will sort that out later. I had to remove the fuel rail and injectors before I could take out the std BBM wiring. While I had the BBM wiring out I thought I would solder up a few crimp connections I had made while extending the coil wiring when I relocated it. Great idea, in theory. Then I lay the std BBM wiring in the replacement BBM, followed by the LPG Intercept loom. After establishing which plugs on the intercept loom needed to go to which injector, I matched the std wiring and petrol injectors with the intercept loom. The LPG Injector wiring looms were routed so the plugs will both hang out under the BBM between runners 3 and 4. After plugging in the various sensors, I applied a handful of cable ties to lock all the looms together, and then ran the LPG Supply hosing and T Piece to each Injector Manifold. After Snap cleaned up the petrol injectors and swapped out a couple of dodgy O-rings, I installed the petrol injectors and fuel rail. Something of a mission considering all of the extra components I have now added. Quite crowded in there now. No way I could unplug anything while it is in the car. 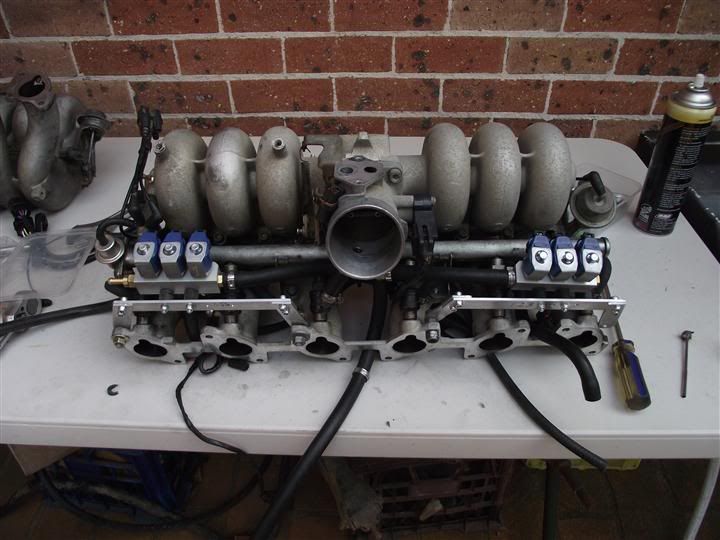 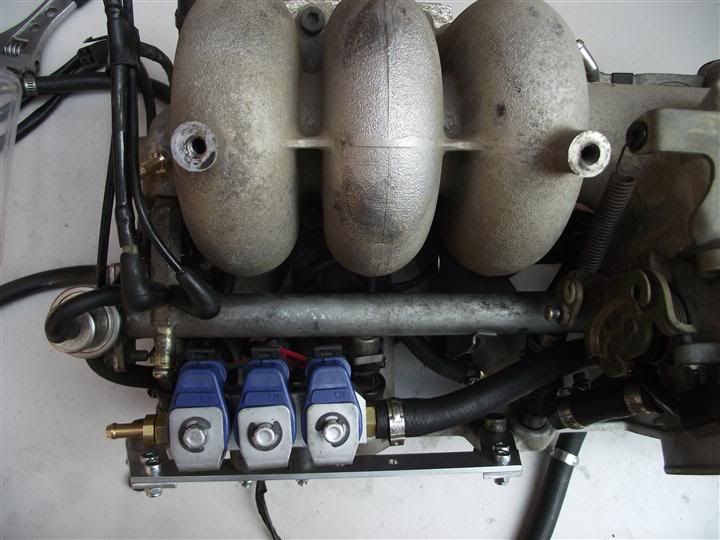 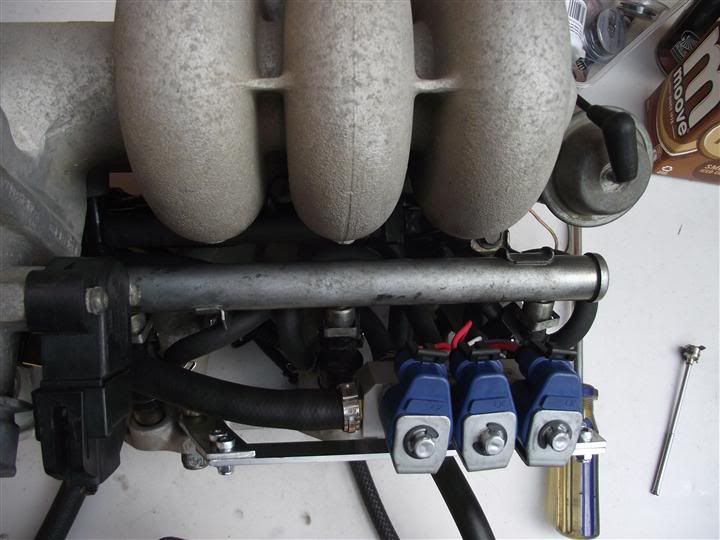 Now that the BBM was sorted, I could focus on the engine bay. I mounted the Pressure Regulator on the Bracket I had installed the day before, and also added a support bracket for the Lock-off Valve. I was able to quite easily reposition the LPG Supply Line. I had previously run it behind the rocker cover and the hard line terminated beside the brake booster. A bit of gentle coaxing and I had it in place and supported with the connection mating just right with the Lock-off Valve. Looks quite tidy too. This photo gives a good idea of the location of the pressure regulator. 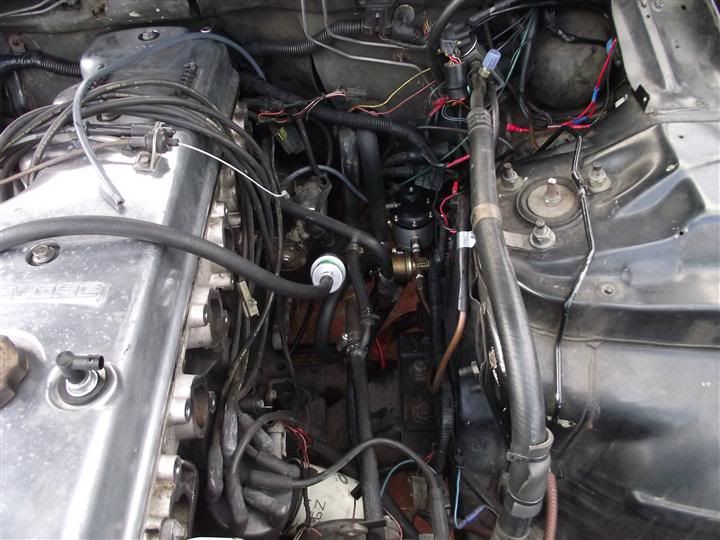 And a bit closer. This also shows the In-line filter and the Injector Manifold Supply hose. It will run up to the T Piece between runners 3 and 4 on the BBM.   And looking down from the passenger side. Once the BBM is back in you won't be able to see it. But I can still reach it from under the BBM or from under the car. 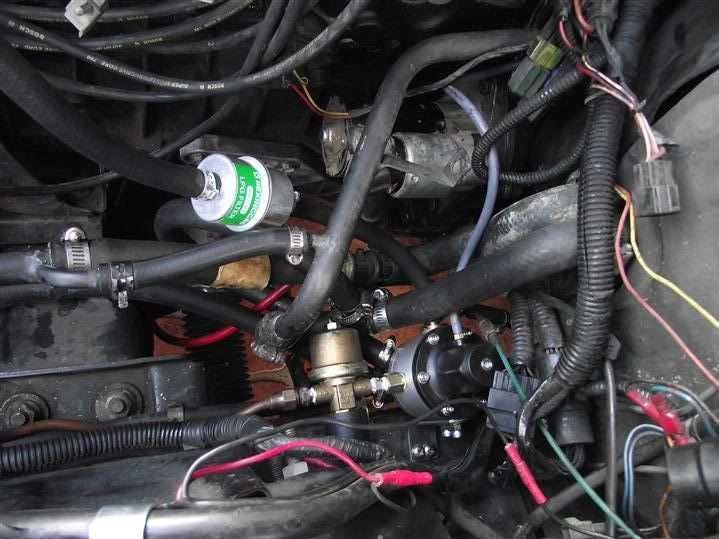 This photo shows how I ran the hard supply line. The idea was to reposition it without undue manipulation which could create a fatigue fracture. 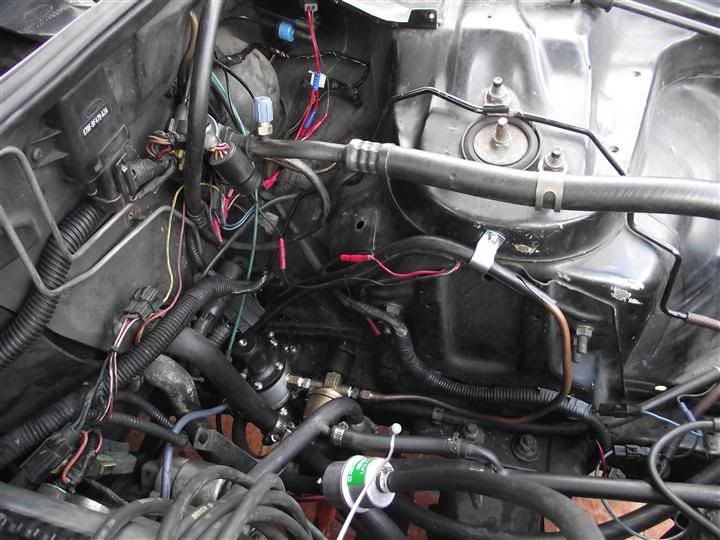 I then ran the vacuum line from the Pressure Regulator, and spent a fair bit of time running the new heater hoses to bottom of the Pressure Regulator. I was careful on how I routed the hoses as I didn't want there to be a lot of lateral force on the plastic connections in the bottom of the Pressure Regulator. The heater hoses are in place in the above photos. The BBM went in next. I needed to have the car mobile the next day and as long as it ran on petrol I would be happy. It was getting on in the day somewhat by the time I had finished. Snap had left a couple of hours ago to return to his home down south, and I was quite tired. I plugged in all of the std wiring, reconnected the petrol fuel lines (Paulmac, I was able to remove the joiner piece after rerouting the hoses - win!) and checked all of the vacuum lines etc went where they should. I then mounted the LPG Map Sensor and routed the required vacuum line and the LPG Pressure line from the rear Injector Manifold. I connected all of the LPG wiring, including 12v+ and earth wires. Then I remembered I had to sort out the fuel pump issue. I ran a few tests and established the fuel pump relay had failed and stayed ON of all things. A replacement was installed and all was deemed good. It was time to fire her up. I knew I didn't have time or the necessary focus to connect a laptop and start playing with software, so I was aiming to get her running on petrol. I turned the key, and it cranked for approx 5 seconds before the battery gave out. *&$#@*#^&!!!! It slowly dawned on me that the fuel pump must have been running all night, and while the car started that morning, I only did a quick three point turn before turning it off again. Certainly not long enough to recharge anything. A quick attempt to crank it again proved futile, and I was at a loss as to why it didn't fire, and also how to recharge the battery. My charger had died not that long ago. And it was now DARK! A phone call to a good friend who dropped everything to bring over his U beaut battery charger, and his wealth of knowledge regarding cars in general. Once the charger had been connected and a few torches and a flood light were found, we were ready to see try again. But no joy. Yes, the engine would crank, but it was not firing. Wanting to eliminate the LPG ECU as a failure point, as at this stage we did not know if it was working or not, my mate came up with a great solution to bypass the injector bypass. This photo explains how quite well I think. 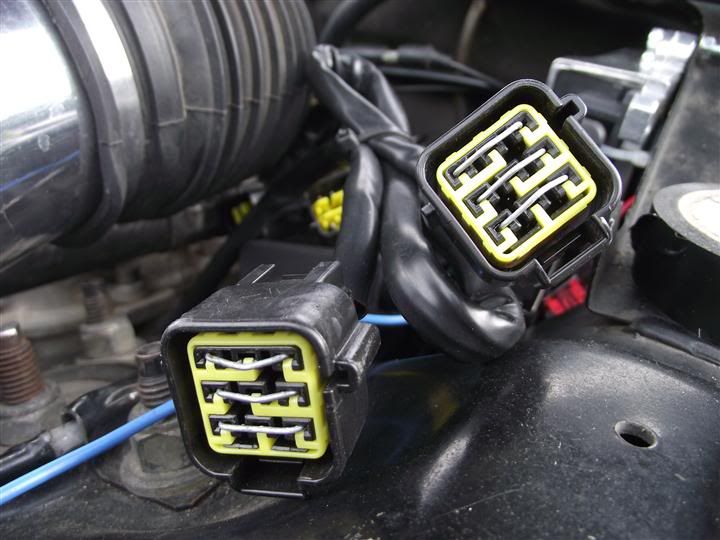 I now have a hardware bypass to ensure the wagon will run on petrol even in the event of complete LPG ECU failure. We then tried to start the car with the bypass in place, but still no go. Knowing that I had "FIXED" the coil wiring earlier in the day, we checked for spark, and got nothing. Further investigation showed the power supply line to the coil was dead. It seems that my soldering was not up to par. Now that I think on it, I did have a LOT of trouble getting the solder to take to the wires. We sourced a 12v IGN source and ran a substitute wire to the coil plug, and after testing the TFI signal wire was up to spec plugged it back together. Finally, the engine fired up on Petrol and purred away. YAY!!!!!! I thanked my Mate for his help and assistance, and after he had left, drove up the road and back for some dinner. This proved there were no obvious leaks in the cooling system, which was great as I had to go to Fox Studios early the next day, a good hour plus drive through peak hour traffic to the other side of Sydney. More to come soon. Cheers BenJ
_________________ {DESCRIPTION} - Current Ride |
||
| Top | |
||
| Who is online |
|---|
Users browsing this forum: Google Adsense [Bot] and 34 guests |


