|
| mitchell g |
|
||
|
{USERNAME} wrote: No job, No money. Motor i got is just an E series with an AU head thought i was full on EL hybrid. Plug is got given an AU inlet not E series, Just wrong stuff more to mention, lost interest, just can't trust some ppl. wreck the ED buy a new falcon when i can. Thanks for your interest any way. Regards, Michael. now now stay in there bud leave it awhile coz i'm sure u love to have a car like this done up with el hybird motor |
||
| Top | |
||
| huggiebear |
|
|||
|
i got an EL BBM here, your welcome to it if you wanna get rid of the AU injectors from the BBM setup you got
|
|||
| Top | |
|||
| itlookslikeaxr6 |
|
|||
|
I've got to work some crap out with a "Trade" that went bad with a fellow fordmods member.
Once all sorted ill think about putting some more money into the car. Can't do much with out a job and with the parts like motor and stuff that i recently got... there all from the trade which went bad putting me out of some coin. Won't bad mouth anyone Thanks again for your interest, Regards, Michael.
_________________
|
|||
| Top | |
|||
| huggiebear |
|
|||
|
shoot me a PM with what you need as i have a little bit sitting here. can work something out
|
|||
| Top | |
|||
| itlookslikeaxr6 |
|
|||
|
Just small updates.
Moved the amp from the side of the sub box to the side of the boot and did a bit of custom work to get it to look good but slightly factory. Sub Front 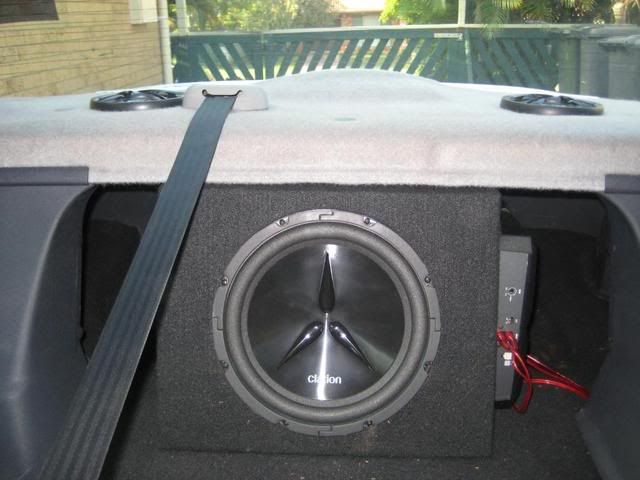 Sub Back 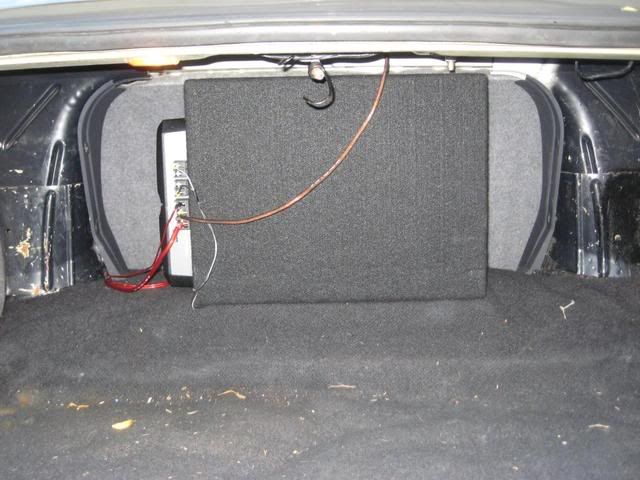 Disconnect amp 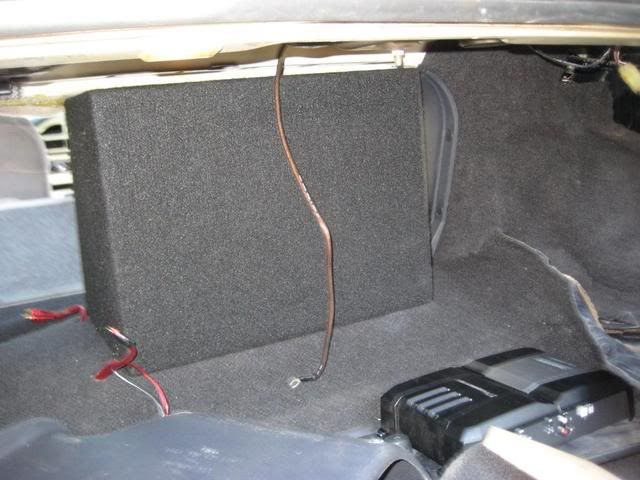 Factory ghia carpet 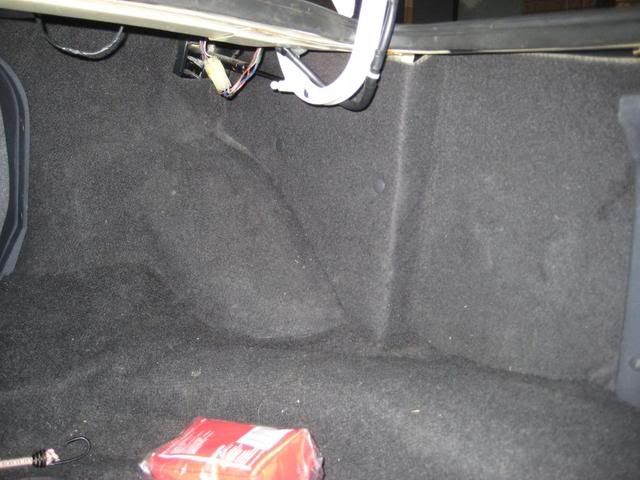 First bracket 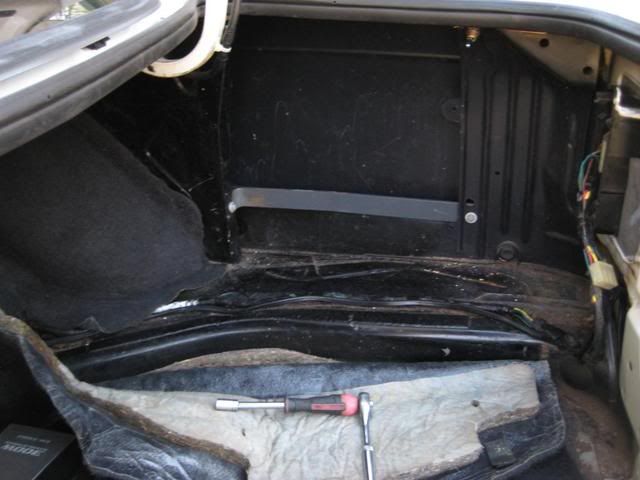 Test fit 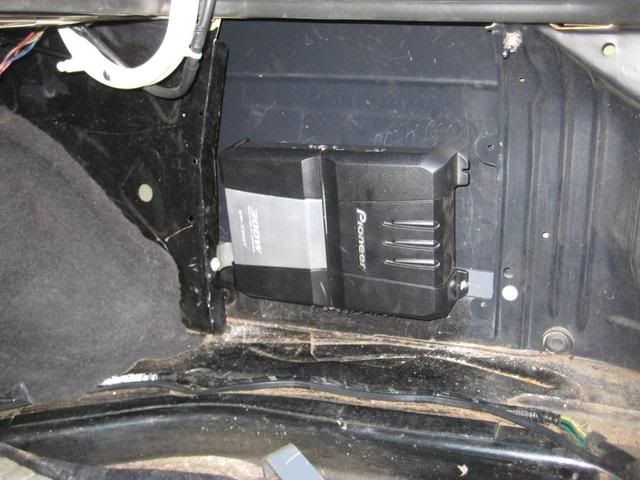 Both brackets 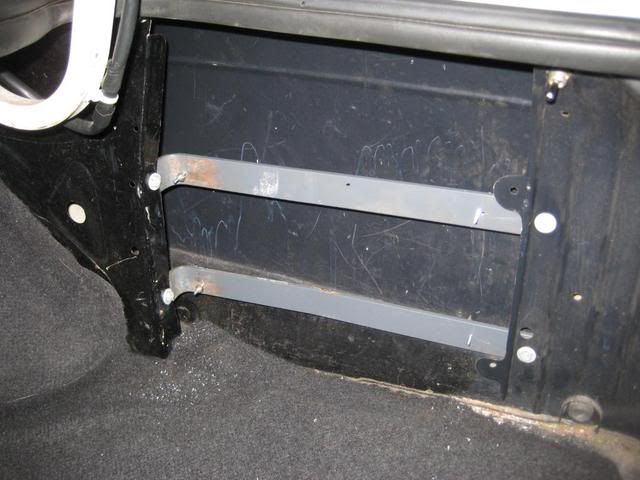 Test all working 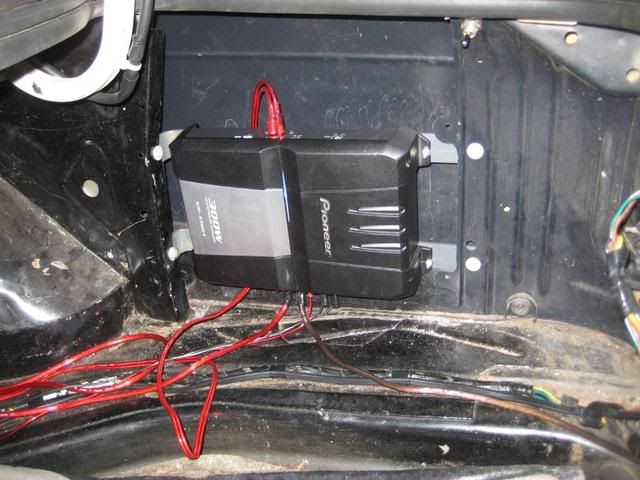 Trial and error template rough copy  Good copy (had 2 of the ghia pieces) 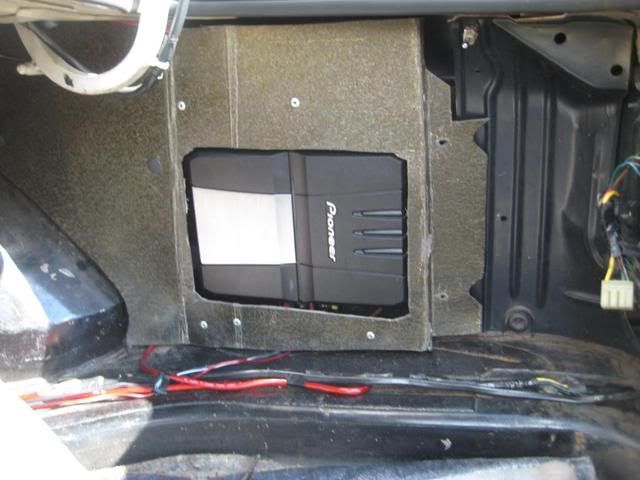 Some bracing light alloy and pop rivets, just glued and cut carpet. 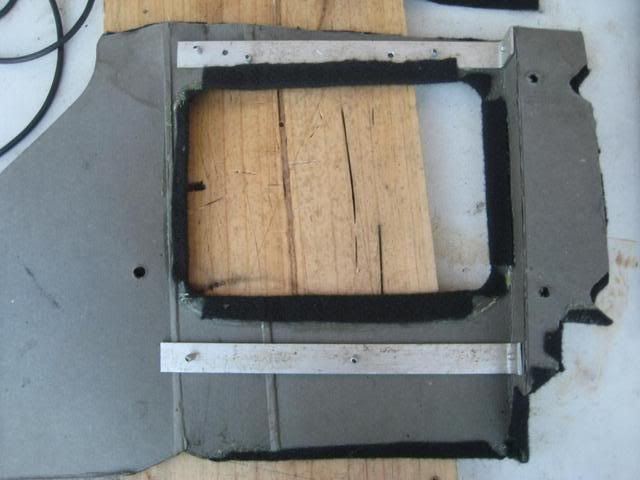 Finished 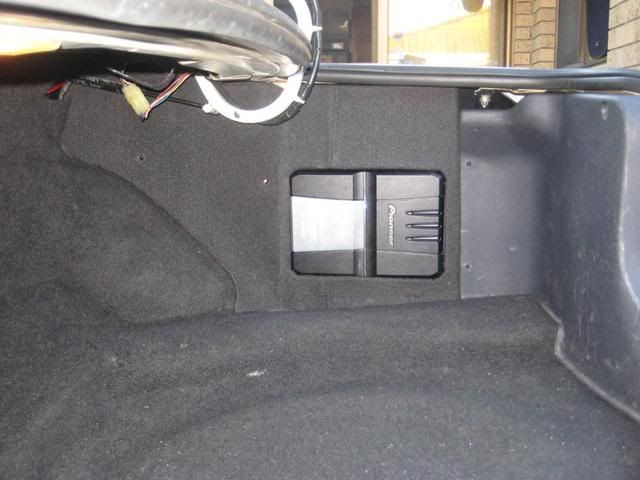 Finished 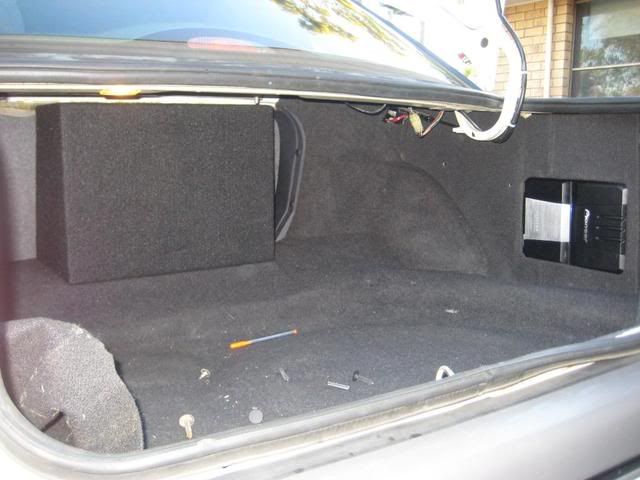 Rust in sill is gone, resprayed sill. RH/R wheel arch was damaged since i got it as well under under the right tail light. All this has been fixed up by panel beaters. Damage 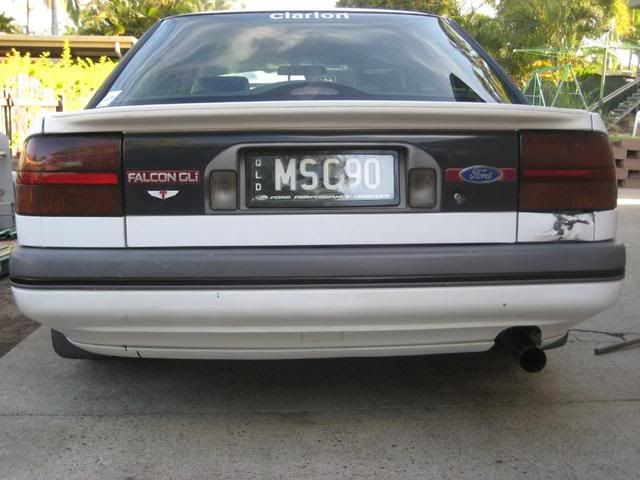 Fixed 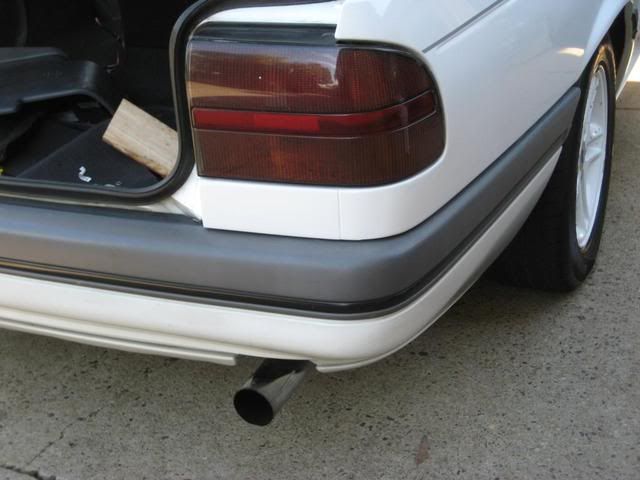 Damged wheel arch(best photo i had) 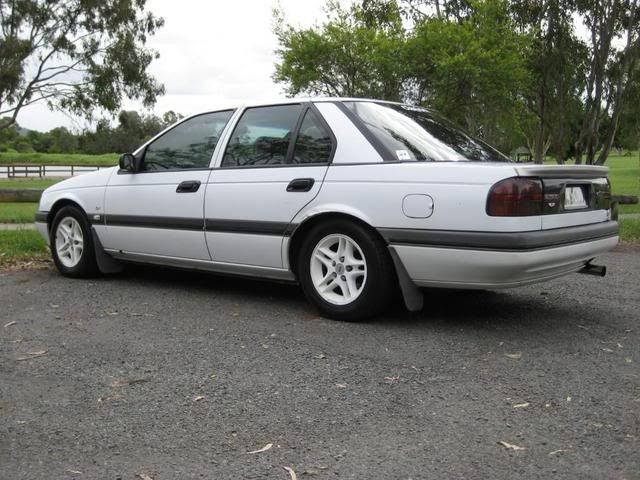 Fixed 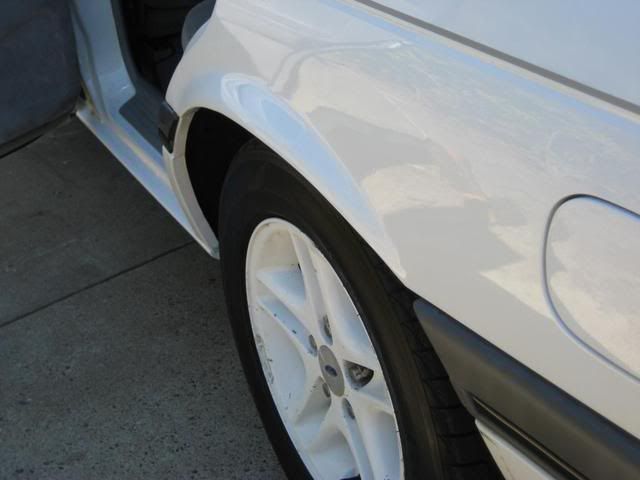 Also today sanded all the plastic boot trims ready for satin black tomorrow, fitted new rear shocks, rewired rca cable down middle of car not passenger side so it would reach to new amp position. power wire runs drivers side, they say to run them away from each other as much as possible to stop interference. Slowly over the next week or so dad and i will repaint the front and rear bumpers as well as lots of little things like door handles ect, door moulds will be changed and the grey pin stripe up top we be removed. When ive got some money saved the T5 will come out of the EA be checked over rebuild or repaired if needed and put in. All i need it an ED manual ECU as ive only got an EA one. Regards, Michael.
_________________
|
|||
| Top | |
|||
| SLO247 |
|
||
|
Awesome, good to see you are getting more done. Looks heaps better now. I did a similar thing with the amp in mine, I'll have to get a photo.
Would look great at the back with a de-badged fairmont garnish I reckon. |
||
| Top | |
||
| itlookslikeaxr6 |
|
|||
|
{USERNAME} wrote: Awesome, good to see you are getting more done. Looks heaps better now. I did a similar thing with the amp in mine, I'll have to get a photo. Would look great at the back with a de-badged fairmont garnish I reckon. Chuck a photo up would like to see, yes trips to the wreckers include a search for a fairmont garnish. i have an EB style Falcon S badge with the red back ground. i have a genuine XR6 garnish already but i don't like how the badges have a black background as it doesn't match the tail lights. Some ppl don't think its right to put the badges on a mock up haha
_________________
|
|||
| Top | |
|||
| SLO247 |
|
||
|
I'll try remember in the next few days. Love your car man.
|
||
| Top | |
||
| itlookslikeaxr6 |
|
|||
|
haha woo! I have a fan.
Once I get a decent job ill be looking at getting a motor from Jim Mock Motor sport instead of pouring money into the engine I have now. Some people aren't keen on his products but there drag car is pretty mean and I reckon they know their stuff. I'm really happy with the exhaust and air intake I got from them, thou if I knew what the intake parts were before I ordered them I would have gone and brought them here much cheaper. Regards.
_________________
|
|||
| Top | |
|||
| itlookslikeaxr6 |
|
|||
|
T5 conversion is under way to get some more info with out my typing it again check this thread
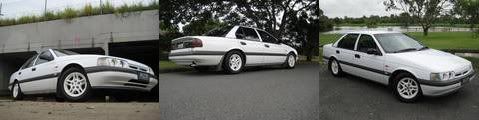
viewtopic.php?f=4&t=81543 I have an idea of what i want with the car but can't make up my mind. Race director has done close to what i want to do with his EDL wagon. Keep my ED shell, or find another cheap I want a complete EL sedan an use the.... Interior EL dash With normal clock and air con, not fussed about trip computer and climate control. Use full EL looms. EL front and rear seats Which hopefully will be recovered in future. ( again do what RD did with the floor to suit any EF EL seats) EL door trims ( electric windows, fairly simple) Drivetrain EL Engine, HP AU engine, or a $5000 race built JMM engine, all this depends on my new income from what job rings me back ( i have a EL engine but don't know the condition of it at the moment, need to give it a birthday) AU BBM i Have as it's in good condition, need to find out what i have to do to get this to work) liquid injection LPG, expensive but works well. T5 of course, billet shifter from USA LSD, with 3:45, or 3.23 I think AU IRS will be taking it a bit to far, don't want AU off set..... or do i would have to do the same to the front. Body ED no rust!, no damage! good paint job! XR6 front, boot lip, custom colour scheme with mouldings ect, Wheels will stay White ED XR6 until i find some nice ones i like. All depends on money and what i think i can do, mechanical isn't to bad but totally fail with auto electrics. I'm just mumbling my thoughts in my thread, Feel free to comments with idea's Regards.
_________________
|
|||
| Top | |
|||
| itlookslikeaxr6 |
|
|||
|
Hey guys,
I will be using this thread to ask Questions about a up and coming manual conversion and ask you subscribe and help where possible. I brought a EA S pac for $150 bucks with all intentions of converting the ED to manual. I have the gear box, previous owner said he had spent $1200 on it but as the engine is seized i cannot test the box. I can slightly remember reading somewhere that there's something different about the reverse gear or the way you select it on an old gear box, anyone know what i'm on about or if there's anything to worry about? I have the manual pedal box, but there's not much info on getting it out besides the following (please correct if wrong) You have to drop the steering wheel, undo the bolts that hold the bottom of the pedal box to the firewall (I think there are 4 or so) and unclip the accelerator, brake and pedal cables. Once you have done that you have to remove the head unit surround to access two bolts that are hidden underneath and behind a metal frame which helps support the head unit, can get to them with a socket with extension bar and you can see them when you put your head down on the gear boot and look towards the front. Remove both kick panels on either side to get access to a bolt on either side which also holds the dashboard in place. Remove the plastic cover that runs along the top of the dashboard towards the front of the car under the windscreen, it is held in place by 2 screws on either side next to the A-pillars. Once you remove that, undo the 5 or 6 bolts that run along the top of the dash. Just remember of unplugging wiring looms before you start yanking on the dash. I have found the conversion guide written by Voxace so i have that information. I am mostly struggling with the ECU side of things. I have collected the following ECU's over my short time of working on car's and used page 14 of this thread for info ecu-fuel-system-eec-f21/ecu-catch-codes-t30186-260.html This ecu was in a EA S pac 3.9 CPEFI Manual info from thread 0DDB - 90DA 12A650DX (X can be either A,B,C,D,E) - EAII 3.9L CPEFI 4spd Auto This ecu was in a EB fairmont 4.0 MPEFI Auto Sedan into from thread 3DBB - 93DA 12A650BX (X can be either A,B,C,D,E) - ED/NCII - 4.0L MPEFI Auto, Long Wheel Base (Wagon, Fairlane) dunno what its out of but into from thread 6DBB - EL 4.0L Auto - Falcon. This ecu from my ED GLi 4.0 MPEFI auto sedan 3DBB - 93DA 12A650BX (X can be eather A,B,C,D,E) - ED/NCII - 4.0L MPEFI Auto, Long Wheel Base (Wagon, Fairlane) Questions Which of the ECU's would be best for me to use to run the EA T5 in my ED, Or do i need to buy one. Do things like air con, cruise control or smart lock matter as i would like to keep all of these mainly because i have the MOMO wheel with cruise buttons. I don't mind having to do a serp and BBM setup. Once i figure that out too What do i have to do to make the AU BBM work. Does anyone or can anyone make a decent re-enforcement plate for the firewall, or link me to troymans measurements as i went through 50+ pages of his thread and failed to find where he made his. I've been quoted $100 but $75 of that was labour Thanks for your help, Quote: kramer wrote: hi, use your ed computer in the conversion, your auto ed tailshaft and crossmember as the ea ones will be different. dont bother wasting your time with the pedal box, just get a mal wood clutch pin and install it in the auto box. takes about 10 mins.. costs $105 plus postage and saves hours ripping the dashes out. I would need to use the EL ecu if i do the BBM conversion? Rather save the dosh considering the pedal box is here and only thing stopping me from using it it time and effort. Thanks for your help, Regards. Today's mission: Remove manual pedal box from EA Mission status: Complete I read in several threads it was a 4 hour job to remove the dash and pedal box. After 1 hour i had the dash unscrewed but most wires still plugged in and the pedal box unbolted then removed. Not that hard of a job, Note, i already had the front seats unbolted so i moved them out of the way allowing me to lay on my back with head near the pedals. After looking around and choosing my plan of attack I removed the clutch pedal from the box. This may be a lot harder from someone bigger then me, IE average adult. 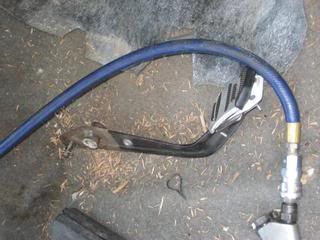 I unbolted a single bolt holding part of the handbrake on. 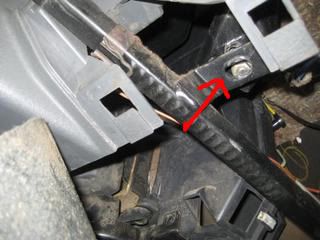 Using my weapon of choice 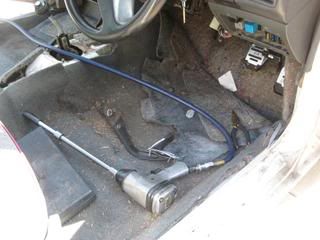 I removed the 5 nuts holding the back of the pedal box on  After realising the pedal box still wasn't even wiggling i went on the hunt for the rest of the bolts. During this time i managed to also remove the pin holding the brake pedal and unhooked it from the booster. I dropped down the steering column with 2 nuts and un-plugged a few wires. I ventured behind the cluster and saw 1 bolt which gave me hope. After feeling behind the air con duct i could feel 3 in total. 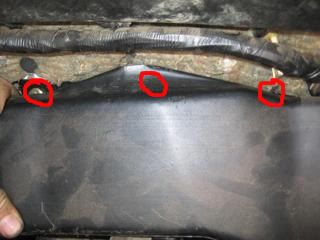 From here i needed to start removing the dash. After removing the top panel across the dash i undid about 5 screws that were 100 turns to long! It dropped forwards a little perhaps enough to get a spanner in there. But i opted to undo 4 bolts which pretty much completely dropped the dash out. 4 either side of were the centre console air con duct meets the duct from the heater box or whatever and another 2 either side behind the kick panels going up. 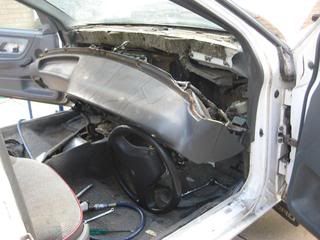 This revealed the 3 nuts which i removed with 2 zaps each of the air gun. 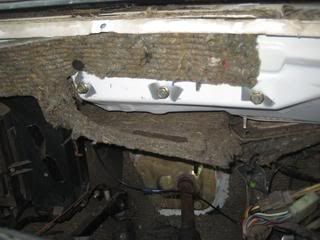 Now i have the pedal box out ill start removing the gearbox 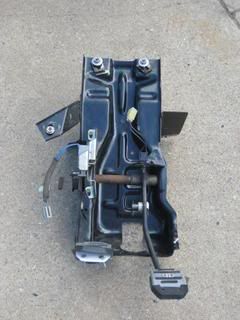 After the gear box is out ill go and buy everything needed like resistors to trick the EL ecu i have. Surprised myself and got the gear box out tonight There was some good points with removing the T5. The oil looked brand spankin, nice clean red. Has exedy clutch plate. The gearbox its self has a near new coat of gloss black paint under the dirt leads me to think it has been rebuilt like the previous owner mentioned. pedal box in good condition, may end up doing so small reinforcing A few questions, does it matter which way the clutch plates goes on, i can't remember which way it was on there. Only 1 side has writing and 1 side is slightly dirtier than the other 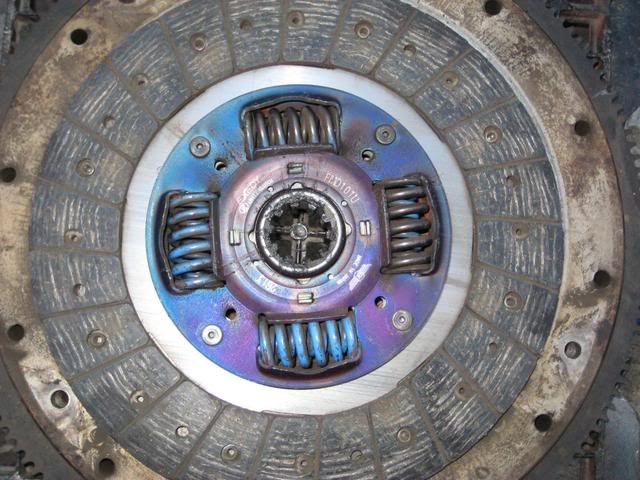 Does this clutch pedal end of the clutch cable look normal where the slit is? The rest seems to be in good condition moves freely no kinks ect. 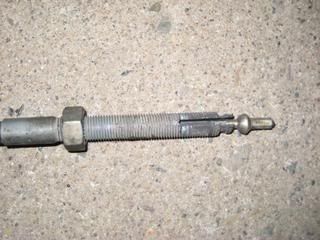 Will i be able to use the same tail shaft? Do i need the manual gearbox loom from the EA? or just the one i get from the Auto in mine. 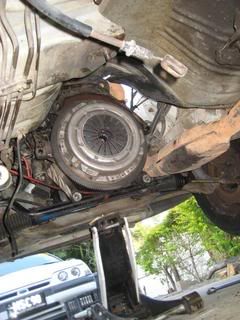 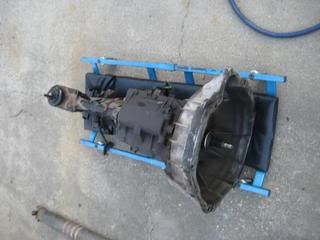 After this adventure i was thinking of just dropping it in to the local gearbox place where dad gets work on his cabs done and pay them to do it in an hour or so. Or see if dad mates that does our RWC has his car lift free and wants to lend a hand. This car cost me $150 and im really happy with my value for money so far. Tomorrow i will attempt to get the ecu and wiring loom ready has a have a spare auto loom sitting on the ED motor from my first car. I want to leave my car together for as long as possible and get it all done in a day or two. I am preparing a spare ED auto loom i have to go with the EA T5 i just took out of the EA. I have using a couple of threads and voxace's tech doco but it's for the EF EL. I have just stripped down the wiring and the ED wire colours are different to the EF EL like in the doco. Does anyone know what colours i need on the auto plug to do the resistor trick to turn my auto ecu into a manual one. The colours are as follow on the round black plug Colour___Stripe Purple Purple___White Blue_____Orange Yellow___Red Green___White Green___Black Green___Red Yellow___Green Yellow Green Blue____Yellow Green___Yellow Many thanks in advance, Feel free to link me to something useful if its not to much trouble, Regards, Michael. Quote: hi.. The colours are as follow on the round black plug on the auto trans loom Purple = gear position Purple___White = gear position- 7 k resistor between these two. Blue_____Orange =trans temp Blue____Yellow =trans temp - 1.2 k resistor between these two Yellow___Red - the rest are for trans solinoids and are not needed for the manual.. Green___White Green___Black Green___Red Yellow___Green Yellow Green Green___Yellow Regards, troy......................... also the clutch plate it should have something like f/w side for flywheel side or t/s for trans side it should be marked near the centre... thats the same clutch i got in my ed , and its a damn fine clutch!!! Thanks for your help Troyman Good clutch aye....Did yours cost $150 and come with a complete car Quote: lol na its ok! the clutch was about $250 compared to the valeo hd clutch and the pbr hd that was in mine before that, the exedy clutch is king!!! lol Good news, Got to a d**k smiths that had stocked "parts" and got me 2 of each of the resistors. I was like aww yer what $1 each sweet as but no....10c each for two 1w 1.2k and two 1w 7k. Tomorrow morning i will finish off the auto loom and then attack my car after helping dad pull new springs and shockies in sisters vitara so i can drive that around if mine doesn't go together and i need a car. Regards. Auto is nearly ready to come out, just have to get the hard second starter motor bolt and a few more bell housing bolts, then take of the gearbox cross member. Thou when attempting to loosen off these bolts i slipped and hit the bony part of my forearm and took a chuck out needing 6 stitches. Highly annoying as i have to keep it totally clean and dry because there is a higher chance of infection due to have having grease on my arms and in the cut from what i hit it on. I got the manual pedal box in, but the EA box must be different some how. i put the brake pedal on but there isn't much travel in the pedal it doesn't seem to come out enough. it sits closer to the firewall then the accelerator does and sit well away from what ever the switches it is suppose to hit is brake light i assume. And i don't know if there is a plug for the switch on the brake pedal.
_________________
|
|||
| Top | |
|||
| ToranaGuy |
|
|||
|
Why don't you pull the peddle out of each car, label them from which they come from & compare? You may find they have different bends in them. You might also be able to "cut down" the auto peddle pad part & fit the manual rubber to it & use it in the manual peddle box. You can do it with older holdens, worth having a look to see if you can do it to the ford.
Otherwise grab a mal wood clutch pin & mod your original peddle box. Just make sure you reinforce it. I know changing peddle boxes is a b*tch, i bought a ED GLI 5spd to rip all the gear from & fit into my EB. Using the factory manual ECU, loom, peddle box reinforced, and my original tail shaft. Cheers ToranaGuy
_________________ I am the ToranaGuy!|74 Lh Torana Turbo|78 Hz PanelVan|86 Mighty Boy Ute|93 EB2 Ghia,GT Mockup,5spd,LPGI,Full Leather|2 x EB Xr8 5spd's|{DESCRIPTION}|{DESCRIPTION}|{DESCRIPTION}| |
|||
| Top | |
|||
| itlookslikeaxr6 |
|
|||
|
Engine is out so using this opportunity to do some work on it, give it a birthday and freshen it up.
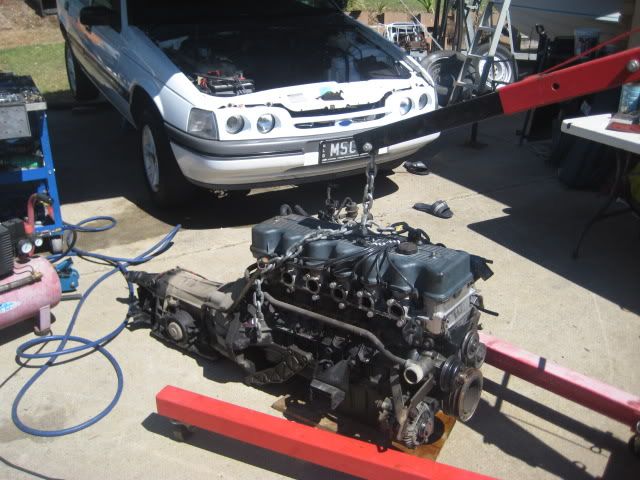 Remove the Auto 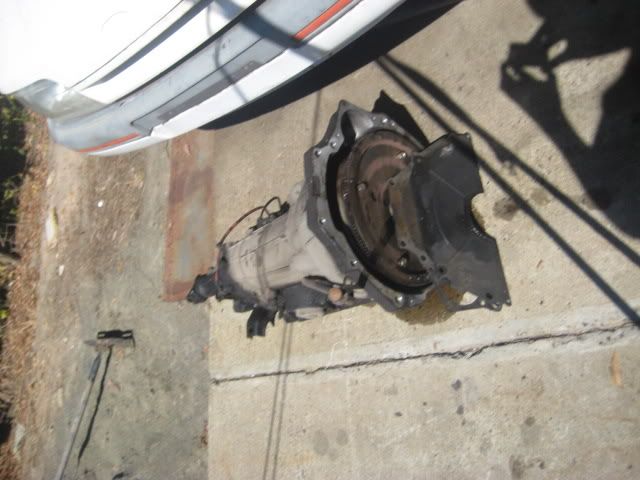 Using the tarp for shade i set up a work area to work on the engine by pushing the car back on the grass for a while till the engine and T5 are in order. 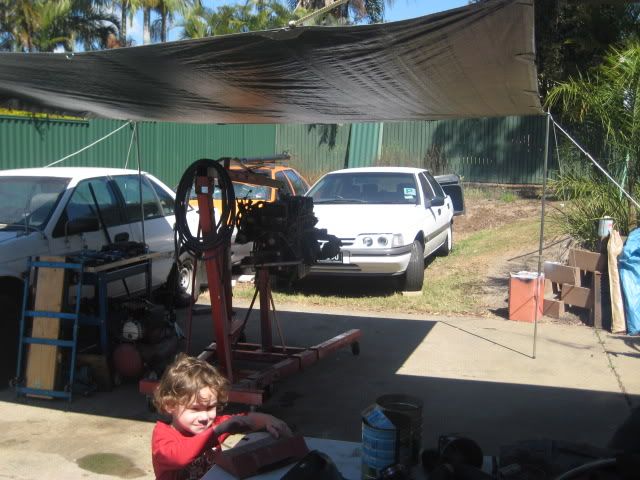 Before the weekend i striped down the engine removing the belt set up and intake manifold. Finished that off this morning completely and began to pull the engine apart with intentions to: Rebuild the bottom end Replace the ED head with an AU one Replace auto with an EA T5 Fit serpentine set up BBM manifold BA CAI Dad and i pulled it apart to see how things were looking and what needed to be replaced. 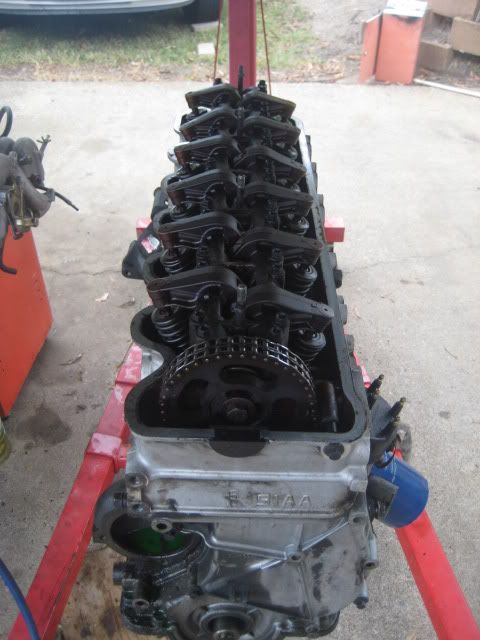 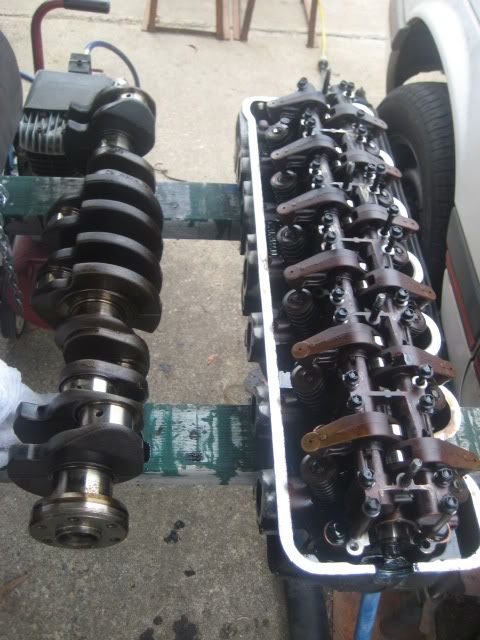 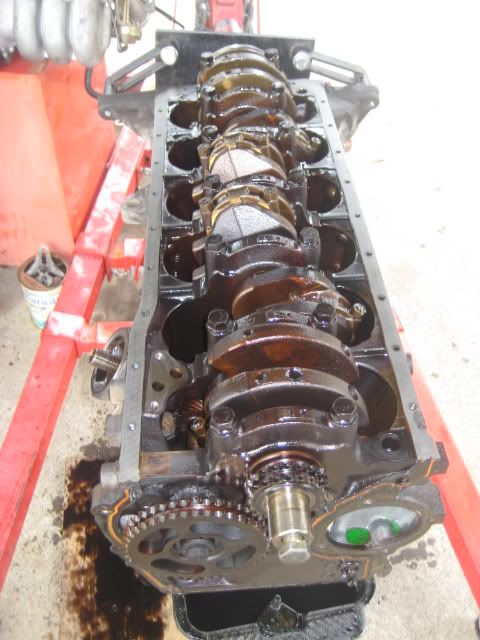 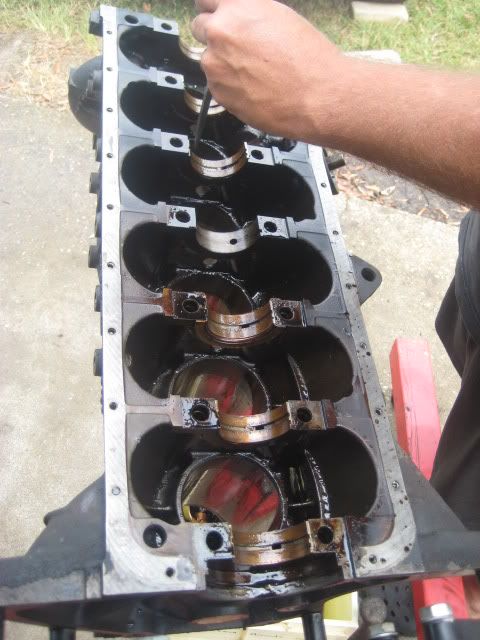 These will need replacing as you can see they are bronze brass colour and should be a shade of silver. These bearings? are what would have contributed to the knocking noises on start up. 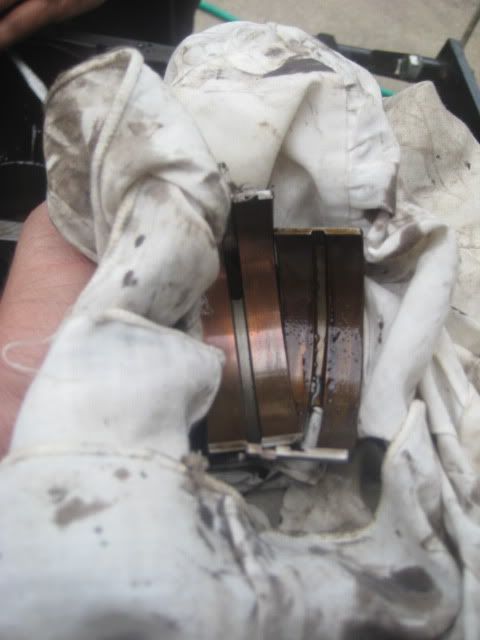 After establishing a list dad went through the shed and struck gold just before we left to go to the shops. I s**t you not these were sitting in dads shed as if they were just waiting for me to rebuild my engine. Includes big and small bearings, piston rings, gaskets, new head bolts. 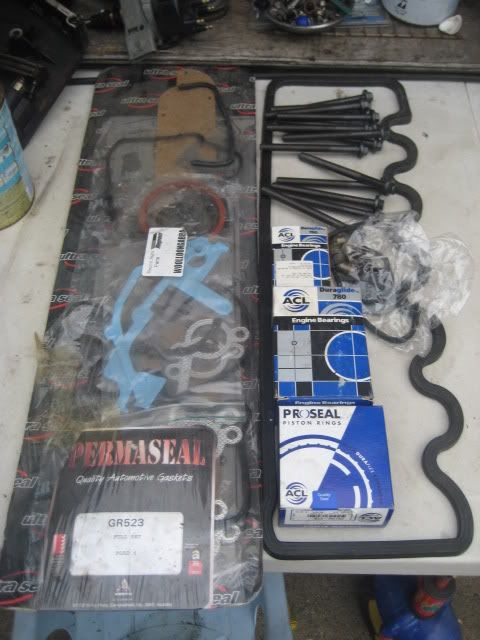 As well as a complete new timing kit 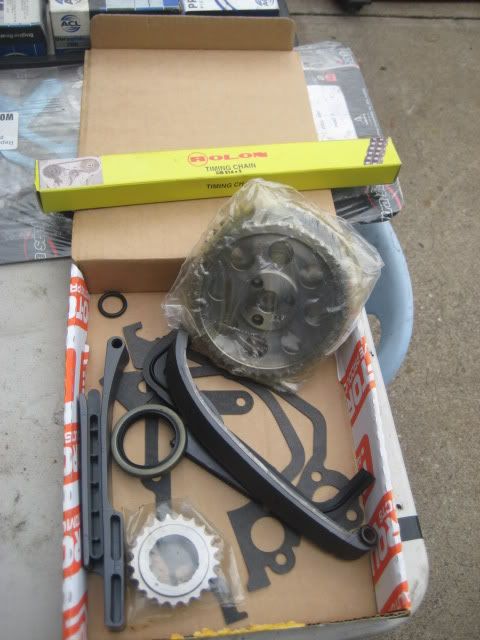 Finding this stuff has saved me quite a bit of cash Considering the engine has over 250,000k's its in good condition with no major wear and tear. Man o man the head bolts were tight i dare say the head hasn't been off for a while if ever. Tomorrow will be pressure cleaning the block, get it nice and clean then build the engine back up, paint the block, EL rocker cover. Will clean and maybe paint the brackets and what not on the front. Just get everything clean and fresh looking. I'm quite excited to get the engine together as it should feel a lot better and not as tired. Im not expecting massive gains in KW's but would imagine the engine will perform better. Looking at getting the AU injectors cleaned but they might not need it. Not 100% on what to look for. Questions Can anyone provide me with torque measurements for how tight to do all the bolts in the head ect. Dad has a EA, EF and BA manual (3 different books) can these help? Regards, Michael.
_________________
|
|||
| Top | |
|||
| itlookslikeaxr6 |
|
|||
|
Today today today,
Since there is no hurry to get the car back together just been taking my time. Just a lot of cleaning so far, not as good as getting thing hot tanked but for $20 worth of degreaser and some scrubbing they didn't come up to bad. Pistons, had to go buy a ring compressor so just cleaned them today and will fit the new rings tomorrow after we take the shine of the bores to the new rings seal properly. 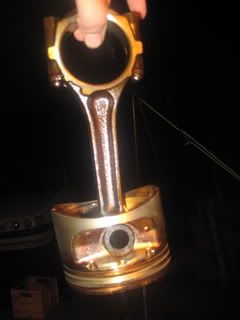 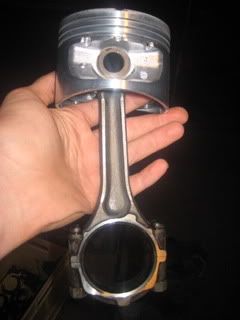 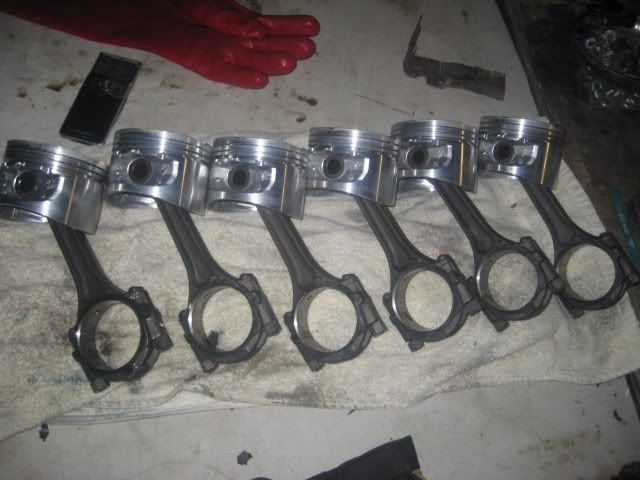 Sump, after some minor panel beating to flatten out some dings the scrubbing began.  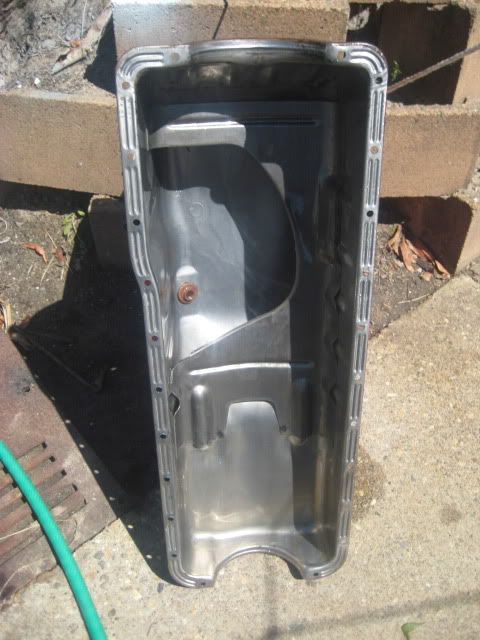 Timing cover, Dirty dirty, scrub scrub, clean clean. 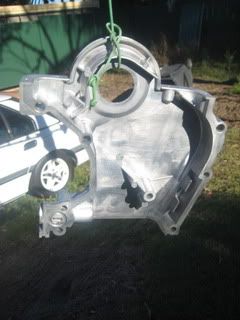  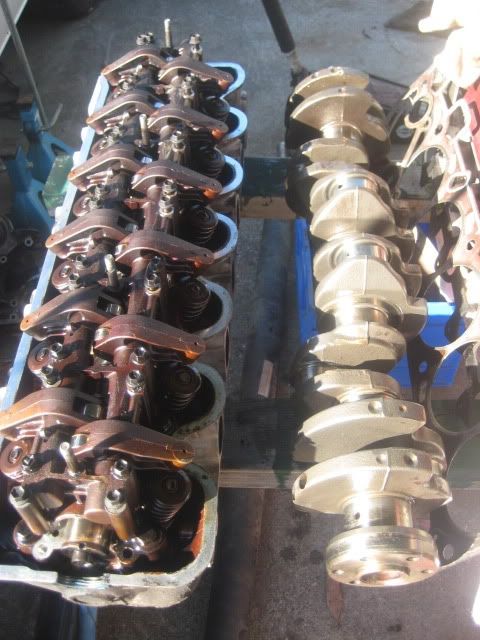 Block, had the usual dirt but came up pretty clean, might not bother giving a fresh coat. 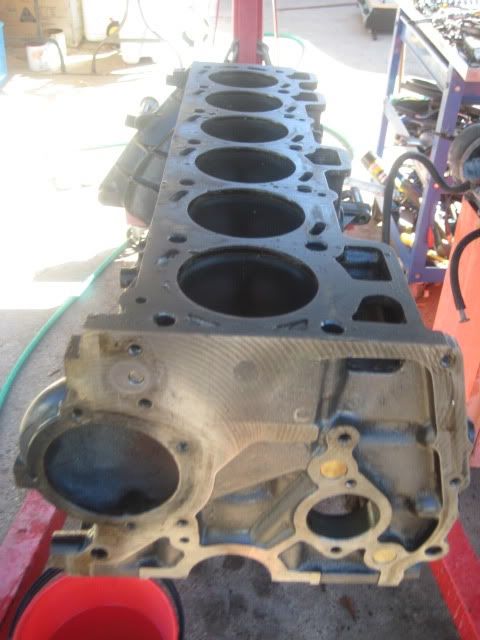 Tappet cover, started to sand it down for a fresh coat as the previous paint job is crap just like the colour. Tomorrow morning the bottom end will go together as everything is clean. Then check the head clean it up a bit if needed then once the engine is together work out the BBM as dad and i fail at auto electrics. Regards, Michael.
_________________
|
|||
| Top | |
|||
| XFWAGON |
|
|||
|
Wowzers, well done mate, the thing looks a million bucks, just like new! Those pistons look as if you just pulled them out of the box, same with all the other parts. Any chance you wanna come do my 302
Top effort mate, just shows what a bit of motivation can do. Wish i had some of that stuff.... |
|||
| Top | |
|||
| Who is online |
|---|
Users browsing this forum: No registered users and 24 guests |