|
| pumpdogg |
|
||
|
THIS GARAGE WILL HOUSE ALL MY CARS - IF SOMEONE COULD POINT OUT HOW I CAN CHANGE MY TITLE. THX
Well, i have been floating around fordmods for a fair while now and have thoroughly enjoyed reading other peoples build threads. So much so that I thought I'd post up a little about mine. I wont post all the pics but all the major ones i will and if anybody wants to see more I'd be happy to put more up. So here goes. I was on the hunt for a project, something that would get the full treatment. (paint, warm v8, good looker). At this point in time i had an xf ute and an eb xr8, but i really wanted an ef/el xr8. Scouring ebay one day i found an ef xr8 that didn't sell at $2500, so i contacted the owners to make an offer and ultimately it was decided a swap for the xf ute would suit everyone. The deal was done and i drove a 13 hour round trip to bring back this beast.   Full of rust she was, but the important parts were good. (doors, bonnet, boot, etc). More importantly it was complete and not mucked around with. The motor and gearbox ran faultlessly even though the odometer said she had covered 305,000kms. I went over the car with a fine toothed comb and decided that the body was to far gone. Thanks to a local wrecker who said "Yep, I have a nice clean, ef shell you can HAVE, all i'll get you to do is take your f**d shell to scrap, and put the profit on my account". Deal done i left with a gold ef futura rolling shell that had only 180,000kms on the clock. Now the fun could begin. Two weeks later, the f**d shell was empty and at the scrap joint, and the gold shell was empty and sitting in my mates shed awaiting body work. My mate owned a 2pac spraying business at the time, so resources to panel beat and spray were all in the one spot. Due to quiet times at work the boss asked if I'd take a week off, so I did and got stuck into straightening and prepping the gold shell ready for paint.   Nothing was bare metaled as a local panel beater said "only bar metal a car if absolutely necessary, its not really worth risking getting bare metal moist if you can help it". He had a look and said "that paint is fine to stay as its in good nick and its 2pac". (that only mattered because i was repainting with 2 pac). All the panels were scuffed with a flat board to find any low spots. Low spots were then filled and flattened back with a speed board. Then the whole panel was skim filled to make sure all dings were removed, i then removed 99% of the filler i put in. i got so sick of doing it but it was good insurance for ding free panels. Right about now I decided I'd prefer an El xr front, so more ebay came up with a brand new el xr upper for $100. So i got that and a new standard ef bumper. I then cut the top of the ef bumper and glued the el xr upper to it. (Using the ef xr bumper for guidance as that's how they're done) Once everything was prepped it was primed with PPG Prima, a very nice 2 pac primer that was easy to spray and dry sand with out clogging paper. Door jambs and engine bay weren't primed as you can paint 2pac over 2pac and no repairs had to be made to these areas. With a "whole" lot of sanding in front of me, we decided to colour door jambs, door inners, engine bay, under boot, under bonnet. All areas that wouldn't get paint with all panels back on. To prep these areas I used a product called 3M Scuff-it and a grey scouring pad. Basically the scuff-it aides abrasion, you just wet the scourer add some scuff-it and rub away. So with this all done it was time for colour, I had chosen the original colour which was "navy blue metallic" or N9. The paint system i chose is a clear over base, as opposed to a direct gloss. I decided to use PPG cobra as the base coat (colour) and the clear i went for was called PPG Deltron. This is an exceptionally good clear coat, easy to spray, don't use much, and super glossy. Here's the first bit of basecoat.   And these bits done.  *the bits that look light aren't it was just dodgy camera work, my bad. *the bits that look light aren't it was just dodgy camera work, my bad. Now it was time to, re hang all the panels with rubbers, locks etc. Adjust all the gaps and she looks like this  I should point out at this stage, we chose to spray the car as complete as possible, we did it like this as its really easy to ensure all panels had even coverage, and sprayed the in the same way. The bumpers, body kit, etc weren't sprayed at this time though due to insane over spray from fiddly panels ie headlight cut outs, etc.
_________________ Let the xr8 collecting begin!!! Last edited by pumpdogg on Tue May 04, 2010 11:58 pm, edited 1 time in total. |
||
| Top | |
||
| pumpdogg |
|
||
|
Once it was all back together i got sanding, for this i used some powder stuff as guide coat (forget its name, made for this purpose). I started with a sanding board that took 3rd sheet pads with velcro (the bigger the board, easier it is to keep flat). Once that was done i used a festo sander with a soft pad on it to remove any slight flats created by board. For the small fiddly bits i sanded by hand then went over them with a grey pad with a fine grit on it (forget their name to, but again made for this purpose).
So sanding done time for colour;  *Again photography not my strong point, and was taken through booth window *Again photography not my strong point, and was taken through booth windowAnd finally all painted.  Now that its all painted it was time to sit that aside and get cracking on the motor. Firstly i bought some parts, i got new water pump and hoses, fully reco'd gt40p heads, crane 2040 cam and valve springs to suit, pacemaker extractors and some hi flow cats 2.5". Heres how it went -Acid dip block, sonic test and hone. -Polish crank -Bead blast pistons -Balance bottom end -New big end, main and cam bearings - KING -New chrome moly rings - HASTINGS -New conrod bolts - ARP -New head studs - ARP -New double row timing chain set - CROW IIRC -New valve springs, retainers and locks - CRANE -New 2040 cam - CRANE -Full gasket set - FELPRO -New harmonic balancer - POWER BOND Me and my mate assembled the engine together, first one i had done. I had the machine shop check all the important measurements ie, crank float, ring size, size of journals etc. Unfortunately I didn't get pics of this stage (way to keen to stop and take photos), but i did take this pic *don't mind old balancer only on cos i wanted a pic and new one hadn't arrived yet.  Ok, so motor is all done car is painted time to reassemble, this took about 4 weeks, just cleaning everything servicing everything that needed servicing etc. At this point I replaced things i found that needed replacing, like bushes, fuel filter etc. Here it is all assembled; 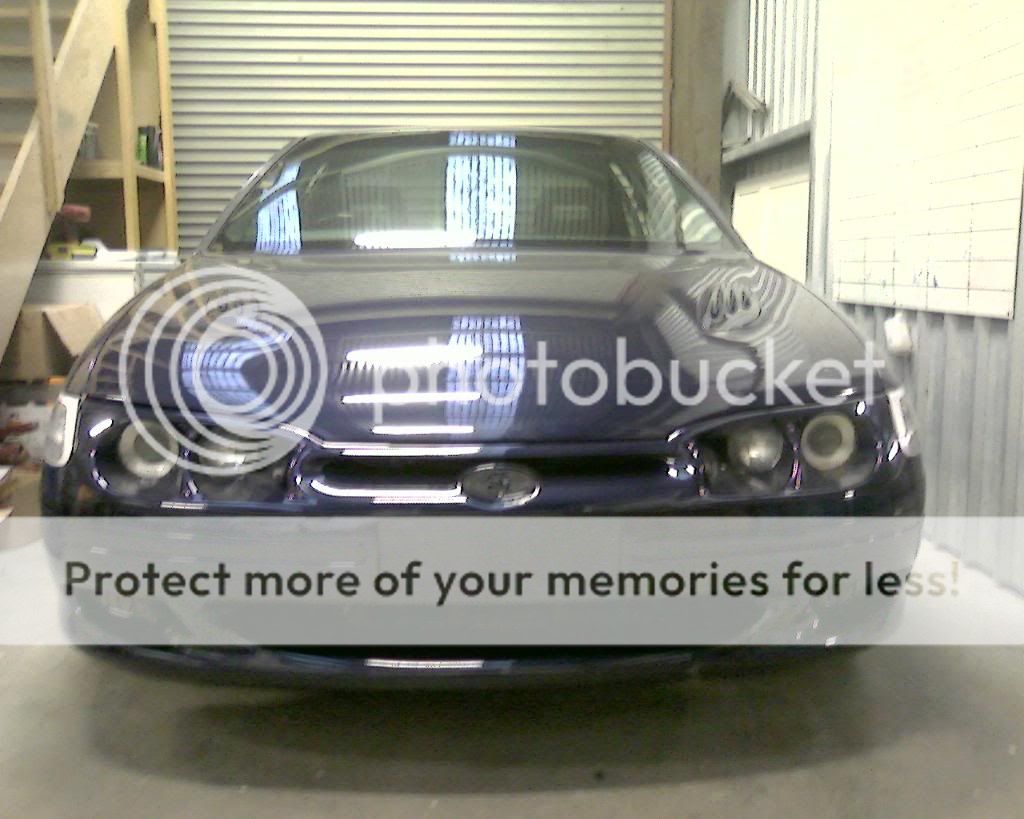 I didn't get a lot of pics while doing certain things but i did get pics in stages of completeness. The next stage i got to was the firing the mother up. This all happened rather quickly, at one moment i was looking at an empty engine bay, the next it was all in and ready to start. Then came the issues the first of which was - Fill it with the vital fluids, started with transmission and power steering fluid, then i filled it with coolant, then finally i filled it up with some gtx2 to run it in. So i pull the dipstick to check the oil level and what the? coolant on the dipstick. First thought was inlet manifold gasket may have slid while putting it on, so i drained the fluid and changed the gasket put it all back together. Fill with coolant, fill with gtx2 then F**K coolant on the dipstick again, so i decided to leave it overnight to get a water level. Came back next day and pulled off top water pump hose - no fluid. Pulled the bottom hose off the water pump and - fluid. Pulled off the water pump and there was the tiniest pin hole in the timing cover which was letting coolant run into the sump. Got it welded up and milled back all nice as cheapest price for a new one was $530. Then put it all back together AGAIN, topped it up with fluids AGAIN. checked the dipstick - coolant free YAY!!!!!! Next up we primed the oil pump and fired her up, she roared into life, we bedded the cam in then set the timing. Chucked on my nice wheels (rod jane racing 17's - love ebay @$520 with tyres).Then time to drive it. *The wheelies aren't mine, and note the gangsta lean, mmm.  Looking like this, I went ahead and got a RWC and rego. Then it was time to get it looking right. First up King Springs ultra lows all round with monroe gt gas shocks. That got the ride height sorted, next up was some tint, Here I opted to keep it legal with dark as legal fronts and one shade darker for everything behind the 'b' pillar. So This brings me to now, car has done 6000kms since rebuild and is awesome i love it, Its smooth and quiet but has heaps of go when you give it to it.    I have installed a stereo and a few bits inside and under the bonnet but i wont post pics of these until i get it all cleaned up and looking good. I have a list of future mods i want to do, but i need to get my xh work/parts truck done first as i cant get things in the xr8 very well. These are in order of my preference, - Replace pacies with difillipo 4 into 1's and get twin 2.5" system made. - Replace Auto with a tko 5 speed manual - Get her all tuned up and running sweeter (chip and dyno) Then I plan on taking it on a few track days (slightly raised of course) and after that I'm sure I'll want to do more mods. Well that's about it for now, I hope people enjoy looking at this like i do (looking at others garages). Any and all comments are welcome and if i can help any one with what I've done just ask and I'll try and help. On that note I'll leave you with a few teaser pics of the xh.   Cheers and thanks for looking Justin
_________________ Let the xr8 collecting begin!!! |
||
| Top | |
||
| KWIKXR |
|
|||
|
Mate, excellent build up so far!! Paint job came out mint, nice rims and ride height is spot on. Freshened up V8 under the hood is also very cool. Awesome work dude!!
Looking forward to seeing future updates on the XR8 |
|||
| Top | |
|||
| facer01 |
|
||
Age: 32 Posts: 284 Joined: 27th Sep 2009 Ride: 1995 EF Ford Fairmont Location: Bundaberg, QLD |
excellent work mate car looks mint!
|
||
| Top | |
||
| pumpdogg |
|
||
|
Thanks guys, all we can do is try hey? So far I'm stoked with how it turned out considering i did all but the spray painting (i did prime though). I love doing something yourself and then a panel beater comes up and goes "F**k that's straight".
KWIKXR - I'm still getting through your build but i'll be sure and comment at the end, lookin' real good so far though..
_________________ Let the xr8 collecting begin!!! |
||
| Top | |
||
| krisisdog |
|
|||
|
Come a long way bud, very nice job.
|
|||
| Top | |
|||
| TerroristGHIA |
|
|||
|
Nice work dude. If you were to pay someone to prep and paint the body that way, what would you be looking at. Giving me ideas for my Fairmont.
Brett
_________________ The Terrorist ED Retired due to RUST. |
|||
| Top | |
|||
| pumpdogg |
|
||
|
Hey guys, thanks for the comments. There will be more to come for sure.
Brett, I could only guess at how much a panel beater would charge to do that job. I can say though, that the cost for primer, basecoat and clear was just shy of $1800 (and that was with spray painting mates discount). And in total I spent about 120 hours straightening, sanding an masking, and it took another 10 to paint. So you could say 130hrs @ $60 an hour is $7800. Plus paint that's $9600. I'd imagine a pro would do it quicker, so I would say maybe $7000 ish. The best part of skim filling is it's almost fool proof so I'd recommend getting a panel from a wrecker and having a go yourself. Might cost you couple of hundred for a speed board and paper etc, but it's worth a dip I think. Ya never know might save yourself thousands. Another quick note, the xr8 is booked in for a dyno run on Monday. More to check afr than anything else but I'll post it up. Cheers Justin.
_________________ Let the xr8 collecting begin!!! |
||
| Top | |
||
| TerroristGHIA |
|
|||
|
Thanks. I figured it would be ap auround that. Something to think of for the future.
Goodluck and i await the dyno results. Should be fairly healthy i reckon. Brett
_________________ The Terrorist ED Retired due to RUST. |
|||
| Top | |
|||
| Albino |
|
||
|
Justin, she's come up a treat. The paint has quite a depth to it...time well spent. I will be following your progress with interest. One question, what was your process to paint the engine. good on ya
_________________ Any man over the age of 26 that drives a car of less than 8 cylinders with a 0-100kph time greater than 7 seconds must consider himself a failure. |
||
| Top | |
||
| pumpdogg |
|
||
|
G'day Albino, thanks for the comment mate. No real process to paint the engine, the block was acid dipped so all I did was wash it thoroughly and wipe it down with prepsol. Best hint I can suggest is very light coats and keep the finished paint thickness as thin as you can. Thick seems to flake easy. The other important thing is, the colour has to be competion ford blue jk.
_________________ Let the xr8 collecting begin!!! |
||
| Top | |
||
| bottlejack15 |
|
|||
|
Thats a dam nice XR8. The extra effort you put in with the prep really makes a huge difference.
I had a N9 coloured EL Fairmont Ghia with all the Tickford bits on it so i have a bit of a soft spot for that colour. Nice work and look forward to reading about the XH. |
|||
| Top | |
|||
| Falcon_92_EB |
|
||
|
that thing would have to be one of the cleanest ef xr8 on here your blood sweat and tears went in to this car. looks very nice
|
||
| Top | |
||
| pumpdogg |
|
||
|
Cheers for the comment Lukas, much appreciated.
I had to cancel my dyno run due to splitting a radiator tank on sunday. I thought i would post up where I'm at with the xh, I think i will post as i go with this one.. Basically, the silver one in the earlier post has been canned due to too much cancer. Found another shell on ebay for $800.. Here she is.  The next few pics are how she is now, i have stripped it out and been over it thoroughly (no rust at all not even inner sills) and the only bit that's no good is the drivers quarter. Full of bog, that wont do, so i have ordered a new 1/4, taillight housing, and inner brace, from ford. As soon as they show up i can get into it.    So once these panels are on, i can chuck the ute on the rotisserie and clean up underneath. On another slightly more unpleasant note, picture this. Utes up on stands, back wheels are off and i'm drilling out the spot welds around the wheel arch. I loops my arm over the disc brake cover for a bit of leverage. Then about 5 mins later "Geez my arm is a bit stingy, must've got some brake fluid on it". So i go outside and rinse it off. Still a bit stingy, then 10 mins later I get this wild pain under my arm, into my armpit, then into my chest. Im thinking "what have i done?", Took a pic with my phone to see what a mate thought, and as i took the pic i got a square on look at it. "Looks like a bite, better retrace my steps." Looking everywhere, poke my head over the disc brake cover and i see this bad boy chilling out.  Shot of to hossy, made sure i wasn't going to die. All was good i just had to hang there for 5 hours in case it got nasty. I had no side effects, all the underarm pain went in an hour. The stingy pain hung around for a few days, but all good now. Sh*t happens hey? Cheers Justin
_________________ Let the xr8 collecting begin!!! |
||
| Top | |
||
| Froudey |
|
||
|
That's no good f**k spiders GRR kill it lol
good that nothing major happened with that. the cars looks really good and the ute should be great
_________________ R.I.P Tobias my son. |
||
| Top | |
||
| Who is online |
|---|
Users browsing this forum: No registered users and 25 guests |


