|
| frankieh |
|
|||
|
Hi all,
Thought this might help someone sometime. I picked up an AU alternator for 20 bucks recently but needed an EL one. Making the AU one fit an EL would have been a nightmare as they have no mount points in common. While I was investigating, I noticed that the mount points aside, the alternators looked otherwise identical. (internal layout I mean.) I decided that I'd try to swap the internals over and put the good AU internals into the shell of an EL alternator that had died. I was curious and figured that at worst I'd have wasted 20 bucks. Turns out it's really really easy. So I took lots of photos as I'll be replacing bushes and stuff myself in future rather than continuously buying replacements. In all 5 of my dead alternators, not one of has any bearing slack, so I don't think it's necessary to replace the bearings as they are sealed units and generally seem to long outlast the alternator. Some pics: AU alternator with the pulley off:  EL alternator with the pulley off: (as you can see not much in common as far as mount points go) 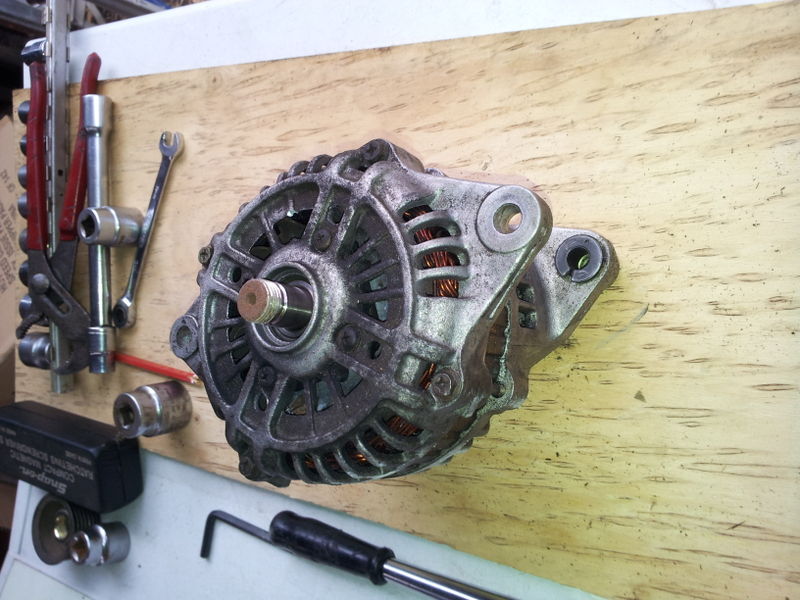 Turns out getting the pulley off was the hardest bit, and that turned out to be much easier than I expected. I stuck the biggest allen key I could fit into one of the 4 round holes on the front of the alternator between two of the rotors (to stop the internals spinning) they are solid metal so as long as you don't go to far in.. there is no issue. Then I put a socket on the nut and whacked the ratchet with a hammer once, the nuts came loose and the pulley falls off. Piece of cake. Next take the four 10 mill bolts off the front face of the alternator and the nut off the back where the positive output is and with some gentle tapping, the alternator splits in two. EL alternator apart: 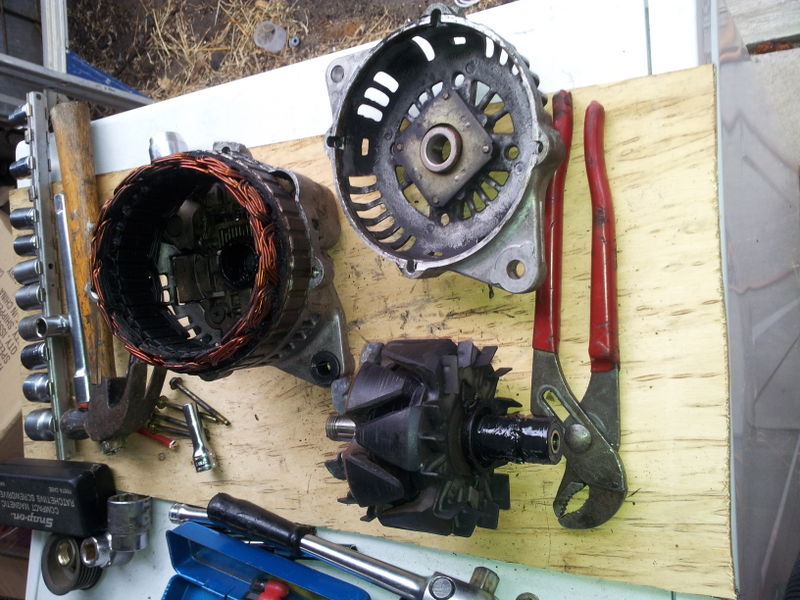 Here is the EL and AU stator/regulator/rectifier assembly side by side, hard to tell them apart isn't it? The B+ output bolt is thinner on the AU unit. 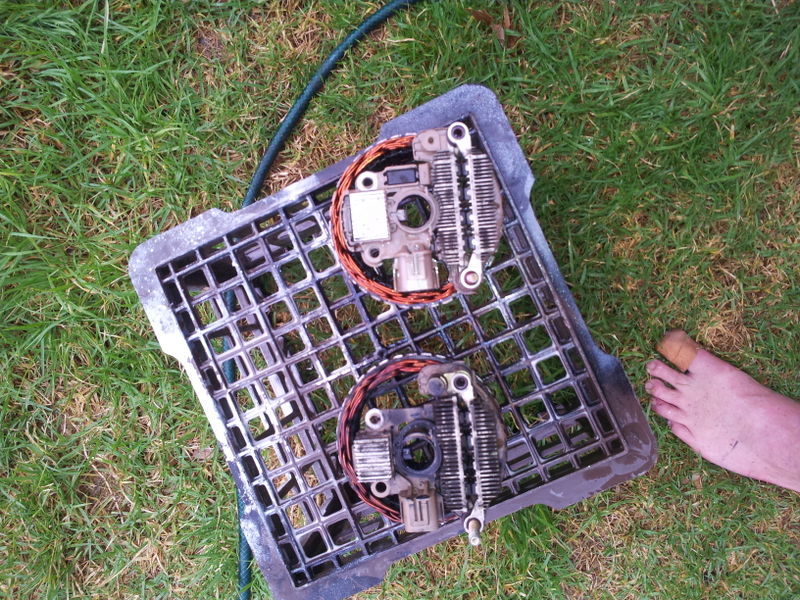 At this point changing the brushes involves removing a small plastic cover and soldering in two new single wire brushes.. easy peasy. Here is a look from the other side. In the middle you can see the brushes sticking into the round area. To the left is the rectifier and to the right is the regulator. (the yellow area) 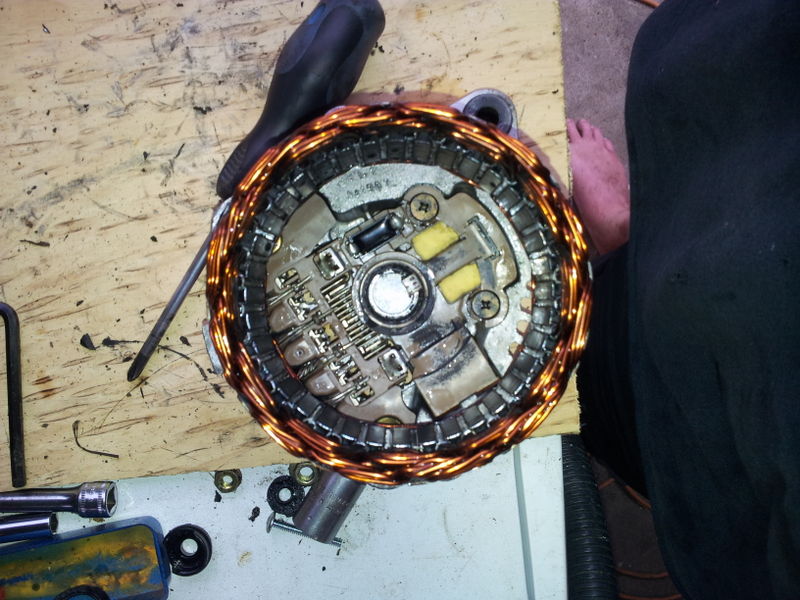 It all comes out of there with just 3 phillips screws you can see in the pic. All of those bits can be separated and all can be replaced from ebay fairly cheaply if needed. It all comes out of there with just 3 phillips screws you can see in the pic. All of those bits can be separated and all can be replaced from ebay fairly cheaply if needed.So you fix/replace what is needed and then it's time for assembly. First thing I did was slide the AU rotor into the EL front housing all ready to go. 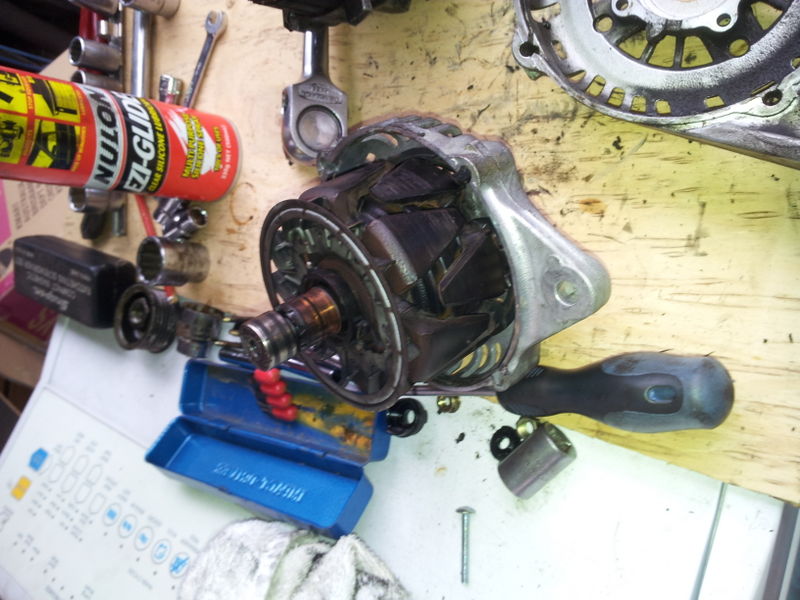 It wasn't necessary, but I put the AU bearing into the EL housing just because it was newer, but neither had any noticeable signs of wear. The front bearing is lightly pressed into the housing (couple of gentle taps popped it out) and it has a square plate and 4 screws holding it into the housing. You don't need to remove them if there is nothing wrong with the bearing. (you can see the square plate and the four screws in the third photo from the top (the first disassembled photo) Assembly of the rear is a little bit tricker as you can't just slide the rotor back in as it will hit the brushes and stop dead. No problem, they have allowed for that too. In this next photo you can see a small allen key has been slid into a hole on the back of the alternator.. it's directly in front of the brushes inside.. so all you do is use a piece of stiff wire with a 1/2 inch bend in the end, to push the spring loaded brushes into their housing and then slide the allen key in.. once it's in front of both brushes, it holds them inside their housings and out of the way of the rotor bearing. and you can then slide the rotor into the back case. 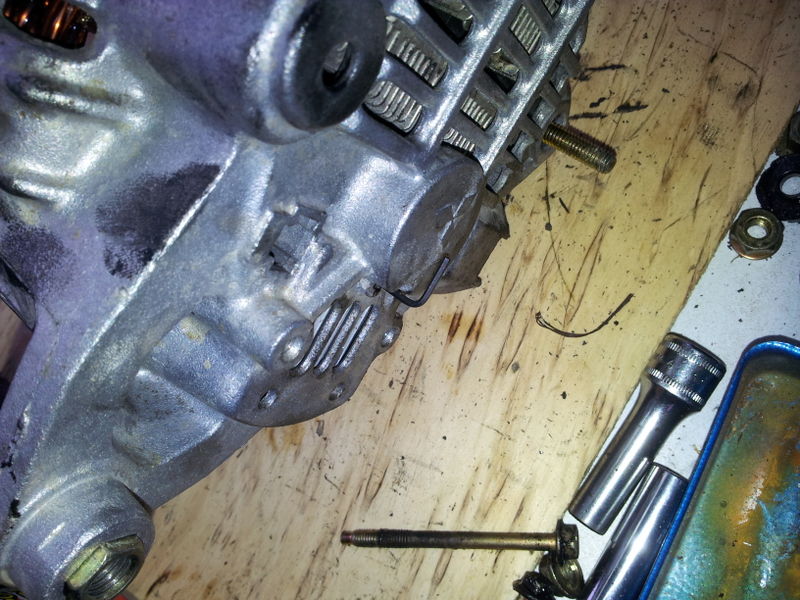 In this one, you can see the brushes are being held right out of the way of the rotor bearing/shaft. 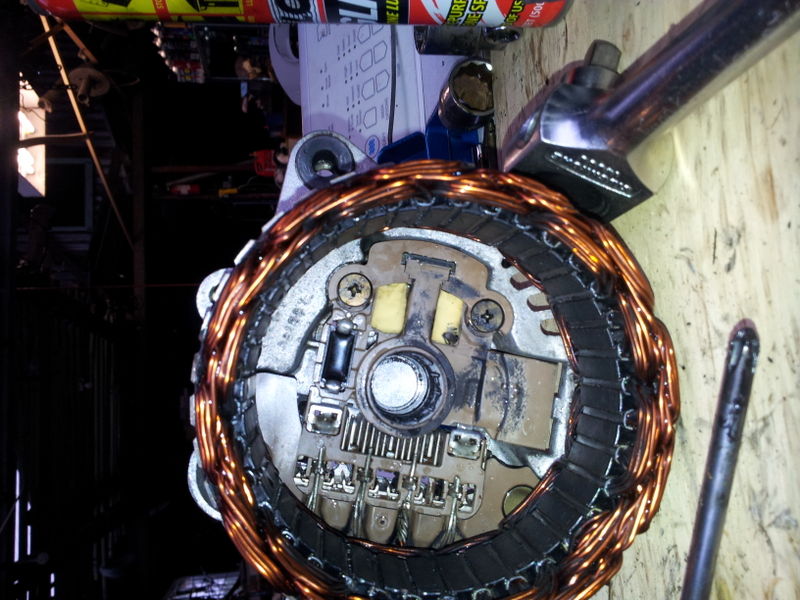 At that point you just slide the front and back halves together and gently tap them till it seats nicely. Put the 4 10mm bolts back in and the pulley back on. once it's completely together, you can pull the little allen key that's holding the brushes back out and they will slide out and contact the rotor contacts again. externally, what you have then should now look like this: 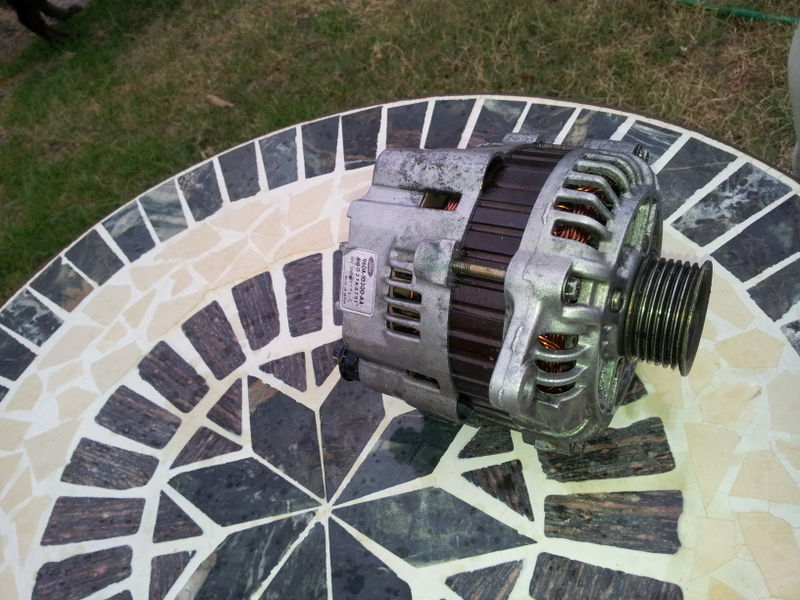 An EL alternator with entirely AU internals. (and an extra 10 amps capacity, better cooling and whatever else they fixed/improved when crafting the AU unit) I then promptly put it in my car: 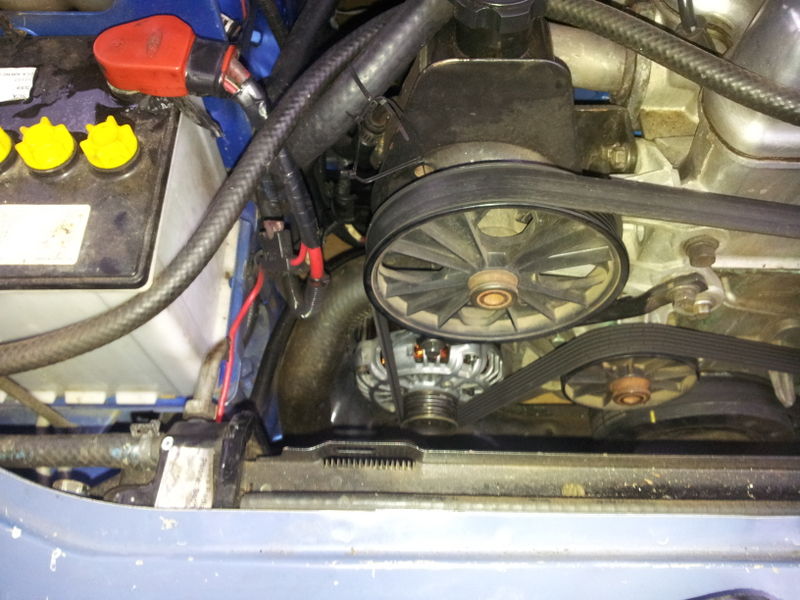 Hooked it up to a multimeter and fired up the car. 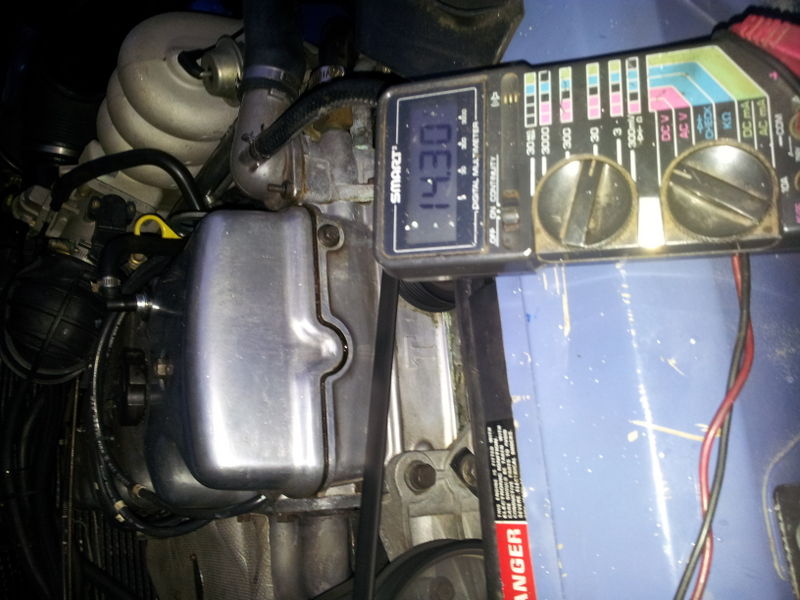 14.3 volts.. with no load except a fairly flat battery... pretty much perfect!. Had I known how easy these things come apart, I would have bought new brushes.. but as it stands now, I'm going to buy a bunch and fix my other alternators for spares. (except the ones with dead regulators/rectifiers as I don't need that many spare alternators) Hope this helps someone.. If I can do this in 45 minutes with no schematic to work from and with no previous alternator experience other than fitting them... it can't be that hard. In retrospect, the AU alternator I picked up wasn't in fantastic shape, it could have benefited from a new slip ring like this one (it is the contacts on the rotor that the brushes touch.. in my alternator one of the contacts was worn): {DESCRIPTION} or some alternator brushes: {DESCRIPTION} Some other things I've discovered. 1. This will also work with BA alternators, as long as they are Mitsubishi units and not the 120 amp Bosch ones. The BA units don't need a sense wire, but apart from that they are pretty much the same. The BF and later units will NOT work as they use a modulated pulse from the cars ECU and our cars don't have that. Lastly, if you do want to replace the regulator/rectifier or brushes (all of which are on ebay) you will need to be able to solder.. not a huge amount of soldering, but there is a few wires here and there. I was only swapping stuff over here so I didn't need to solder anything. If reading the above makes it all seem hard, I've done a bad job writing it up because it really wasn't. |
|||
| Top | |
|||
| Esteven8 |
|
|||
|
Good work frankieh, well written and informative with plenty of pics.
I think this should be a sticky.
_________________ {USERNAME} wrote: Cheap pads squeal like cheap hookers, and you can take that to the bank. {DESCRIPTION} {DESCRIPTION} |
|||
| Top | |
|||
| frankieh |
|
|||
|
Thanks.. I only knocked this up because I figured everyone seems to think that alternators are so complicated and fiddly that it's easier just to spend 200+ bucks and get a new one.
Turns out they are not hard at all... and if everything but your brushs is good.. you can give your alternator a new lease on life for roughly $15 bucks. |
|||
| Top | |
|||
| snap0964 |
|
|||
|
Yep, good write up.
Be careful with the front mounting nut - an easier way without possible damage is to mark the nut to the front body, and use an electric or pneumatic rattle gun to loosen it - someone holds the rotor in a rag, and short bursts with the rattler. Do it up same way, aligning the marks. The slip rings can wear over years of use, but there's not a huge current going through the rotor coils. To fit new brushes, you'll need to cut the old brush pigtails, and solder the new ones to them. The bearings might be a bit dry, so they can be repacked with hi temp bearing grease - lift the seals off carefully with some instrument screwdrivers, repack, leave a bit of heat expansion space, and refit the seals. If the bearings have play, and feel rough initially when first rotated, then best replace them - don't bother with repacking.
_________________ 96 XH Longreach 'S': LPG, Alarm, 3.23:1 LSD, Cruise, Trip Comp, ABS, Power Windows, Mid Series Dome Lt, Climate Ctrl |
|||
| Top | |
|||
| frankieh |
|
|||
|
yeah, I would have used a rattle gun if I'd had one, but having said that, the three I did all came off really easily. As an added bonus, the spare pulleys will be coming in very handy with my supercharger as they solve a problem I've been having. (not enough belt to pulley contact on the charger) I will add an alternator pulley to the bracket behind the SC to pull the belt into more contact with the charger.
Ive just put a heatshield under the exhaust header for cyl #1. My extractors glow red after a hard bit of use, so I don't imagine having them 5 inches from all the cooling fins on the back of the alternator is beneficial to the life of the alternator. I used the alternator support rod from an AU as well as some heatshield pulled off the exhaust manifold of one of my spare engines. Doesn't look to bad and I'll bet both the alternator and the power steering pump run much cooler as a result. It's also totally rigid (there is a little support bracket underneath and it bolts to the AU support rod which in turn is bolted to the bottom engine mount support bolt. 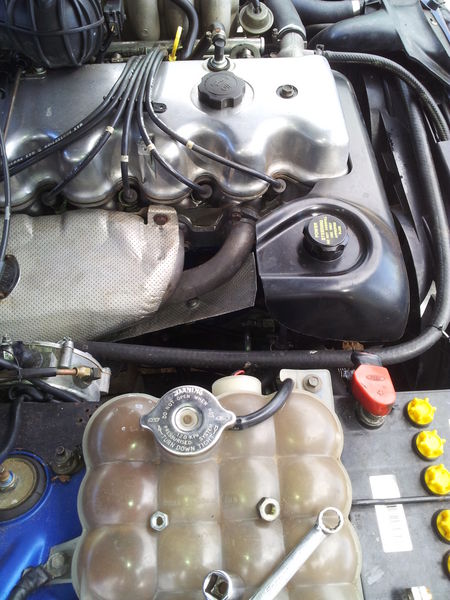
|
|||
| Top | |
|||
| Denislovesit |
|
||
|
Thanks for this. My EL was only charging at 12V. Bought those brushes from evilbay. Stripping the alternator was no problem, hardest part was removing the brushes as they are soldered in but I figured it out.
The slip ring needed replacing but I didnt bother. Reassembled and installed alternator, test, 12.5V bugger Thought I'd wait another day for the brushes to wear in. 2nd test= 14.5V! total cost $20 and about 2hrs my time |
||
| Top | |
||
| Disco Frank |
|
|||
|
LOL i thought this was common knowledge
scotty used to do this before he passed best part as well teh au alt is 120amp and most e series are 90 iirc
_________________ RIP SCOTT |
|||
| Top | |
|||
| frankieh |
|
|||
|
{USERNAME} wrote: LOL i thought this was common knowledge scotty used to do this before he passed best part as well teh au alt is 120amp and most e series are 90 iirc Are you sure about those numbers? My reading has the following: ea-ed : 80 amp EF : 110amp EL : 100amp AU : 110amp BA : 110amp BF : 120amp |
|||
| Top | |
|||
| frankieh |
|
|||
|
{USERNAME} wrote: Thanks for this. My EL was only charging at 12V. Bought those brushes from evilbay. Stripping the alternator was no problem, hardest part was removing the brushes as they are soldered in but I figured it out. The slip ring needed replacing but I didnt bother. Reassembled and installed alternator, test, 12.5V bugger Thought I'd wait another day for the brushes to wear in. 2nd test= 14.5V! total cost $20 and about 2hrs my time excellent.... glad it helped. |
|||
| Top | |
|||
| Disco Frank |
|
|||
|
i did is IIRC lol
{USERNAME} wrote: {USERNAME} wrote: LOL i thought this was common knowledge scotty used to do this before he passed best part as well teh au alt is 120amp and most e series are 90 iirc Are you sure about those numbers? My reading has the following: ea-ed : 80 amp EF : 110amp EL : 100amp AU : 110amp BA : 110amp BF : 120amp
_________________ RIP SCOTT |
|||
| Top | |
|||
| elongas12 |
|
||
|
Cool I bought a second hand mitsubishi alternator and a bosch for my EL but I think refurbing the
original with a combination of new and old parts sounds good (as the 2nd hand mitsi is already on the vehicle). |
||
| Top | |
||
| hans hartman |
|
||
|
nice work and nice links,i had my spare starter and alternator done by a work shop in there spare time,about a week $100 bucks for both.then swaped the units and done it again,so spare units.
_________________ R.I.P HANS HARTMAN |
||
| Top | |
||
| danyool1 |
|
|||
|
{USERNAME} wrote: Hi all, Thought this might help someone sometime. I picked up an AU alternator for 20 bucks recently but needed an EL one. Making the AU one fit an EL would have been a nightmare as they have no mount points in common. While I was investigating, I noticed that the mount points aside, the alternators looked otherwise identical. (internal layout I mean.) I decided that I'd try to swap the internals over and put the good AU internals into the shell of an EL alternator that had died. I was curious and figured that at worst I'd have wasted 20 bucks. Turns out it's really really easy. So I took lots of photos as I'll be replacing bushes and stuff myself in future rather than continuously buying replacements. In all 5 of my dead alternators, not one of has any bearing slack, so I don't think it's necessary to replace the bearings as they are sealed units and generally seem to long outlast the alternator. Some pics: AU alternator with the pulley off: EL alternator with the pulley off: (as you can see not much in common as far as mount points go) Turns out getting the pulley off was the hardest bit, and that turned out to be much easier than I expected. I stuck the biggest allen key I could fit into one of the 4 round holes on the front of the alternator between two of the rotors (to stop the internals spinning) they are solid metal so as long as you don't go to far in.. there is no issue. Then I put a socket on the nut and whacked the ratchet with a hammer once, the nuts came loose and the pulley falls off. Piece of cake. Next take the four 10 mill bolts off the front face of the alternator and the nut off the back where the positive output is and with some gentle tapping, the alternator splits in two. EL alternator apart: Here is the EL and AU stator/regulator/rectifier assembly side by side, hard to tell them apart isn't it? The B+ output bolt is thinner on the AU unit. At this point changing the brushes involves removing a small plastic cover and soldering in two new single wire brushes.. easy peasy. Here is a look from the other side. In the middle you can see the brushes sticking into the round area. To the left is the rectifier and to the right is the regulator. (the yellow area) It all comes out of there with just 3 phillips screws you can see in the pic. All of those bits can be separated and all can be replaced from ebay fairly cheaply if needed.So you fix/replace what is needed and then it's time for assembly. First thing I did was slide the AU rotor into the EL front housing all ready to go. It wasn't necessary, but I put the AU bearing into the EL housing just because it was newer, but neither had any noticeable signs of wear. The front bearing is lightly pressed into the housing (couple of gentle taps popped it out) and it has a square plate and 4 screws holding it into the housing. You don't need to remove them if there is nothing wrong with the bearing. (you can see the square plate and the four screws in the third photo from the top (the first disassembled photo) Assembly of the rear is a little bit tricker as you can't just slide the rotor back in as it will hit the brushes and stop dead. No problem, they have allowed for that too. In this next photo you can see a small allen key has been slid into a hole on the back of the alternator.. it's directly in front of the brushes inside.. so all you do is use a piece of stiff wire with a 1/2 inch bend in the end, to push the spring loaded brushes into their housing and then slide the allen key in.. once it's in front of both brushes, it holds them inside their housings and out of the way of the rotor bearing. and you can then slide the rotor into the back case. In this one, you can see the brushes are being held right out of the way of the rotor bearing/shaft. At that point you just slide the front and back halves together and gently tap them till it seats nicely. Put the 4 10mm bolts back in and the pulley back on. once it's completely together, you can pull the little allen key that's holding the brushes back out and they will slide out and contact the rotor contacts again. externally, what you have then should now look like this: An EL alternator with entirely AU internals. (and an extra 10 amps capacity, better cooling and whatever else they fixed/improved when crafting the AU unit) I then promptly put it in my car: Hooked it up to a multimeter and fired up the car. 14.3 volts.. with no load except a fairly flat battery... pretty much perfect!. Had I known how easy these things come apart, I would have bought new brushes.. but as it stands now, I'm going to buy a bunch and fix my other alternators for spares. (except the ones with dead regulators/rectifiers as I don't need that many spare alternators) Hope this helps someone.. If I can do this in 45 minutes with no schematic to work from and with no previous alternator experience other than fitting them... it can't be that hard. In retrospect, the AU alternator I picked up wasn't in fantastic shape, it could have benefited from a new slip ring like this one (it is the contacts on the rotor that the brushes touch.. in my alternator one of the contacts was worn): {DESCRIPTION} or some alternator brushes: {DESCRIPTION} Some other things I've discovered. 1. This will also work with BA alternators, as long as they are Mitsubishi units and not the 120 amp Bosch ones. The BA units don't need a sense wire, but apart from that they are pretty much the same. The BF and later units will NOT work as they use a modulated pulse from the cars ECU and our cars don't have that. Lastly, if you do want to replace the regulator/rectifier or brushes (all of which are on ebay) you will need to be able to solder.. not a huge amount of soldering, but there is a few wires here and there. I was only swapping stuff over here so I didn't need to solder anything. If reading the above makes it all seem hard, I've done a bad job writing it up because it really wasn't. OR YOU COULD LINISH THE OLD SLIP RINGS WITH SOME EMERY PAPER INSTEAD OF BUYING NEW ONES WELL DONE ANYWAYS |
|||
| Top | |
|||
| frankieh |
|
|||
|
{USERNAME} wrote: OR YOU COULD LINISH THE OLD SLIP RINGS WITH SOME EMERY PAPER INSTEAD OF BUYING NEW ONES WELL DONE ANYWAYS Normally yes.. but in my case, the wear was bad enough that I'm surprised that its lasted as long as it has. There wasn't enough material left on one of the contacts that it would have been very close to worn though. (the alternator was full of old transmission oil and dirt from the AU it was out of when I got it.. the two mixed together and became much like grinding paste). I have a couple of rebuilt spares so I've been waiting till this dies before popping one in.. but the thing just keeps working.... I put a heat shield around it when I swapped it out to stop my extractors cooking the back and to stop any oil from running down onto it.. (and this engine doesn't leak which helps) so the wear conditions have been minimized I guess. |
|||
| Top | |
|||
| Fetus Pie |
|
||
|
Any differences on the 6 compared to the 8 alts for an EF/EL you reckon? Cause I've got an 8 one that's gone kaput, but a handful of 6 alts in good nick.
Might have to crack em open and have a squiz! |
||
| Top | |
||
| Who is online |
|---|
Users browsing this forum: No registered users and 0 guests |


