|
| SECTION25 |
|
|||
|
Has anyone done this?
Would love to see pics! Cheers
_________________ Wanted - boot floor and lining for sedan - cheap - Syd-Central Coast |
|||
| Top | |
|||
| fordfreak ef |
|
|||
|
i havent..although the thought has crossed my mind retro fitting them into my EF Fairmont head lights... although i dont know anyone who has baught the plans to buil your own off ebay..
|
|||
| Top | |
|||
| bArNsY |
|
|||
|
there is a write up on how to build them on Fordforums
http://fordforums.com.au/showthread.php?t=72907
_________________ FG G6E Turbo |
|||
| Top | |
|||
| twr7cx |
|
|||
|
Dang, thats pretty cool.
But there's no way I'm going to pull apart my XR lights - there way to expensive these days. For those without an FF.com.au account: [QUOTE=mavs19]Parts needed: A length of FlickStick = Clear Acrylic/Plastic Rod used for opening and closing window blinds/curtains etc. (Found at Spotlight or any Curtain retailer). Diameter approx. 8mm. Length varies from approx. 60cm to 125cm. Cost: for a 100cm APPROX. $4.99. Ooooooh, now I have to live on strict budget again. 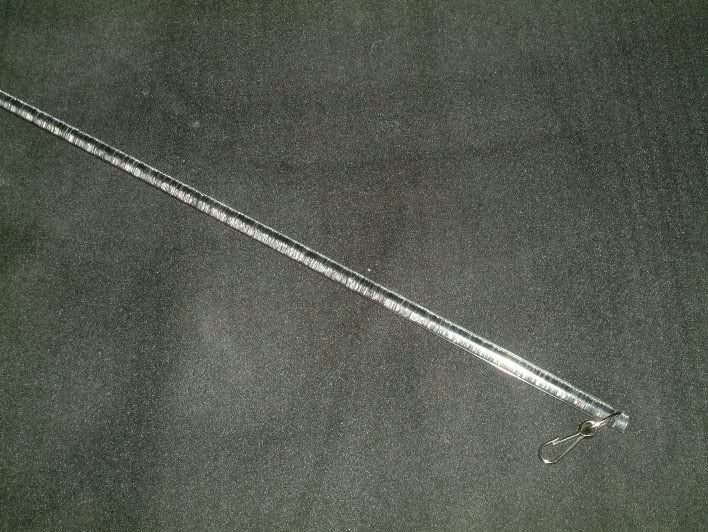
A Dremel. 2 x WHITE or BLUE, 5mm, LEDs. From 2 - 8000mcd (for each ring) 1 x Resistors 220 - 420 ohms. Depending on how strong you want the light to be. 1 x Oven. Usual tools and some. 1- Cutting the correct length. We need to create a circular ring out of the rod. In order to determine the circumference of the circle, measure the diameter of your either Hi or Lo beam reflector. That is if you want to have Halo Rings around both of the reflectors. In this case it comes out to be 10cm (or 5cm radius). Using the circular formula (C=2ðr, where ð=3.14), cut the rod about 32cm long. If math is not your thing. Take a string or shoe lace, lay it carefully around the edge of the location you want to mount the Angel Eye. Mark the ends and use the bit you marked to cut the lengt you need. 2- let’s get the rod to light up. In order to make the ring to lights up like the true 'Angel Eye', you need to refract the light as it goes through the rod by making multiple cuts along the rod. 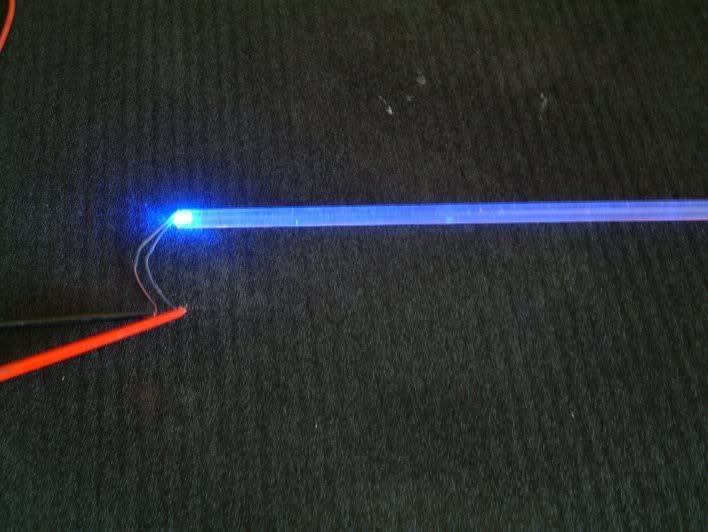
As you see from the picture there is not much light being reflected. Use a Dremel and cut groves in the rod. Each cut/groove allows the light to 'escape' the ring. Each cut should be about 2~3mm apart and 1mm deep. This will make your ring look like a continuous band of light. DO NOT CUT ALL THE WAY THROUGH THE RING. To get the cuts look perfect, use masking tape and draw a line every 2-3mm. Stick the masking tape to the rod and cut along each line to a depth of 1mm. 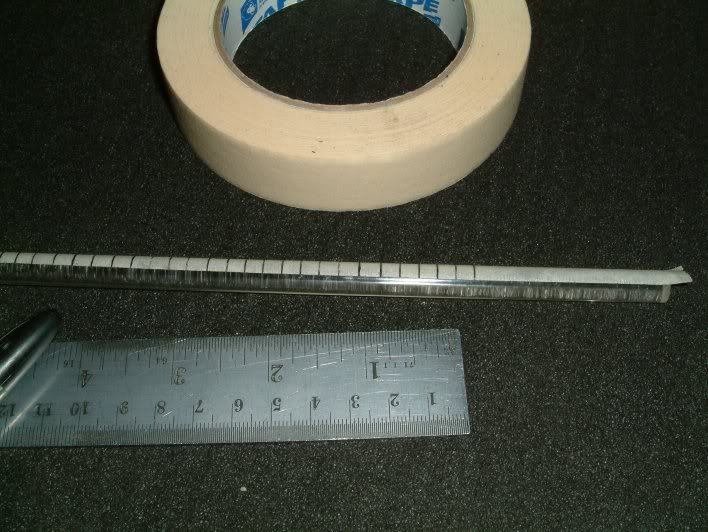
Don't make the cuts too close to one another. You only need to make the cuts along one sided of the rod. Make sure that the cuts are evenly space out. It will take about a few minute to do the cuts using a Dremel. 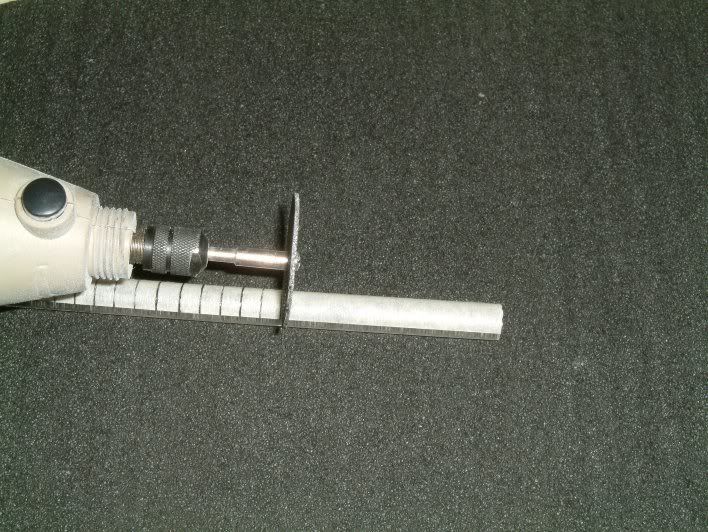
If you don't have a Dremel, you can use a small saw, but then will take you a bit longer to do the job. 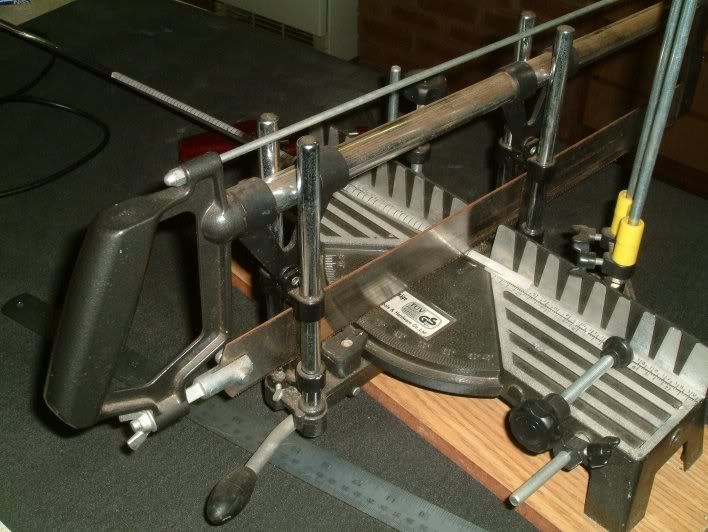
Here is few cuts. 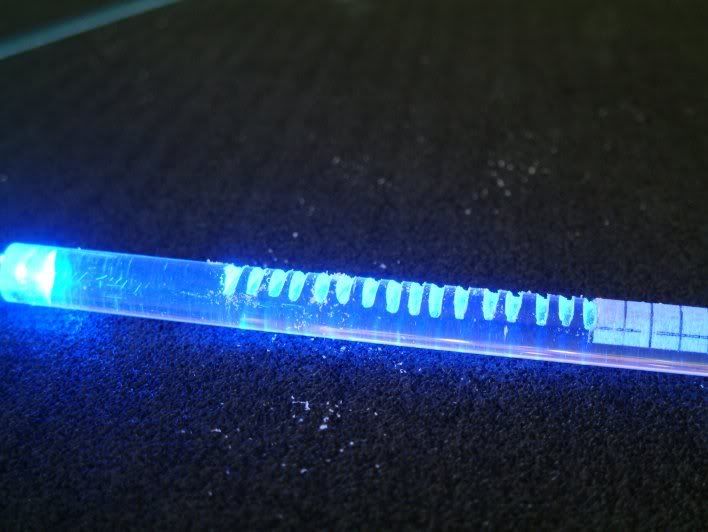
Use a saw blade and even out the cuts so they are all starting and ending at the same place of the rod. If you have access to an air compressor, blow the shaving off the rod. If not a brush would do. To see the final effect these cuts have, turn the rod upside down, so the cuts are on the bottom side of the rod. 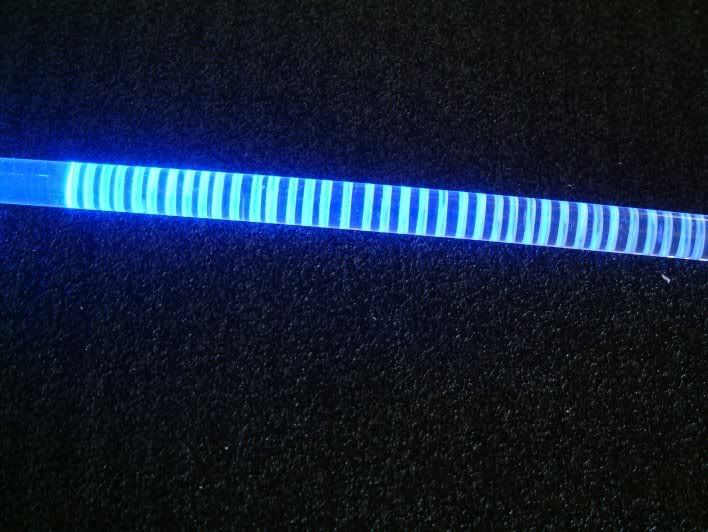
Now you can see how the cuts refract the light and how the rod hides any imperfection in the cuts.(Remember this is only an example to show you how. I know the cuts are not exactly perfect….(. 3- Making a ring. Now, find an aluminium can or a glass jar (let’s call it a Peanut Jar) that has about the same diameter as the ring you want to make. Heat up the oven to 150°C. When the oven is 150°C, turn it off. Place the rod on an aluminium tray and then leave it inside the oven for 10 minutes. Put on a pair of oven mitts or gloves and take the rod out. Hold the two ends of the now VERY bendable rod with your fingers and wrap the rod around the peanut jar lid and hold it for few seconds. 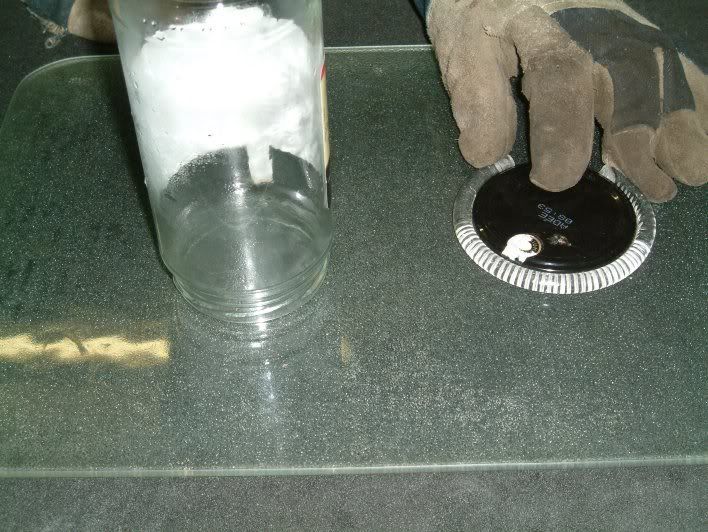
MAKING SURE THAT THE CUTS ARE EITHER FACING UP OR DOWN (not sideways towards or from the jar). In the above picture they are facing down. The rod will harden within 30 seconds or so. If you did not succeed to make a perfect circle, repeat putting the rod in the oven and warm it up etc….. one more time. Now you should have a nice circle. With the cuts facing up or down. 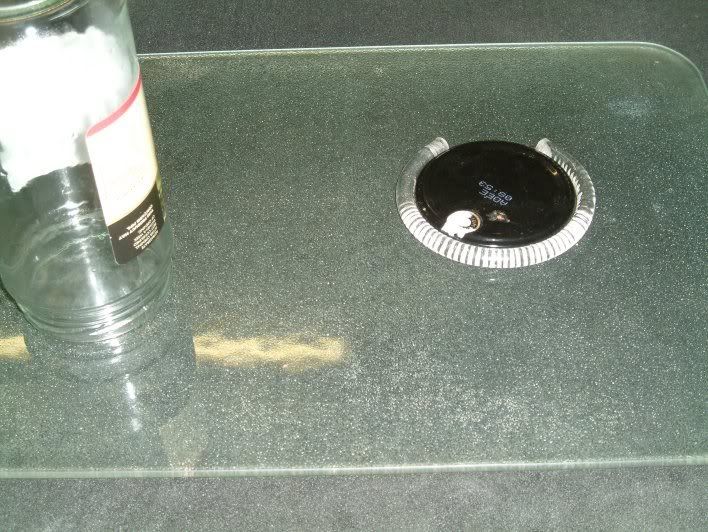
There is your ring. 4- The LED Attach the resistor to the positive terminal of LED bulb, which is the longer of the 2 terminal leg. Attach a wire to the LED first, and then attached the resistor at the end of the wire on the positive terminal. This will give you flexibility because the resistor will be outside your headlight unit and you can change it if you have a need to do so later, like changing to a lower resistor to make your Angel Eye brighter. 5- Securing LED Bulbs Inside Angle Eye Rings To secure the LED bulbs into the rings, drill a hole in both ends of the ring, 5mm wide and 5mm deep. 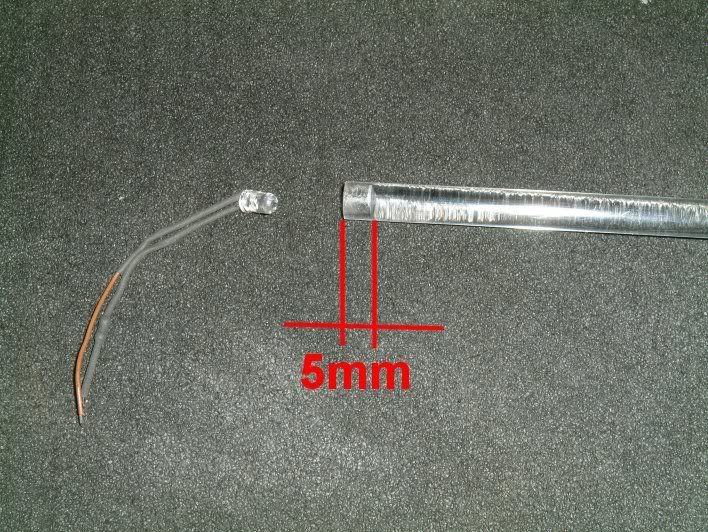
Parallel connect two LEDs for the both ends of the ring together. After soldering a 25cm long wires to the positive and negative legs of the LED bulbs, wrap black electrical tape around or use some shrink wrap on the exposed part of the legs and the wires to keep them apart. Attach the resistor to the end of the wire later on and connect the wire to the parking light. Make sure you connect the correct wire to 12V+ and earth. Next, insert the LEDs inside the holes of the ring, and either wrap black electrical tape around them or use a drop of Superglue to fix the LEDs to the holes you made in the end of the ring. DO NOT paint the rod, specially in black. The black paint will absorb the light and will make your angel ring look dim. If you plan to wrap the black tape around the uncut/unused part of the ring, make sure you wrap some aluminium foil around them first before wrapping the black tape. The aluminium foil will reflect the escaping light back into the ring, making the ring brighter. 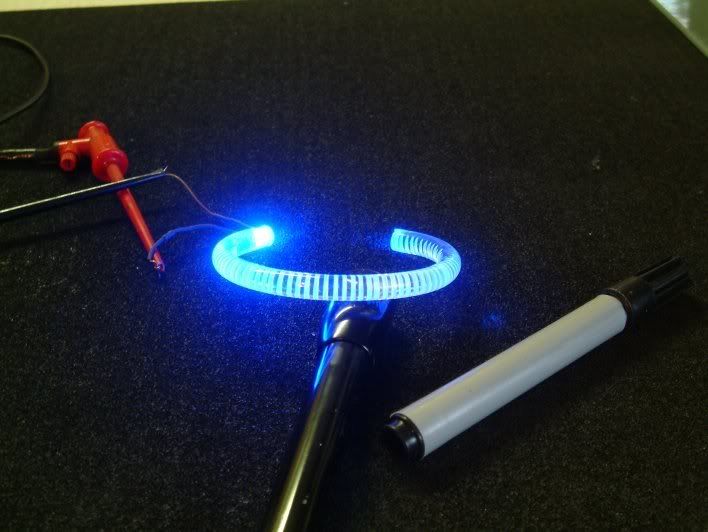
This is how it looks with ONLY one LED. 6- Securing the Halo Ring to the reflector Use either JB Weld or Loctite 406 Super glue to glue the Angel Eye rings to the headlight housings trim or the reflector edge or if you got a bezel. i.e. a suitable place. Apply only a very small amount of glue to the un-scratch/un-cut part of the ring. The inner black frame acts as a barrier and helps protect the Angel Eyes from the heat coming from the reflector housing. MAKE SURE THAT THE CUTS ARE FACING DOWN or ARE AT THE BACKSIDE FACING THE TRIM/REFLECTOR EDGE etc., WHEN GLUING THE RING. Before reassembling the headlight lens to it’s housing, test that everything works OK. If everything is OK, reassemble your headlight lens to it’s housing. Permanently connect the LED wires to 12V+ and earth of your Parking lights. Enjoy your Angel Eyes. :toocool:[/QUOTE] [QUOTE=mavs19]Here they are (That is a BA headlight). 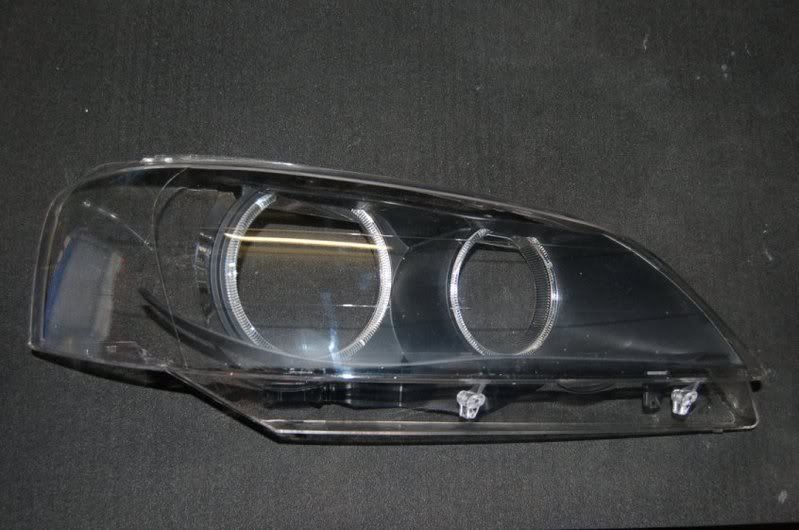
NEVER try to attach them to the reflector bracket. Always try to mount your Angel Eyes on the edge of the headlight trim or make provisions so they can be mounted somewhere on the trim, either inside the cylindrical tunnel or just on the outside of it..[/QUOTE] [QUOTE=mavs19]OK, here it is. The BA headlights with Angel Eyes and Angel Eyebrow. This is a "transplant" of a complete Bi-Xenon headlight internals from a BMW 540 into a Ford Falcon Ba/BF housing. The only thing I did not transplant on this unit is the AFS system. I retrod the AFS on another BA headlight last year. I designed and manufactured all the necessary bits and pieces to get the Bi-Xenon projectors move in all directions with changes in height and movements of the steering wheel. It has been working perfectly since then. The major problem with headlight assys used in Australia (specially the ones made by Hella) is the poor material they use. Which makes the reflector bracket extremely brittle. Then there is the chrome which is completely worthless. The thickness of the chrome used by Hella in Australia is a fraction of what Hella uses in their European headlights. I, either replace the reflector brackets with a proper one or usually manufacture my own. I mean after all the work, time, money and effort you put in a retro, you want it to last for more than the first bump or 2 on the road…… 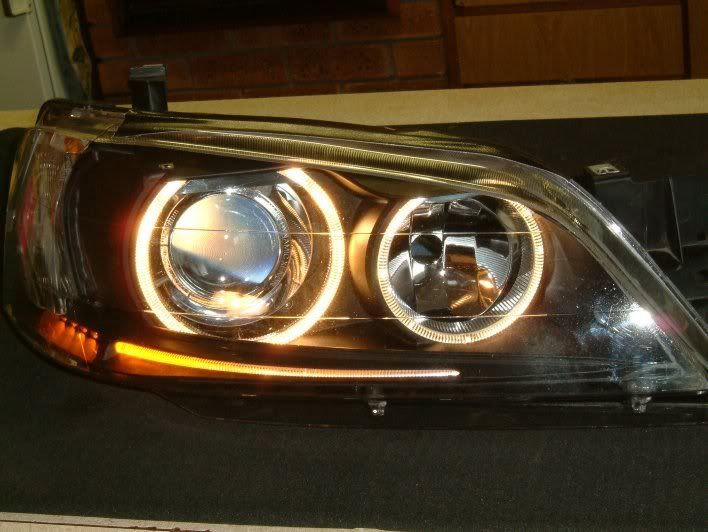 [/QUOTE] [/QUOTE]
[QUOTE=mavs19]You need to remove or at least open the sides of the front bar (one side at a time) to remove the headlights. I am sure there are some posts on this forum showing how to remove the front bar. Then you need to open the headlight. 2 proper ways to do it. One is that you preheat an oven to 125-150 degrees. Turn the oven off, and place the headlight on a tray inside the oven for about 7 minutes. Have a pair of gloves or oven mitts and a pair of screw drivers. Start from the pointy end of the headlight. Use the screw driver and undo the tabs holding the lens in the housing. Then carefully put one screw driver on each side of the pointy end of the headlight under the lens and push the lens out. 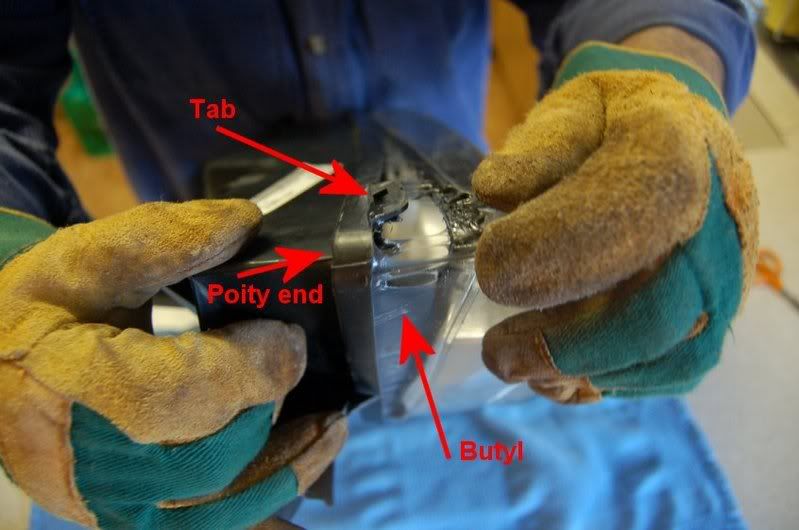
Have a Stanley knife or a scissors and cut the butyl (black gooey stuff) that holds the lens in place. Make sure that none of it comes in contact with any parts inside the headlight. 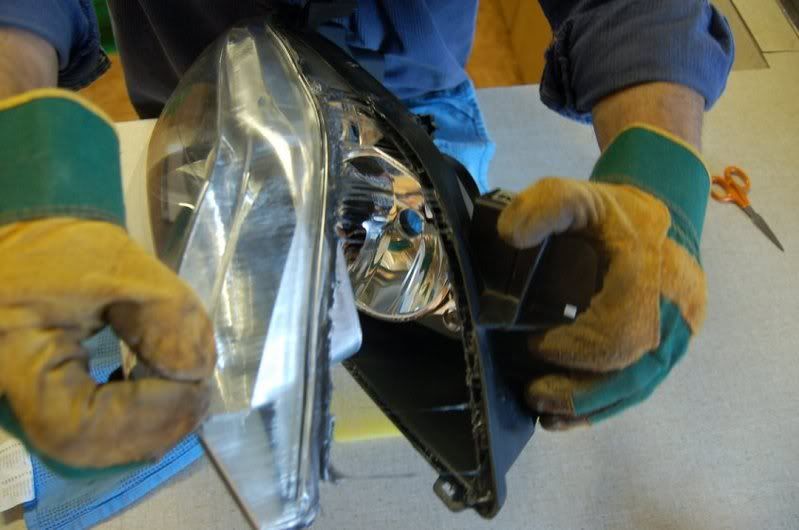
Remove any butyl that you can see, well as much as possible from both the lens and the headlight housing track. 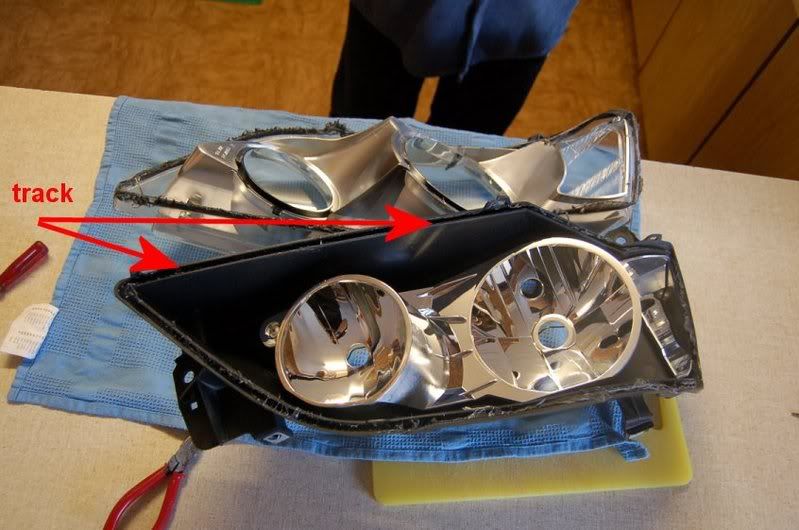
The other way is to use 1 or 2 heat guns and carefully heat the edges between the lens and headlight housing. It is easier if you use 2 heat guns and there are 2 people doing the job. What ever you do, DO NOT TOUCH any chromed surface inside the headlight. Make your Angel Eyes. Attach them to either the opening of the front trim or if possible to the edge of the reflectors. BE CAREFULL DO NOT touch the chromed surface. Either, roll the butyl you saved into a thin and long strip, approx. 2-3mm thick. for reuse or buy a Black Sikaflex for Auto use to reseal the headlight. If you are reusing the butyl you saved and make sure that it covers the entire length of the track properly. Pre heat the oven again. Place the butyl in the track on the headlight housing. Place the housing in the oven for same amount of time. Take the housing out and push the lens properly in the track. To make sure that it is water tight. Push the headlight lens (LENS DOWN) in some water and see if it is tight or not. If not, remove the water and add some more sealant. If using Sikaflex. You don't need to heat the headlight housing in the oven.[/QUOTE] |
|||
| Top | |
|||
| WAGHOON |
|
||
|
I have, put twin angel eyes in my EF falcon head lights about 3 months ago
|
||
| Top | |
||
| twr7cx |
|
|||
|
tried adjusting the settings on the camera? maybe take it from a different angel or in different lighting conditions?
|
|||
| Top | |
|||
| phongus |
|
|||
|
They had an argument on AFF about the legalities of this modification.
I think in the end they said it is illegal if it is any other colour but white...but I am unsure of that. phong =P~
_________________ phongus = Post whore 2006 |
|||
| Top | |
|||
| fordfreak ef |
|
|||
|
{USERNAME} wrote: They had an argument on AFF about the legalities of this modification. similair to the clear ef/el tail light legalities debates that often rage here occasionally.... I think in the end they said it is illegal if it is any other colour but white...but I am unsure of that. phong =P~ |
|||
| Top | |
|||
| twr7cx |
|
|||
|
{USERNAME} wrote: They had an argument on AFF about the legalities of this modification.
I think in the end they said it is illegal if it is any other colour but white...but I am unsure of that. Would also depend when you use it. If only used when your on private roads it could be any colour you like. But if you want to drive around with it you'd be needing them to be white. |
|||
| Top | |
|||
| phongus |
|
|||
|
{USERNAME} wrote: {USERNAME} wrote: They had an argument on AFF about the legalities of this modification. I think in the end they said it is illegal if it is any other colour but white...but I am unsure of that. Would also depend when you use it. If only used when your on private roads it could be any colour you like. But if you want to drive around with it you'd be needing them to be white. yeah...I'd want to use them as parkers...so wouldn't be driving around heaps with parkers on. phong =P~
_________________ phongus = Post whore 2006 |
|||
| Top | |
|||
| twr7cx |
|
|||
|
{USERNAME} wrote: {USERNAME} wrote: {USERNAME} wrote: They had an argument on AFF about the legalities of this modification. I think in the end they said it is illegal if it is any other colour but white...but I am unsure of that. Would also depend when you use it. If only used when your on private roads it could be any colour you like. But if you want to drive around with it you'd be needing them to be white. yeah...I'd want to use them as parkers...so wouldn't be driving around heaps with parkers on. phong =P~ Park lights are always one when your lights are on. |
|||
| Top | |
|||
| phongus |
|
|||
|
{USERNAME} wrote: {USERNAME} wrote: {USERNAME} wrote: {USERNAME} wrote: They had an argument on AFF about the legalities of this modification. I think in the end they said it is illegal if it is any other colour but white...but I am unsure of that. Would also depend when you use it. If only used when your on private roads it could be any colour you like. But if you want to drive around with it you'd be needing them to be white. yeah...I'd want to use them as parkers...so wouldn't be driving around heaps with parkers on. phong =P~ Park lights are always one when your lights are on. but I doubt you can tell that there are angel eyes underneath it with all the bright light coming out... phong =P~
_________________ phongus = Post whore 2006 |
|||
| Top | |
|||
| WAGHOON |
|
||
|
I hooked mine up to my parks and even with the headlights on you can still sort of see em. I have to say though the light just from the angel eyes is so clean and white
|
||
| Top | |
||
| fpvf250 |
|
||
|
Could you use electroluminescent wire (ebay??) because its very flexable instead cutting up plastic?
|
||
| Top | |
||
| Who is online |
|---|
Users browsing this forum: No registered users and 0 guests |


