|
| frankieh |
|
|||
|
Hi all,
------------------------------------------------------------ EDIT: This thread is a continuation of this thread: {DESCRIPTION} I did not know that changing the subject mid thread would split it in two. live and learn. ------------------------------------------------------------- only really get one day to work on it a week so progress is slowish. Here is the charger sitting in it's mounting plate, which is bolted to the block. 
This second one shows one of the tabs on the bracket bolted to the block. 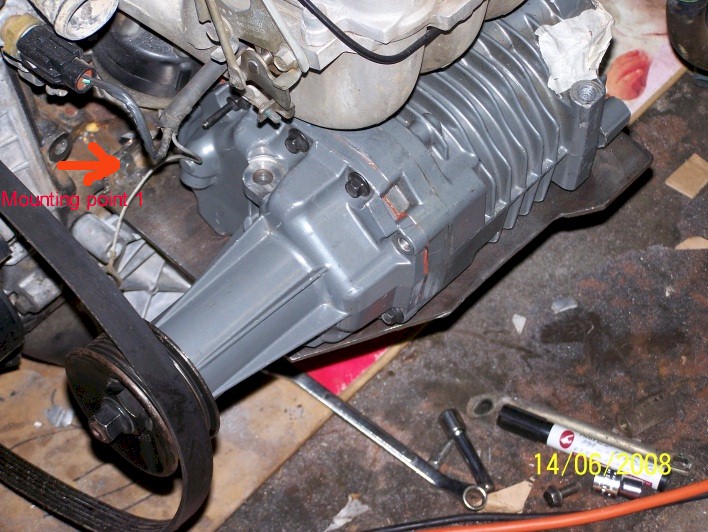
This next photo is from underneath and shows mounting point to the block 2. (one of the engine mount bolts) It also shows mounting point 3 also, but at this stage I had not welded a tab onto it.. I have since down this. (there are only 3 bolts on the compressor, the 4th is not used, and runs right though into the block.. so I'm using that as an under bracket mounting point. 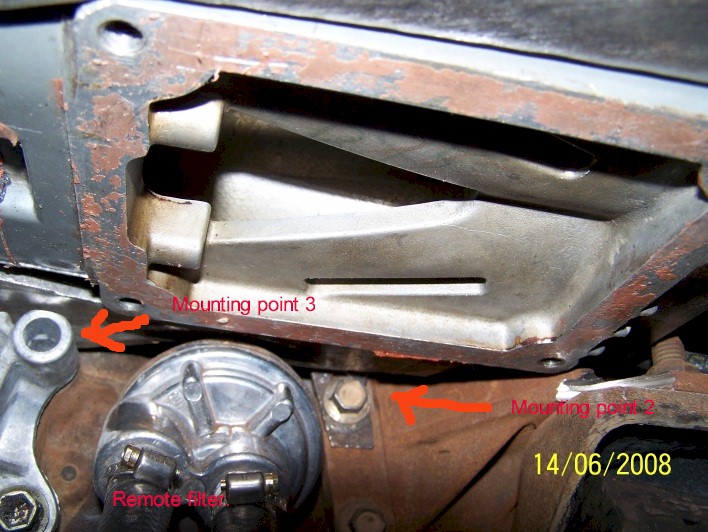
This next one is just a closer view of the front of the bracket, you can see how I've cut into the top of the EA air con bracket to set the charger bracket down low enough. You can also see the front bolt holding the bracket to the block a bit better. 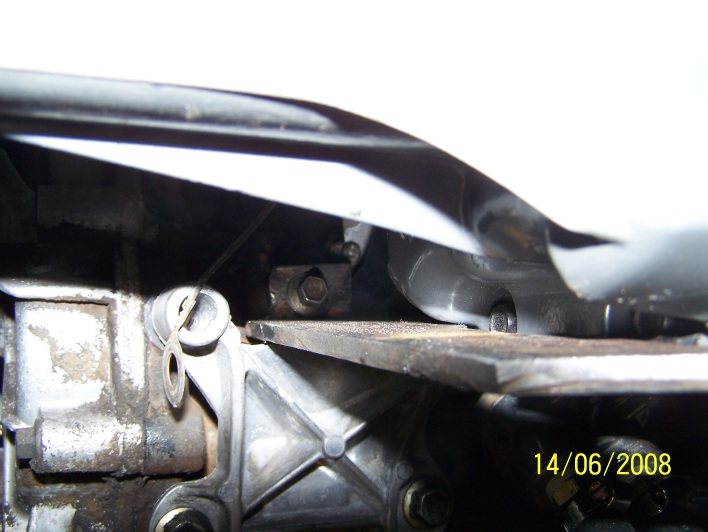
Still going on this post.. just a mid flight save so I can't lose it if the machine crashes............... Just in case anyone else follows in my foot steps.. here are the various mounting points on the block with nothing else in the way. 
Here we have the bracket drilled for the charger, with the bottom mounting lug welded on, and bolted to the charger. The discolored area up the top is because I had to weld the front charger bold to the bracket, as there is not enough room between the bracket and the compressor for the head of a bolt.. So the hole I drilled in the bracket was tapered so the bottom was bigger, and I ground the head of the bolt the same way... so it fit in snug and couldn't pull though.. then I turned the stick welder to full power and sank beads right into the hole area top and bottom.. that puppy aint never coming out. 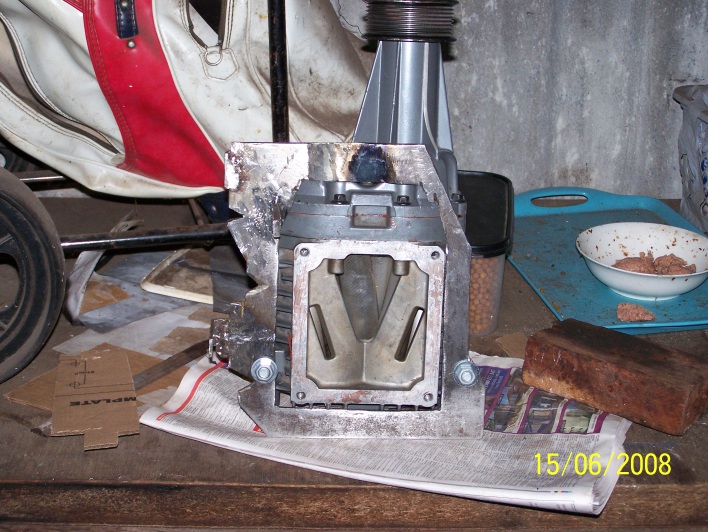
Here is a view from the front.. with the cut down spacers that used to mount the air compressor bracket before I used the EA bracket. (using these to space the mount points on the M90 to the bracket plate.) 
The bracket is now finished, and has been primed and painted black. These photos are so people can see the size of the bracket.. the ruler is exactly 25cm long. (I should add that the odd shape of the inside of the bracket with all the cutouts are to get around supporting ribs on the engine block and the top of the oil filter bracket.) Width (approx 25cm if mounting tab included.) 
Length (approx 27cm) 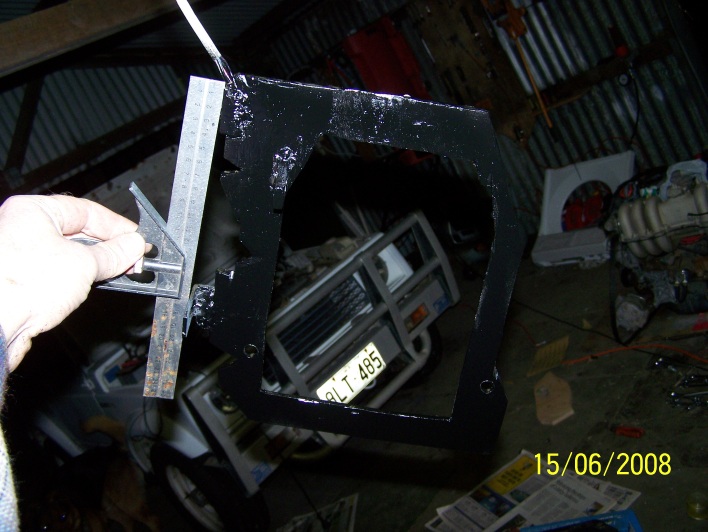
Lastly is a photo of the top of the bracket showing the front mounting bolt sticking out and the two inside edge mounting points. 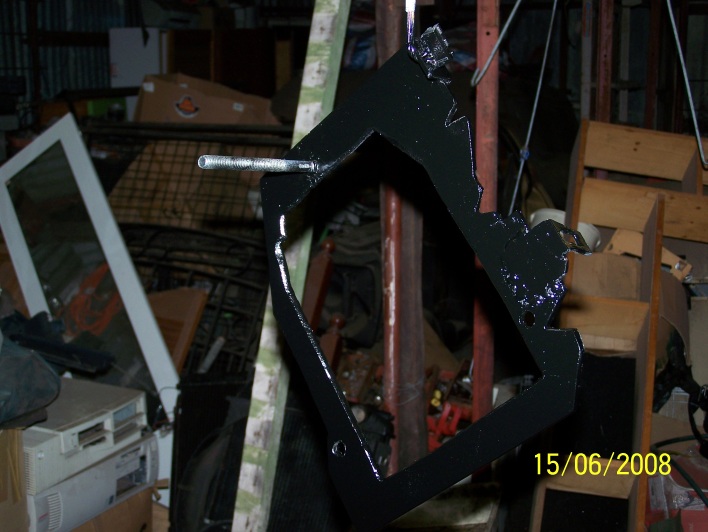
The paint is still drying, and I've trial fitted it so many times today I know it's perfect, that the next time it goes on the motor.. it'll be staying there.. Before that can happen, I want to replace the dizzy cap and button and run the wires for the remote TFI.. Then it all goes in for good. (I hope) All this took about 6 hours.. (things would go much quicker if I always had the tools I needed rather than having to improvise. The charger fits in really really snug.. I'm going to put a strap down from the intake manifold, to the outside bolt on the charger, down to the bottom air compressor... not because I have to, but because I'm of a mind that you can't have to much bracing. Almost forgot.. I think I've figured out how to do the belt as well.. I had it jury rigged today and it looked really good and gave very good wrap on the charger pulley... might turn out easier than I expected. anyway.. it's now 10pm and I'm knackered.. have a good week all. rgds Frank Last edited by frankieh on Sun Sep 14, 2008 4:23 pm, edited 9 times in total. |
|||
| Top | |
|||
| FLASH |
|
|||
|
good work mate, keep us all posted. I know what its like having one day a week; hence my sixth month build
_________________ FALCAHOLIC |
|||
| Top | |
|||
| Disco Frank |
|
|||
|
nice work
have u thought about doing the air intake/xhaust side of things with it out of the car?
_________________ RIP SCOTT |
|||
| Top | |
|||
| frankieh |
|
|||
|
yes, but the ED engine is still in the car atm...
I'll probably put the intercooler in next weekend and see how it goes then... I plan to run pipe from the outlet on the charger to the drivers side intercooler port, and from the passanger side port up beside the air box and around to the intake.. that way I can make it look factory.. will see though. |
|||
| Top | |
|||
| Froudey |
|
||
|
hmm so no a/c then.
_________________ R.I.P Tobias my son. |
||
| Top | |
||
| frankieh |
|
|||
|
huh? yeah it has air con..
The air con uses the front top bolt and the bottom two on the EA bracket.. the top rear one is not used, so I'm using it as it runs right though into the block. air con fits perfectly, I just left it out in these photos so you could see how the bracket bolts up. If I get time this week after work, I'll bolt it all in and take a photo. |
|||
| Top | |
|||
| lownslow |
|
||
|
nice work mate ill be supercharging my 83 xe falcon soon and i found your article very informative
_________________ 0-100 in afew mins
|
||
| Top | |
||
| boosted22 |
|
||
|
looking good mate
|
||
| Top | |
||
| frankieh |
|
|||
|
Hi all...
The supercharger is now bolted in so solidly on my custom bracket that I picked up the front of the engine using the snout of the charger without a mmm of movement.. and the only parts of the engine that required any mods to do it were a bolt tab on the bottom of the intake manifold and the top of the EA air con bracket. (both of which were ground off) Here are a couple of photos.. the flash has made the little bit of surface rust really show up. (EL engines were not painted so ford could save money) It's not actually very rusty.. I was very surprised when I saw the photos. Front shot. Side front shot. I've also worked out how I'm doing the belt arrangement, but I'll get to that abit later. First question. This is the existing EL fuel regulator: It appears to be bolted over the end of the fuel rail.. This however, is the new fuel reg I want to put in: It is designed to have the fuel inlet flow though the pipe connectors and the drain back line hooked to the bottom. 1. How do I take off the old reg, and attach the new one where it was?? Only thing I can think of is to leave the old one in place, but hollow it out so its just a pipe adapter... but figured I'd see what other people have done. Next question. The standard belt is only 8 inches to short for my needs... Rather than order in a custom belt from the US.. I'd rather have one that can be gotten in a hurry if it lets go. 2. What other cars sold in Australia used a Serpentine belt arrangement? I'd like to see if I can find one 6 inches longer than the standard one in AU off the shelf. I will probably get a better one from the US anyway, but I'd not like to rely on hard to get or expensive bits if possible. The intercooler... I have to make this: Fit in here: Now the mechanics of that are not that hard, I've done some measurements and it will fit. The problem is the air con stuff. 3. Has anyone else put an intercooler in there on an EA-ED and kept their air con working? I need to move the tube thing and it's piping in front of the radiator as the intercooler will be where it is.. Where and how (piping) did you move it? When I put the EL front end on down the track, I'll have much more room, but for now it will be a squeeze and the air con stuff has to move over for the cooler to fit in there. Any suggestions? rgds Frank Last edited by frankieh on Mon Jun 23, 2008 12:34 am, edited 1 time in total. |
|||
| Top | |
|||
| mitchg911 |
|
|||
|
good work.. for the belt just goto a parts store and ask for 1 that is 6 inches longer.
i believe you should be able to order almost any length in 25mm incriments. the rarer sizes will be dearer obviously.. good work on the bracketry looks very neat
_________________ BF XR6T 6spd Auto. 60lb injectors, Hybrid Cooler, Custom Piping, Custom Surge Tank, Actuator. |
|||
| Top | |
|||
| badcooky |
|
||
|
Well done.
_________________ BA XL ute. |
||
| Top | |
||
| Disco Frank |
|
|||
|
nice work on the charger dude
with re grads to aircon i cant see a problem with getting new pipes made up to relocate it all off to the side u will need to speak to a aircon place about this btw thats a dirty big cooler
_________________ RIP SCOTT |
|||
| Top | |
|||
| frankieh |
|
|||
|
Yeah, the intercooler is huge.. 660x300x100 it's much heavier than I expected actually.. should do a good job I think.
Biggest one I could find.. got it for $225 shipped including the rising rate fuel reg. pretty stoked with that actually. |
|||
| Top | |
|||
| Paulmac |
|
||
|
Frank,
Have a good look at where an EF-EL aircon receiver drier is located. I checked on one of mine and I think you could relocate the R/D using stock EF-EL lines, even from the TX valve, without too many dramas. Not a big demand for them at the wreckers so they shouldn't be too pricey. As for the fuel reg, try unscrewing the brass spear fittings and getting threaded gas ones to fit so you can screw on the Ford hoses. You can locate the regulator wherever its convenient, it's easier to lengthen the fuel hoses, if required, with pieces of metal fuel line, by cutting the flexible hose near the chassis rail end and inserting same. Mac
_________________ What goes around, comes around. |
||
| Top | |
||
| frankieh |
|
|||
|
Sweet... so EF/EL gear is the go.. might grab the whole lot and use it.. I already have the EL compressor, might as well use EL stuff for the rest (but gonna have to figure out what to do about the in dash stuff cos I'm not pulling my dash out.. not as keen as BenJ and co to do that.. loath pulling dashes out.
I'll work something out.. where does the EF/EL have its drier ? |
|||
| Top | |
|||
| Who is online |
|---|
Users browsing this forum: No registered users and 14 guests |