|
| phongus |
|
|||
|
{USERNAME} wrote: Buy a second hand rocker assembly and get the good rockers and replace the broken ones.
Think i bought the rockers for $80. All the rockers worked good so i swaped it for the ones in my car. That was my option, but i thought I'd get a price on a brand spanking new one...I guess I'll just get a second hand one or use the one that is in my current engine. Either way, I'll need the rocker assembly phong =P~
_________________ phongus = Post whore 2006 |
|||
| Top | |
|||
| phongus |
|
|||
|
Okay...I nearly have all the parts needed to complete this headgasket change. All i need is a second hand rocker assembly and get maintenance staff at work to change the water pump pulley over from the old to the new.
I've tried cleaning the piston tops but they are pretty much caked on...no harm in just leaving them the way they are with one piston super clean, another half clean and the rest with a nice layer of carbon build up? I have the metal AU head gasket, do I need to put any gasket glue/maker thingy on it before I tighten all things up? Was told no need for any glue on the AU gasket...would be greatly appreciated if someone could confirm this thanks Will have pics along the way. phong =P~
_________________ phongus = Post whore 2006 |
|||
| Top | |
|||
| shnoza |
|
|||
|
It should be alright if there is some carbon build up on the piston.
I didnt use any glue for the head gasket. The way i see it is that it gets compressed so there is no need for the glue. But everyone to there own.
_________________ "Chuck Norris does not sleep. He waits."
|
|||
| Top | |
|||
| macxr8 |
|
||
Age: 57 Posts: 451 Joined: 3rd Jan 2005 Ride: AU XR6 with BF Turbo engine Location: Sydney |
you should never use any glue on a head gasket unless the manufacturer says its ok.
_________________ RIP |
||
| Top | |
||
| xfpaul |
|
||
|
if ya using metel gasket buy the proper copper cote its a type spray paint , it seals the gasket while you are still assembling the engine and keeps water where its ment to be until ya get it started , get it hot and retention the head bolts
_________________ NC2 Fairlane AU2 Intech 4.0 Wolf V500 ECU Accel 500cc Injectors Eaton M90 Blower MPx Porting 75mm Mustang TB Intercooler Holley 255lph EL XR6 Rear End 3.45 LSD Duel Fuel lots more. |
||
| Top | |
||
| macxr8 |
|
||
Age: 57 Posts: 451 Joined: 3rd Jan 2005 Ride: AU XR6 with BF Turbo engine Location: Sydney |
{USERNAME} wrote: if ya using metel gasket buy the proper copper cote its a type spray paint , it seals the gasket while you are still assembling the engine and keeps water where its ment to be until ya get it started , get it hot and retention the head bolts
only good for copper gaskets, not metal shim type
_________________ RIP |
||
| Top | |
||
| TROYMAN |
|
||
|
just make sure the head and block are clean.
i mean clean! as clean as you can get it without removing any metal.lol you can get the engine running without coolant for a min or 2 to get some heat into the block and head to help with the head gasket seal then letting it cool and adding coolant..?? i had a chrysler v8 that gave me head gasket grief on more than one ocassion due to a fine machining error on the block. one word.. hilomar?(spelling?) this s**t will glue your head to the block and you will s**t your self if and when you ever try to get the gasket and head off.. but unless you have had problems with the gasket sealing you dont glue or sealant.- |
||
| Top | |
||
| Leroy |
|
||
|
{USERNAME} wrote: Okay...I nearly have all the parts needed to complete this headgasket change. All i need is a second hand rocker assembly and get maintenance staff at work to change the water pump pulley over from the old to the new.
phong =P~ i pretty much read all of this thread in the last 15 seconds lol. which part of the rocker assy do you need? is it just the tappets?
_________________ Now driving a Hilux |
||
| Top | |
||
| xfpaul |
|
||
|
works well on my blown chev (900hp) with alloy heads and the nc blown 4.0 , being a fully qual mechanic i just dont know any more
_________________ NC2 Fairlane AU2 Intech 4.0 Wolf V500 ECU Accel 500cc Injectors Eaton M90 Blower MPx Porting 75mm Mustang TB Intercooler Holley 255lph EL XR6 Rear End 3.45 LSD Duel Fuel lots more. |
||
| Top | |
||
| phongus |
|
|||
|
{USERNAME} wrote: {USERNAME} wrote: Okay...I nearly have all the parts needed to complete this headgasket change. All i need is a second hand rocker assembly and get maintenance staff at work to change the water pump pulley over from the old to the new. phong =P~ i pretty much read all of this thread in the last 15 seconds lol. which part of the rocker assy do you need? is it just the tappets? Aren't you a fast reader Tried to get the pulley off at work, didn't come off, didn't even budge phong =P~
_________________ phongus = Post whore 2006 |
|||
| Top | |
|||
| Leroy |
|
||
|
nah i just skimmed through the pictures lol. i was only asking cause i have one here but probably wouldnt be worth posting to you if you wanted the whole thing. just thought if you only needed a few bits it might pack up ok.
_________________ Now driving a Hilux |
||
| Top | |
||
| phongus |
|
|||
|
{USERNAME} wrote: nah i just skimmed through the pictures lol. i was only asking cause i have one here but probably wouldnt be worth posting to you if you wanted the whole thing. just thought if you only needed a few bits it might pack up ok.
hehehe yeah. Thanks for the idea though ^_^...I'll just go to the wreckers or Pick-a-Part and grab one for myself. Hopefully they go at a cheap rate. cheers phong =P~
_________________ phongus = Post whore 2006 |
|||
| Top | |
|||
| fiftyone |
|
|||
|
{USERNAME} wrote:
that isnt one of these so called 'Rare Engines'? http://www.trueblueford.com/ELengine.html
_________________ ** For Sale ** {DESCRIPTION} |
|||
| Top | |
|||
| twase |
|
|||
|
If its original then its an EL hybrid tickford unit.
_________________ BF Fairmont Ghia Series II update. |
|||
| Top | |
|||
| phongus |
|
|||
|
Alright...I got off my a** and started to put things together...mainly because something is starting a bit strange in my current engine. Probably a timing chain issue in my current engine.
Anyways I have cleaned the block with degreaser, then kerosene and then I used compressed air to get rid of little pieces of crap that may be stuck in weird places...I also put degreaser down the head bolt holes and used the air gun to get all the crap out...came out shmick. (Note: I write a caption of the image first and then put the image...that way people don't get confused as to what image to look at while reading I cleaned the block several times...since I found more dirt here and there which made me paranoid and made me clean the whole block over again. Anyways after cleaning twice I got some advice from arm79 about how to put the head on and he reminded me to put the guides back on the block to help fit the gasket and head on right. Those 2 guides are circled in the picture. 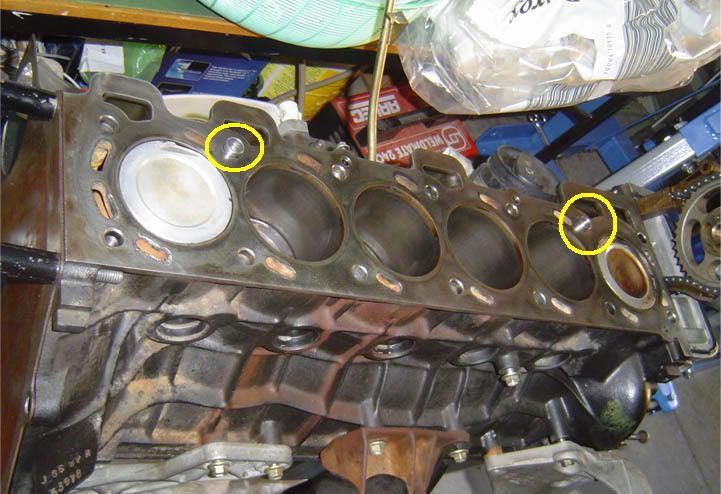
This is when the block was cleaned...looked much cleaner then previous but the photos are a bit deceiving...the block was clean but it wasn't really as shiny as the photo shows. I think the flash and angle made it look cleaner. After 4 runs of cleaning it (wipe, kerosene wipe, dry wipe and air gun), I am safe to say it is clean. 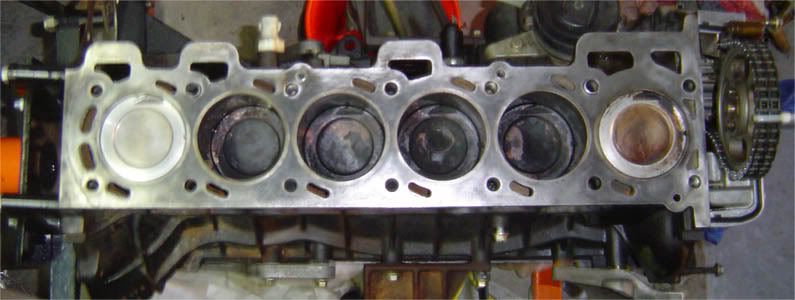
Once all nice and clean, I placed the head gasket on, which made it look even cleaner 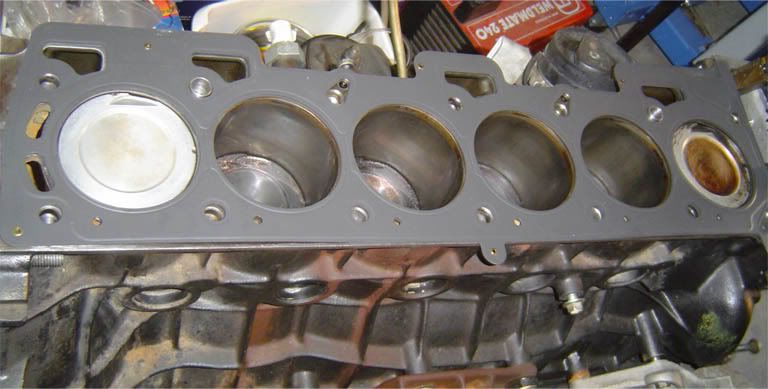
I also replaced the timing case gasket with a new one from the ACL kit. Make sure when you replace the gasket that the mating surfaces are clean. I used degreaser to remove all the old gasket maker and also the oil from the top of the timing case. Once it was nice and clean and dry like, I placed the new one in...it only fits in one way. There are notches on either end of the case which face a specific way which the gasket follows suit. I then put a bead of gasket maker where the timing case meets the block. Was told they sometimes leak there so it is good to put some there. I have indicated where I put a bead of gasket maker in the following picture in yellow. (...note the yellow mark on the timing chain guide, is to indicate a bead of gasket maker for the left side of the case...not on the guide 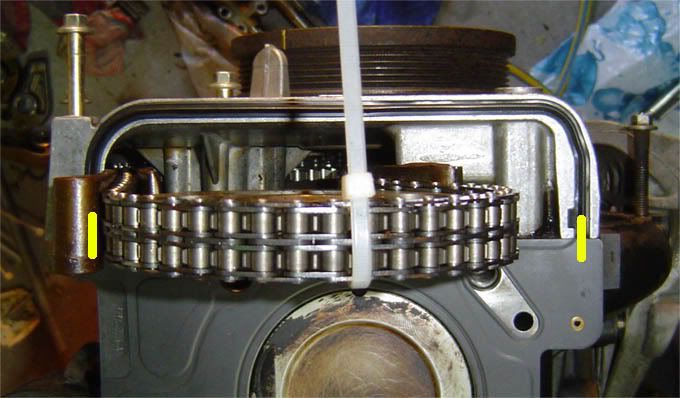
Now I totally forgot to take photos while I was lowering the head onto the block...mainly because I was on my own and couldn't hold the head with a camera in my hand. Anyways I lowered the head on the block making sure the head sat properly with the use of the guides previously put in. Once the head sat right on the guides, the head just slipped in and with a bit of force I pushed it down so that the head was in touch with the gasket. I then took brand new AU head bolts, oiled them from the base to the stud and I put them in one by one by hand first. You don't really have to put it in any specific order by hand, but if you want to get the hang of it, you can always put the head bolts in the correct order which you will find out soon. Once they were all in I then screwed the bolts in until the stud touched the head. At this point I used a torque wrench to tighten the bolts to 30Nm in the correct order. The correct order is the reverse of the removal. You go from the centre in a sprial anti-clockwise direction. I used an older photo to show how the bolts should be tightened. 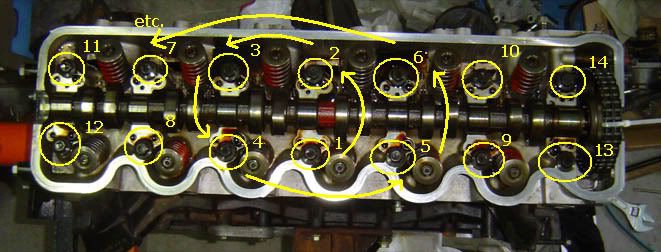
Once I got each bolt to 30Nm in the first run, I did another run around each bolt to tighten the bolts up again, due to the head not being level initially, the first bolts would have been loosened up a bit and thus not at 30Nm. I ran over each bolt about 4/5 times to make sure each bolt is at 30Nm. Next and final step was to tighten each bolt, in the correct sequence, a further 120 degrees. I did the 30Nm + 120 degrees due to the use of the AU head gasket, so when you are doing your head gasket and not using an AU gasket, you do 40Nm + 90 degrees. I went out to Bursons before I started putting things together and got myself a Angular Torque Gauge. Cost me about $23 which was worth it, until I found out I could have made one myself quiet easily. With the help of my dad holding the gauge, I tightened each bolt in sequence to 120 degrees. After about 15 minutes of figuring out how to use the damn gauge and tightening the bolts, we manage to get the head on...now we just hope the thing works without leaks...and I can't find out until the engine is in the car. That will take a while. This picture is the final result...nice and clean 
Next step is, getting a set of rocker gears, putting cam in, shimming the rockers, timing chain tensioner. This completes the Head gasket change which is what this topic was about. Though there is of course more to it once the head is done. During the change over you should have sent out your radiator for a test/flush and when everything is back together you got to top up fluids and what not. Hopefully this thread will help those who want to attempt this tedious task. I will continue the thread until the motor is all together again, that way those who are watching can also see how to put the shims and stuff in when putting a regrind cam in as well as the timing chain tensioner crap. Until another day when I get off my a** to finish it off. haha. phong =P~
_________________ phongus = Post whore 2006 |
|||
| Top | |
|||
| Who is online |
|---|
Users browsing this forum: No registered users and 0 guests |


