|
| TROYMAN |
|
||
|
enjoy!!
AU engine into an mpfi EA conversion. And using the el bbm, ecu and au knock sensor. Same as EB or ED model. To install the AU engine into the EA some modifications have to be made to the K- frame or sump. This is done by cutting the square tube in the centre, bending it forward about 2cm and re-welding it back together. Or, some people prefer to grind the front of the alloy sump for clearance. 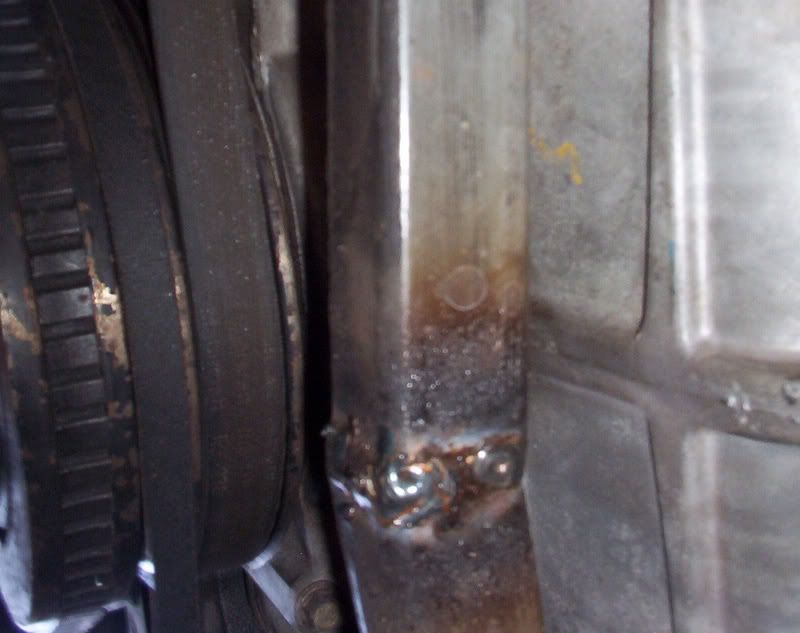
Using the EA engine mounts you can now fit the AU engine. The engine will fit ok but you will find that the 2 lower bolts on the bell housing don’t line up. There is still enough bolts holding the engine and gearbox together and should be ok without them, otherwise you will have to use the AU bell-housing. You may also use the EA flywheel and starter motor if you wish, as they are a direct fit. You now have the option of using the EA belts and accessories or the serpentine set-up of belts used in the EL model. Note: you will need to fit a distributor as the AU uses coil packs. To use the EA set-up, you will need the EA accessories including the water and power steering pumps, alternator, harmonic balancer and the air conditioning compressor. You will have to modify or make brackets for the back of the alternator bracket to attach it to the AU block. (see pic below) 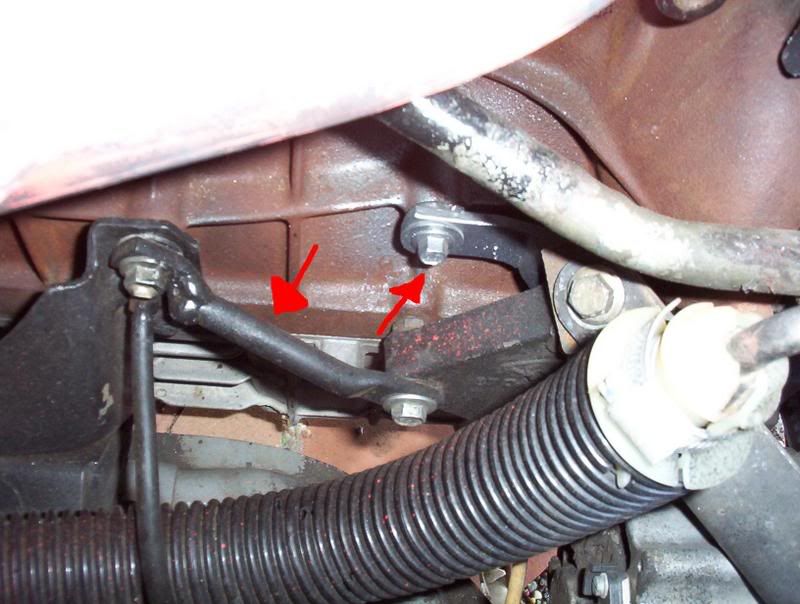
Note: The front of the alternator mounts to the timing case cover, as per EA. Next is the air-conditioning pump. To fit this pump, you only need to space out the top two bolts between the pump and the block with a 12mm spacer or washers are fine. 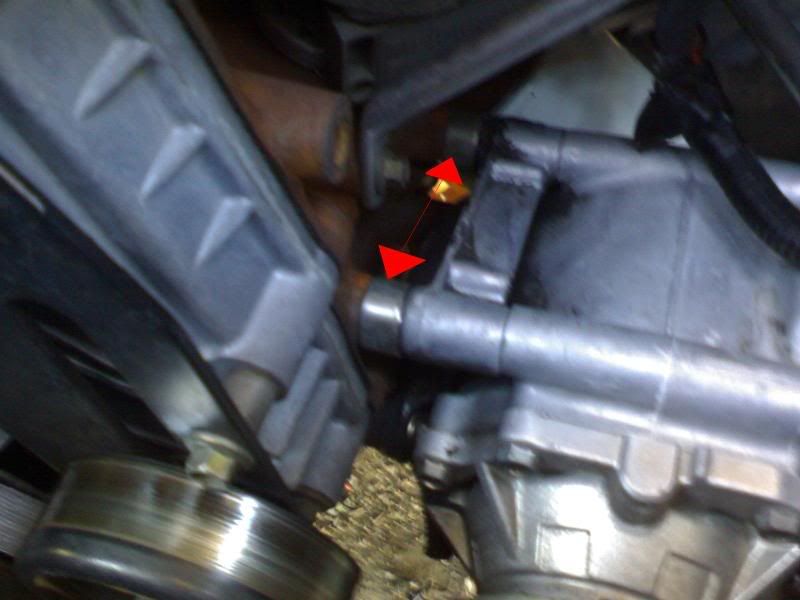
The next step is to use the EA harmonic balancer. This fits fine but timing marks are in a different spot. You can rectify this by measuring and re-marking the timing marks by cutting a small groove with a hacksaw or paint a small line instead. Next you will have to grind the 2 diagonal fins on the timing case cover for the air- conditioner idler bracket to fit. You will also need to drill a small hole in the air conditioner idler bracket just above the idler pulley ( see pic above) And you will need to put a 15mm spacer between the timing case cover and the idler bracket bolting it through the timing case cover to the engine, this is because the bottom hole on the idler bracket doesn’t line up with the AU timing case. And your power steering pump will fit straight on as per EA. If you are to use the EL serpentine belt set-up you will have to use ALL the accessories from the EL model, including the air-con pump, water pump, ect. When you decide what set-up your going to use you MUST consider what manifold you are going to use as well, because the log manifold may interfere with the EL air-conditioning pump. The next step is your chosen manifold. You may use the EA manifold if you wish, or the EL broadband manifold. To start the conversion of the BBM you will need the manifold (complete with fuel rail, injectors and fuel regulator), accelerator cable, intake piping, dipstick tube, air-box & the bbm vacuum release solenoid and the top radiator hose. Also its better if you also change the accelerator pedal to an el one which is a direct replacement for the EA one, as the pedal lever ratio is different and the EA pedal will sit high (but still works ok)... You will also need thermostat housing and heater hose pipes. (One runs from the water-neck to heater hose & the other runs from water pump around the motor to other heater hose as the EA ones hit the BBM.) This pic is before I added the ea loom. 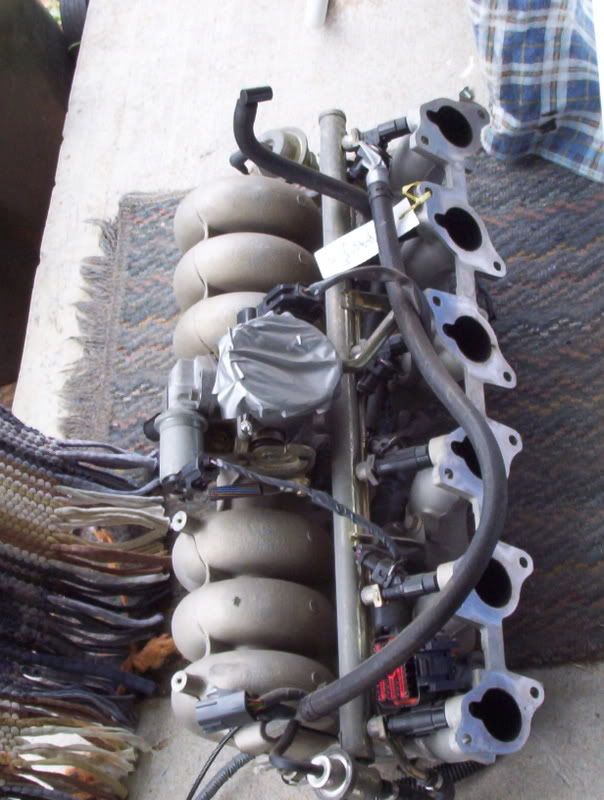
The easiest way to connect the wiring to the manifold is to use the EA/EB mpfi loom. The only modifications you have to make to the loom are extending the wires to the throttle position switch and the idle speed controller. All other sensors are in the same position as EA and they will need no modification. The easiest way is to use the EA loom is to make sure you mark what wires go where. What you do now is put the EA loom onto the EF/EL manifold, connect the injectors up the same as they were on the EA manifold, the wires that went to the EA throttle body are, tps and isc. Now you have to run them from the front of the loom to the centre of the loom and up to the EL throttle body by extending them. You can use the tps and isc from the EA manifold if you want, but some have different plugs but the wire colours should be the same, and every thing else will connect the same as the EA wires. Now for the bbm vacuum release solenoid You must run a vacuum line from the manifold vacuum ports to the blue one-way valve connecting it to the black end of the valve. From the blue end of the valve run the vacuum hose to the bottom fitting on the release solenoid. (Note that the release solenoid hangs upside down so I describe this as fitted to the car) Then run the vacuum hose from the top of the release solenoid to the bbm diaphragm on the front of the manifold. When using the EA ecu with the BBM the timing and fuel maps are different, causing the engine to ping, and the EA ecu doesn’t have the option for the switching of the BBM. You can use a Jaycar type rpm switch to activate the runners in the BBM but you will still have pinging problems. Your best option is to install an EL ecu. The only problems with this is, if your car doesn’t have smart lock you will have to fit smart lock or buy a bypass module. The EL ecu will plug straight into the EA loom, you have to add the wires for smart lock, BBM switching and knock sensor. Also you can now run thermo-fans that are controlled by the ecu. This part is how to put an el ecu into an EA. As my car is manual and I used an auto ecu I have added how to trick the ecu so you can use an automatic ecu in a manual. First you need the EL ecu. If your car didn’t have smartlock you will need a bypass module. You will have to add a few wires to the ecu plug, you might have to go to the wreckers and remove a couple of pins from a ecu plug, and fit them into your ecu plug. To remove the wires from the ecu plug you remove the red plastic locking strip by prying it off with a small screwdriver, (note the yellow arrows in the pic below show the locking strip and where to pry it from). To remove the wire you use the same small screwdriver to push the small plastic locking tab in, whilst gently pulling on the wire. ( note the red arrow in the pic below points to the hole where the wire-locking tab is located) 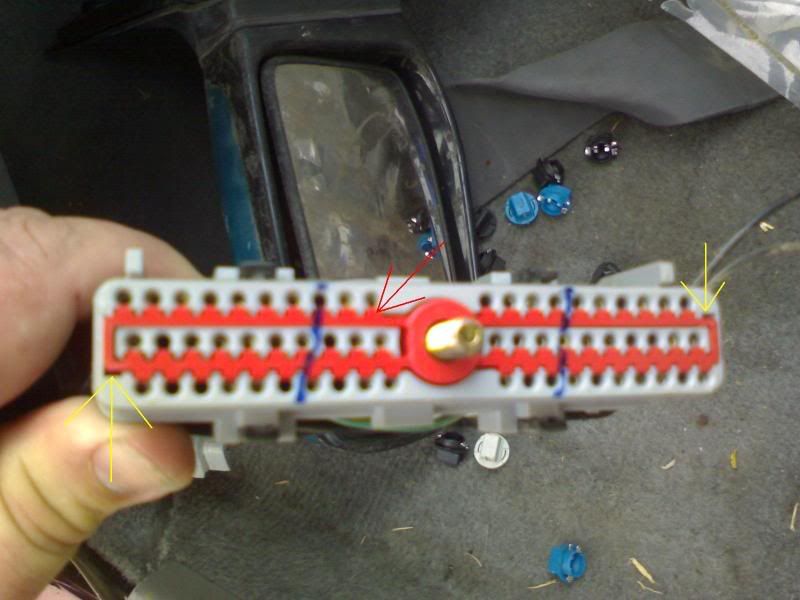
The first wire you need to add is to pin 4 on the ecu plug for the smartlock signal. The second wire to add is to pin 15 for the BBM release solenoid. The third wire to add to pin 42 is for transmission oil temperature.( this is only if you are using a automatic ecu in a manual) The fourth wire to add is to pin 23, which is for the knock sensor. You will have to run the wires for the knock sensor and bbm release solenoid through the firewall into the engine bay. After adding the bbm switch you will need to connect the green wire to pin 15 and the red wire is to be connected to 12v ignition. (I spliced the red wire into pin 57). (12v) Now to trick the auto ecu to use in a manual. To trick the ecu into thinking it is it neutral you will have to add a 7k 1% rated resistor or a 6.8k-ohm resistor to pin 30. And the other end of the resistor is to be spliced into pin 46(signal ground). If there is a wire already connected to pin 30 cut it off and join the resistor to the ecu end. The next step is to trick the ecu into thinking the transmission temp is ok, by adding a 2.2k 1% or a 1.2k 1% rated resistor to pin 42 and splice the other end of the resistor to pin 46 as well. (The only difference in the resistors is that the higher the ohm on the resistor the cooler the ecu thinks the temperature is) I have tried both resistors and they both work fine. Also you can add the knock sensor if you like. I added the knock sensor because the engine had some pinging issues because of the higher compression ratio on the AU engine. The au knock sensor bolts onto the block where the EA coil was bolted. (you will have to relocate the ignition coil to a alternative spot.) Once again you will need to add one wire to the ecu plug. There are two wires from the knock sensor, which is a yellow/red wire, and a yellow wire. The yellow/red wire connects to pin 23 on the ecu and the yellow wire connects to the signal ground (pin 46). Here is the engine and manifold fitted in my car! 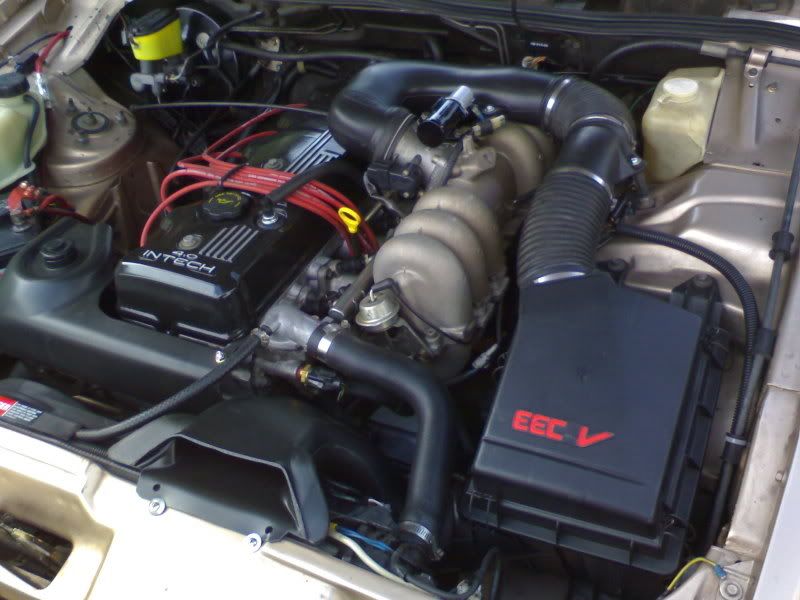
Once the engine and BBM manifold has been installed with the EL ecu, it may idle a little to fast. To overcome this you can either disconnect the isc and raise the base idle. Or you can make a gasket for the isc by making the air bypass holes smaller, from thin metal or cardboard. This will slow down the idle air speed making the maximum idle speed lower. Once the ecu settles in it should run good. BY TROYMAN…. Last edited by TROYMAN on Sat Mar 24, 2007 4:11 pm, edited 16 times in total. |
||
| Top | |
||
| Andrew J |
|
|||
|
Looking good, hows it drive?
_________________ The problem with America is stupidity. I'm not saying there should be a capital punishment for stupidity, but why don't we just take the safety labels off of everything and let the problem solve itself?
|
|||
| Top | |
|||
| TROYMAN |
|
||
|
{USERNAME} wrote: Looking good, hows it drive?
since ive put the el ecu in it runs GREAT!!!!!! |
||
| Top | |
||
| fordster |
|
|||
|
that looks awesome good job cant wait to get my conversion done
_________________ EF POWERED EA |
|||
| Top | |
|||
| bluecube |
|
|||
|
looks great mate. i will be posting up some info about my au conversion soon - just need to sort out the misfiring issue i have first
_________________ Sold my EB |
|||
| Top | |
|||
| Disco Frank |
|
|||
|
thats a wicked right up man
well done
_________________ RIP SCOTT |
|||
| Top | |
|||
| TROYMAN |
|
||
|
ill add the info for putting the el ecu into ea later on...
|
||
| Top | |
||
| TROYMAN |
|
||
|
i have now added the steps to installing the EL ecu...
|
||
| Top | |
||
| TROYMAN |
|
||
|
ok
ive just fitted a au knock sensor to the conversion.. so i have added it to the first post if anyone is interested... |
||
| Top | |
||
| twase |
|
|||
|
My documentation says a 1k2 for the temp signal trick resistor, is it 1k2 or 2k2?
_________________ BF Fairmont Ghia Series II update. |
|||
| Top | |
|||
| TROYMAN |
|
||
|
{USERNAME} wrote: My documentation says a 1k2 for the temp signal trick resistor, is it 1k2 or 2k2?
yea i used a 2.2k resistor .. i also had a doco where it said a 1.2k resistor .. i got both resistors just in case. but i got my info and smartlock bypass from 66coupe so i used what he recommended and it worked fine.. i think you could use a 1.2k aswell. it will only give the ecu a different temp reading so as long as its within the operating temp it should work fine.. as far as i know the higher the resistance the cooler the trans temp will read... |
||
| Top | |
||
| sliptag11 |
|
||
|
hi there sorry to be a pain but do you have any idea on changing a cpi ea to and mpi on the same motor???
|
||
| Top | |
||
| Happy |
|
|||
|
{USERNAME} wrote: hi there sorry to be a pain but do you have any idea on changing a cpi ea to and mpi on the same motor???
ask Southy
_________________ Owning 1 of 67612 EF GLi Sedans made
|
|||
| Top | |
|||
| TROYMAN |
|
||
|
{USERNAME} wrote: hi there sorry to be a pain but do you have any idea on changing a cpi ea to and mpi on the same motor???
hi im not 100% on that one.. i think you will have to change manifold loom ,ecu,and distributor... |
||
| Top | |
||
| TROYMAN |
|
||
|
ok
i just updated the original post by adding how to connect the vacuum release solinoid to the bbm diaphram.. |
||
| Top | |
||
| Who is online |
|---|
Users browsing this forum: No registered users and 0 guests |


