|
| BenJ |
|
||
|
Small Update
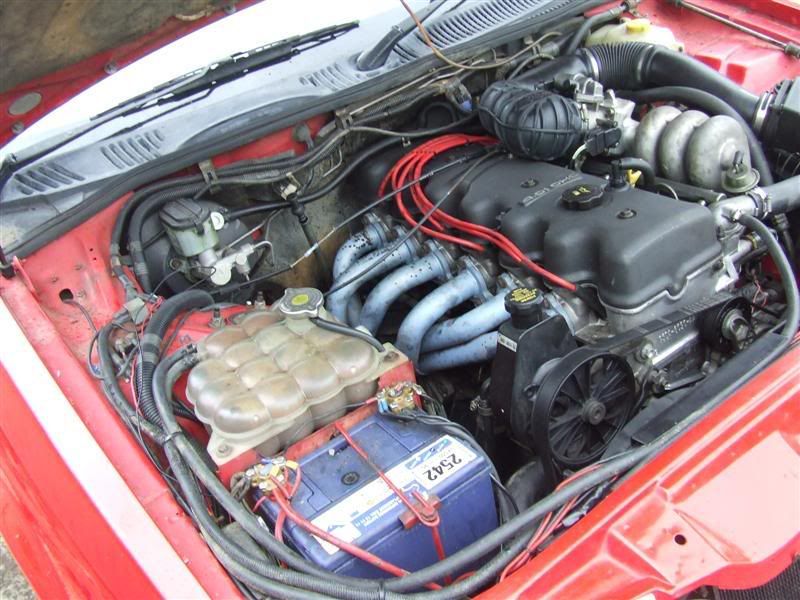
Today I received a Smartlock Bypass Module. I have hooked it up and started the car using a smartlock EBII ECU and an EL Tickford Gas ECU. I have also added extra pins to the ECU plug for Smartlock, the BBM Solenoid, knock sensor and a wire for the EL Gas ECU to tell it to run on petrol. Using some loom from an EB Bootlid, I ran wires from near the ECU through the Firewall via the hole the vacuum pipes run through to behind the washer bottle. I have also mounted the BBM Solenoid in its correct location. Unfortunately this is where the the Cruise Contol vacuum pump is located in the EB, so I relocated it down the inner guard by wedging it under the brake lines. This will do for now until I can drill some holes and bolt it in properely. And, yes the cruise still works Everything seems to be falling into place for Sunday, so it should go relatively smoothly. I just have to wire up the plugs for the BBM solenoid and the knock sensor. Next update should hopefully be good news re the successful completion. Regards BenJ
_________________ {DESCRIPTION} - Current Ride |
||
| Top | |
||
| BenJ |
|
||
|
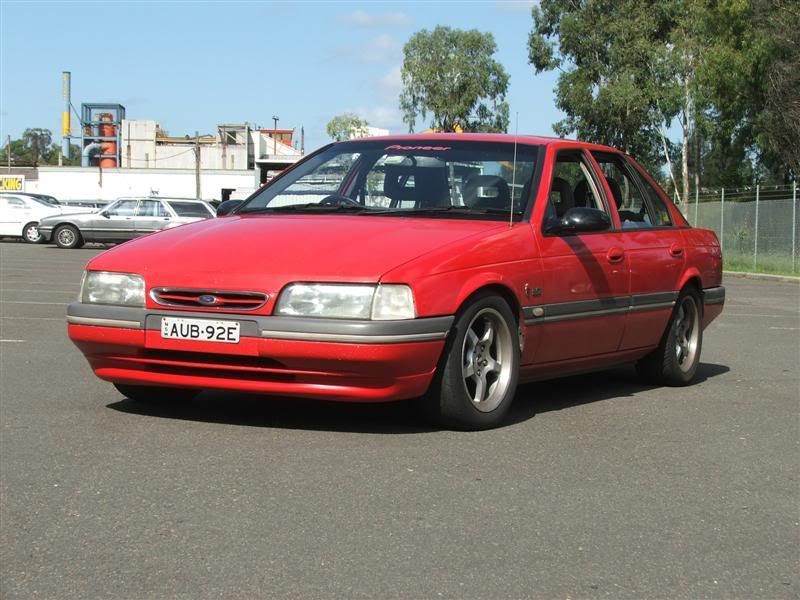
Here is a couple of photos from a recent cruise to Newcastle.
The EB doesn't look to bad in these. 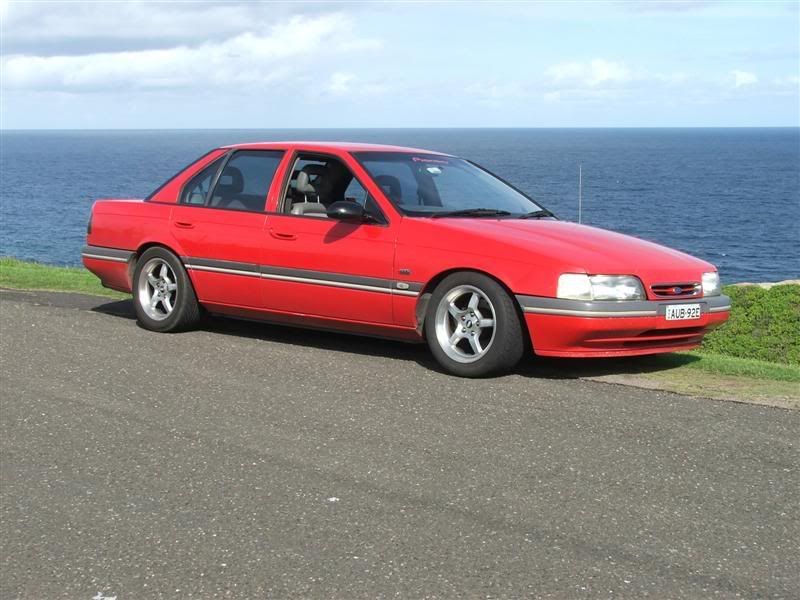
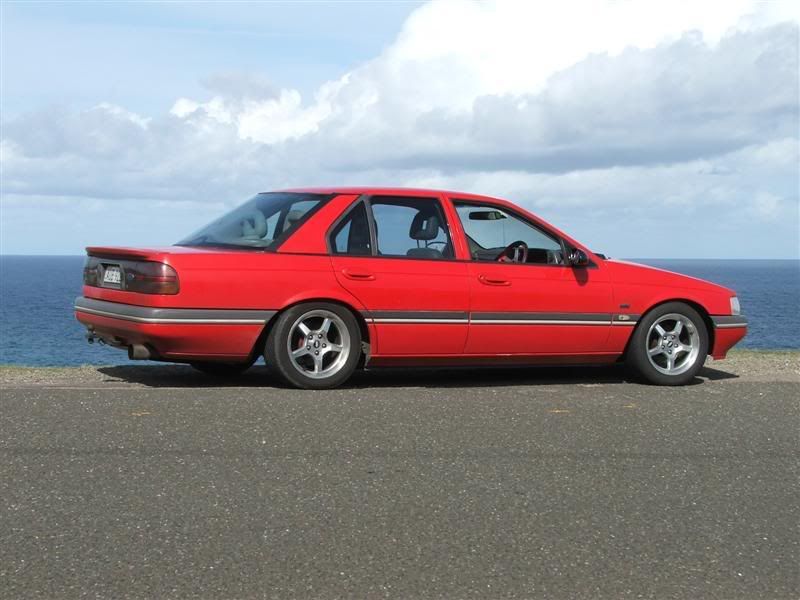
And here are the same two shots with a bit of photoshop surgery. 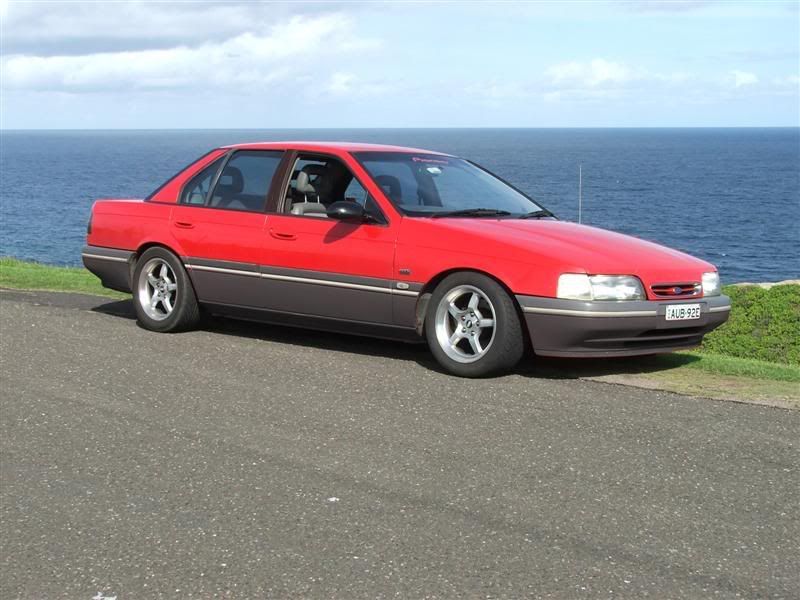
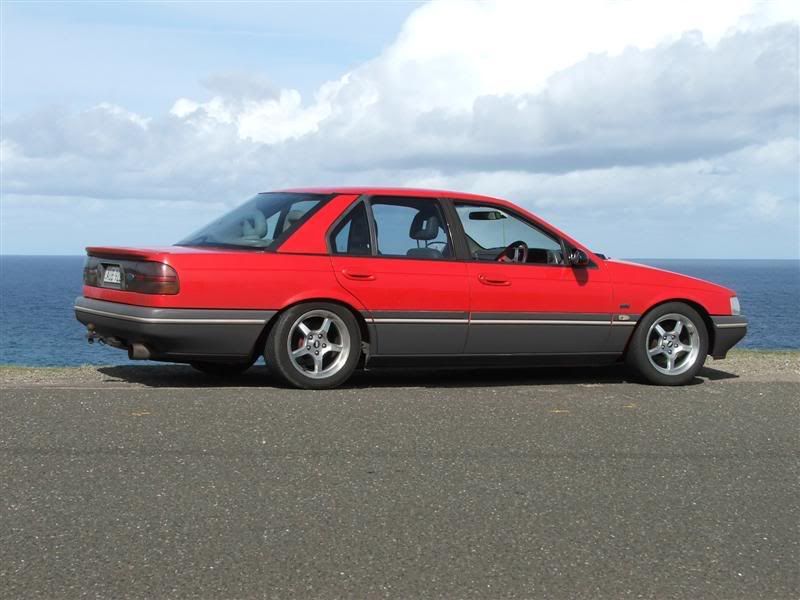
I quite like the red over grey. What do you all think? BenJ
_________________ {DESCRIPTION} - Current Ride |
||
| Top | |
||
| BenJ |
|
||
|
Teaser Pic
BenJ
_________________ {DESCRIPTION} - Current Ride |
||
| Top | |
||
| BenJ |
|
||
|
Well, what can I say. PaulMac, Luke (my son) and I had quite a time.
What started out as, "4 hours, no worries" turned into a very long haul. OK, so Sunday started at 7.30am with Luke and I jumping in the car and heading from Sydney up to the Central Coast to go to PaulMac's place. We rolled up to PaulMac's at about 9am and by 9.30 we were already taking the car apart. Now PaulMac has put an EL engine in his car, but used the Log manifold, so we at least had some experience here. However we progressed slowly and methodically and around 3 hours later, had the EB engine and auto mostly out of the car. 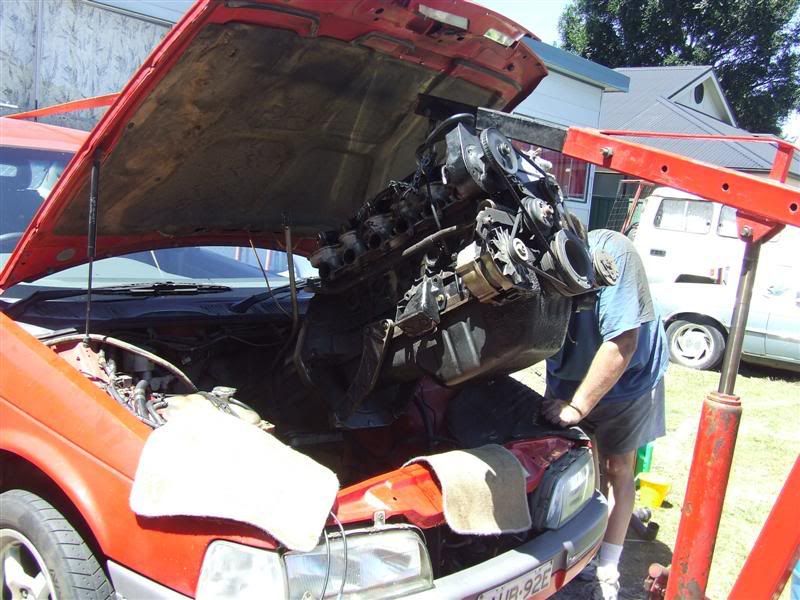
We had our problems like we all do. The auto cooler lines didn't want to come off and the engine crane wouldn't fit under the front of the car as it was too low. But we perservered and got it out. Check out all the gunk on the back of the Auto. PaulMac wondered how it stayed cool. 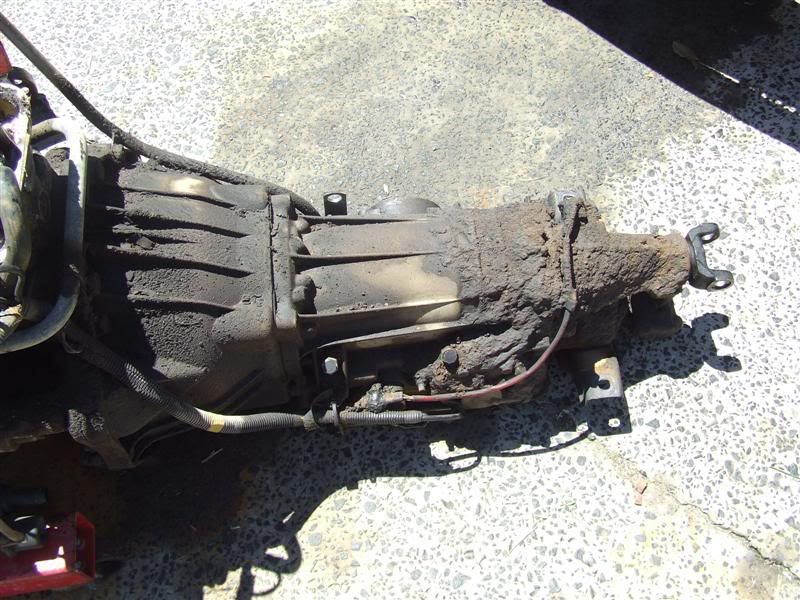
During this time I pulled the EL BBM loom off the engine and layed out the loom I had made. I found I had to extend the plug for the air temp sensor as this hadn't been mentioned in any of the threads I had read. Luckily I had taken everything with me. Here I am with the EL BBM Loom removed. 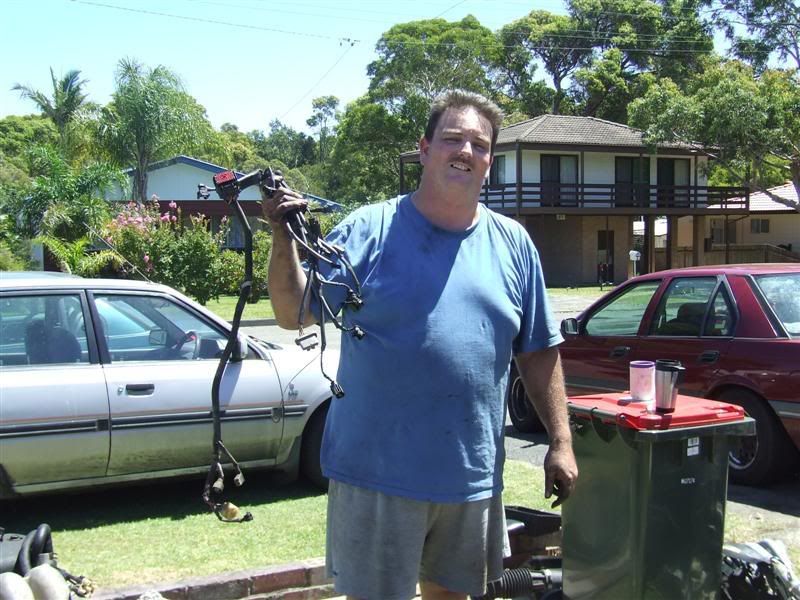
The engine bay was almost as dirty as the auto was, so PaulMac fired up the pressure washer and gave it a good blast. Nice and clean now. 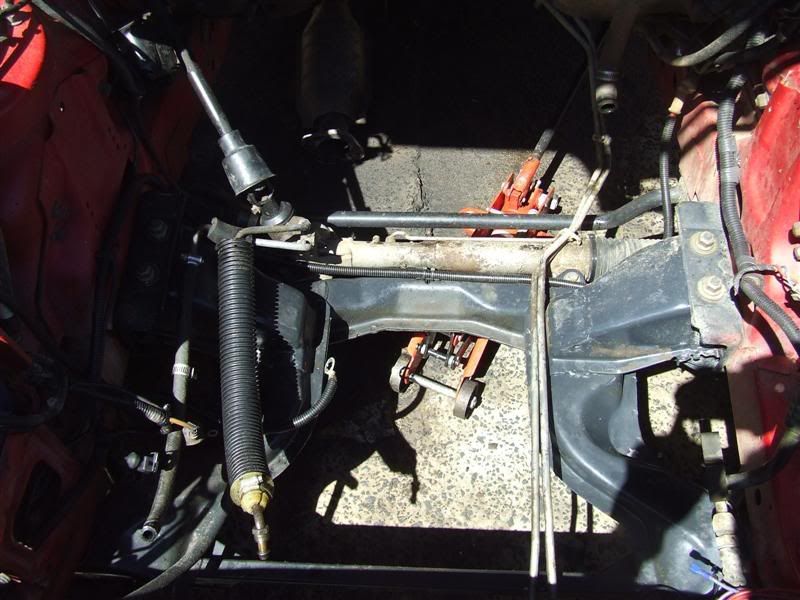
Then we moved the trailer with the EL Engine. I am balancing it. Wouldn't want it to roll over and break something now would we. 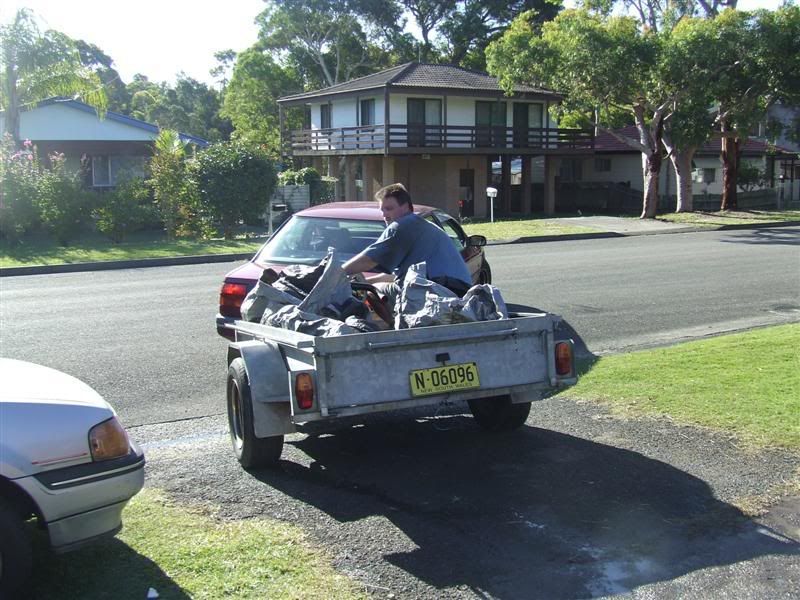
Now the fun begins. It is supposedly a simple task. Just slide the auto up to the back of the engine, give it a bit of a jiggle, and it should just drop into place. 
Next step was making sure the EL Engine was prepped to go in. Close examination showed up a few differences between the EB and EL engines. We realised the heater hoses wouldn't fit. The EL engine mounts were different so had to be swapped. And the fuel lines are different too. PaulMac went off to Bursons and picked up some heater hoses. While he was out I took care of a few things, like changing the alternator plug, bolting in the EL ECU and plugging in my custom loom for the BBM and Knock Sensor, and started playing with the cruise cable and throttle cable. Oh, and where is the EL throttle cable Paul? We realised it was still on the car the engine came out of DOH. PaulMac's lovely wife went for a drive to get it. Thankyou heaps. So PaulMac returned and we hoisted the EL Engine up and slid it half into place. By this time it was dark, and we had to work by light. PaulMac then worked out how we could marry the fuel lines up. The following is his how too. "There are two simple ways to attach the fuel lines and maintain the EL top and bottom connections. 1] My preferred option is to cut the EL metal fuel lines at the chassis rail of the donor car, leaving the flexible line intact with a 'tail' of 50-60mm of metal fuel line. Flare them very slightly with a flaring tool if you have one. Re-fit to engine or manifold while out of the car, marking the regulator feed line 'tail' clearly. Install the engine and from under the car place hose clamps over the [EA-ED] flexible lines then cut them to a length suiting the metal 'tail', insert the tail into the appropriate chassis feed or return line, clamp tight. NOTE: Feed line goes to the regulator, return line from the rail. 2]The second option is used when the EL flexible lines have been cut before the bottom join or the 'tails' are of inadequate length. Cut two lengths of metal fuel line [flare slightly if possible] and insert and clamp them into the EL flexible lines, forming the 'tails'. Proceed as above." The second option was forced upon us because one EL fuel line had not been cut away as required, [due to a misunderstanding by the engine supplier, an otherwise very helpful and professional mechanic] and we had to cannibilise the other for the metal line needed." Cheers, Thanks PaulMac - I guess one could always use the EB fuel rail. Once that was done the engine was lowered down but wouldn't get that last 10mm for the engine mounts to drop over the K frame. So, it was out with the right had mount and down it went. But do you think it was easy to bolt the mount back on? Ohhhh Nooooooo. Stupid bloody thing. This pic shows the engine almost in place, and gives you a look at our high tech lighting. This was around 1am. 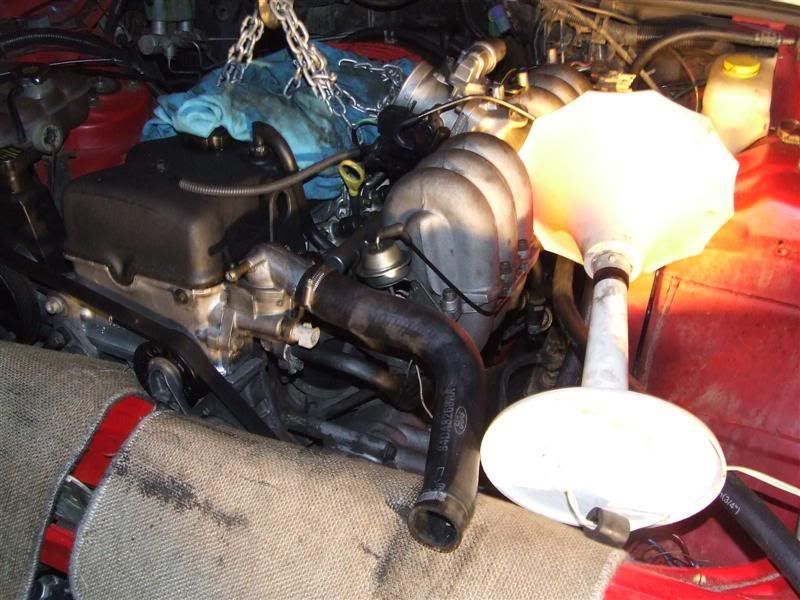
Finally we held our mouths the right way and got it sorted. We went around connecting all the bits we had disconnected. PaulMac put the EL radiator in and found that it was slightly different to the EB one. The rubber spacers on the bottom held it up too high, so he improvised that. And then the hose that goes from the bottom of the header tank into the right side of the radiator wouldn't fit as the EL radiator has a right angle bend in it. More solutions were found. The auto cooler lines didn't want to go back together again. Finally at around 4.30am it was all back together and it was time to start it for the first time. I turned the key and............... ZIP!!!! It just cranked over. The fuel pump sounded odd tho, so we threw a few ideas around, and I suggested that the fuel lines could be back to front. A bit of research on line and comparing PaulMac's car etc proved this theory to be sound. So they were swapped over and we were ready to try again. The key turned, the engine fired..........and ran..........clang clang clang clang....... I turned it off in a hurry. So considering it was now 5am and we had been working straight through from 9.30am the previous day, we packed up a little bit, called it a morning and went inside for a well earned NAP.
_________________ {DESCRIPTION} - Current Ride |
||
| Top | |
||
| BenJ |
|
||
|
Day Two - 3 hours or so later.
We took our sorry worn out selves back out to the car (where did I put that match and petrol again?) took it down off the stands and ramps, and with slightly clearer heads tried it again. More clanging. Much conversation ensued as to the possible cause, mostly revolving around the auto being faarked. In the end we put the front back up on stands, and removed the dust sheild of the auto to check the torque convertor bolts. The all looked fine so I asked PaulMac to start the car while I was under it (Don't do this at home boys and girls). Clang Clang Clang. I immediately could see the problem. PaulMac joined me under the car and agreed with my diagnosis. It would seem that while we were frigging around trying to put the auto on the engine, we had shoved a jack under the sump at the back of the engine to lift it...........and crushed the sump so now the cranshaft was hitting it. NOT HAPPY JAN!!!!!!!!!!!!!!!!!!!!!!!!!!!!!!!!!!!!!!!!!!!!!!!!!! Much more discussion ensued and the only solution was the obvious one. Lift the engine, drop the sump and bash out the dent. Sounds simple enough doesn't it. Let me tell you nothing is simple - ever!! PaulMac ducked off to get a sump gasket, while I removing the gazzillion bolts that hold the sump on. We hooked up the front of the engine to the engine crane to lift it. But it wouldn't lift high enough to remove the sump. So I dropped the K Frame to give us more room. The Bugger still wouldn't come out. Does anyone know if the EB and EL sumps are the same? The K Frames are quite different, so they could be different. After much swearing and struggling it was suggested, not sure by who now, to insert a long object on an angle from the side into the sump and then bash the holy hell out of it in an effort to puch the dent out. To cut a long long day short, this actually worked. You will not believe how relieved I was when we started it and there was no wrong noises. So we buttoned it all back together, filled it with oil and started it again. Now I gave it a rev. Up to 2 grand and splutter. FAAAAAAARK!!!!!!! A quick think later, I remembered the EB Map sensor got pretty squashed by the BBM while putting the engine in. So I grabbed the EL map sensor, swapped them over and all was rosy. It revved strong and hard. The BBM was doing its thing and all was good with the world. Except for the auto fluid pouring out on the driveway. This proved to be a loose auto cooler line. I hate those things. Once tightened up all good. Of course by now it was after 5pm Monday. Here are a couple of shots with the engine in and finished. 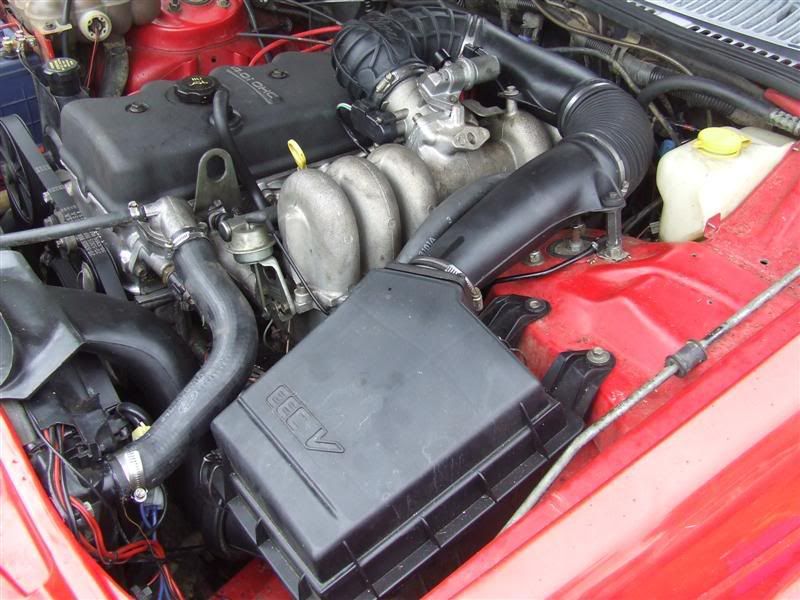
I took the EB for a test drive and it went great. The only real worry was that the temp guage in the dash didn't work, and I think we killed my Davies Craig thermo switch at some point. I had to run the fans from my manual overide switch. We packed up, jumped in the car and headed back to Sydney. The car went well and cruised easily home. I hope you all enjoyed my little story. I will be posting up a list of parts that I think others will need if they are considering a similar conversion. And I will provide some more detail of other changes/mods to make this happen. PaulMac and family, the biggest thank you for the time, effort and hospitality. You are a true friend and Ford Modder. BenJ
_________________ {DESCRIPTION} - Current Ride |
||
| Top | |
||
| BenJ |
|
||
|
OK - List of parts needed to install an EL Engine into a EB Non Smarlock Car.
EL Engine - including air filter box and intake piping/brackets etc - everything El Engine Accessories - Pwr Steering box, alternator, A/C Compressor - All of it EL ECU Smartlock Bypass Module BBM Solenoid and associated Vacuum Hoses Knock Sensor plug and wiring EL Throttle Cable and pedal - The pedal ratio is different to the EB EB Manifold Loom modified for use on the BBM EL Map Sensor EF/EL Heater Hoses - both as they are different to the EB EB Engine Mounts - use yours - one of mine was broken lol EF/EL Radiator - the bottom hose is smaller than the EB EL Lower Radiator Hose EF/EL Thermo Fans - Davies Craig Thermo Switch Exhaust Manifold Gasket - Only needed because I used my extractors Exhaust Flange Gastket - get the correct size Engine Oil and Filter - 15w 40 Transmission Fluid - At least 5 litres Power Steering Fluid A good selection and quantity of hose clamps Radiator Coolant Oh and a sump gasket for when you squash the sump - not recommended I think thats about it. Anything I forgot PaulMac? BenJ
_________________ {DESCRIPTION} - Current Ride |
||
| Top | |
||
| BenJ |
|
||
|
Important Post by Paulmac
Ben, In case any one missed it above, the EL fuel lines complete, preferably cut 50-60mm into the metal [chassis] lines. The coolant hose from the reservoir to the radiator is different although the EB-ED hose can be cut to fit the 90deg spout. As to selectively re-forming [bashing out] the sump, there was NO alternative available for at least 8 hours [when a mate could bring a MIG] and Ben had to be back in Sydney long before that. Barnacus, for once the mozzies behaved themselves but I had donated enough blood for all of us by gouging my right leg open on an EB block, so off to get that patched up as it refused to stop filling my boot up. This interfered with me trying to get the accelerator I had forgotten and after a couple of quick phone calls my wife took up the task and I headed for treatment. We all appreciate the efforts of Darrell from Minmi to have it ready for Kath and the help and courtesy he showed her. We'll have to repay his goodwill in some way, 'what goes around, comes around' surely applies here. Cheers, Paul
_________________ {DESCRIPTION} - Current Ride |
||
| Top | |
||
| BenJ |
|
||
|
Hey All
Along with Paulmac, I want to send out a big thankyou to Darrell for all his help and assistance, especially in removing the throttle cable on Sunday. We hold only ourselves responsible for all the issues that arose during the installation of the EL engine in my EB. I have now driven the car around 450kms since I left PaulMac's house, and I have to say I am very happy with the performance and economy to date. While this could be a big job for any first time do-it-yourselfer, I would recommend that with the proper research, preparation and equipment, this sort of upgrade is worthwhile. For me personally, this was a much cheaper and complete option than repairing my old engine. Regards BenJ
_________________ {DESCRIPTION} - Current Ride |
||
| Top | |
||
| BenJ |
|
||
|
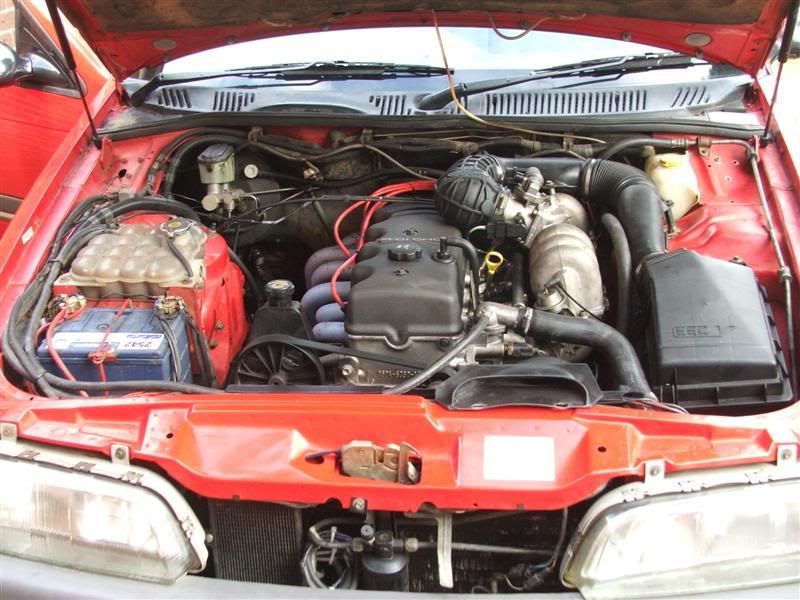
Well it didn't take long. The first mod to the EL engine has happened.
Advice from mates indicated that there is some worthwhile gains to be made by removing the restrictive exit from the EL airbox. I don't know what Ford was thinking but it appears there is quite a backwards step in airflow from the EF to the EL. This is the EL exit pipe 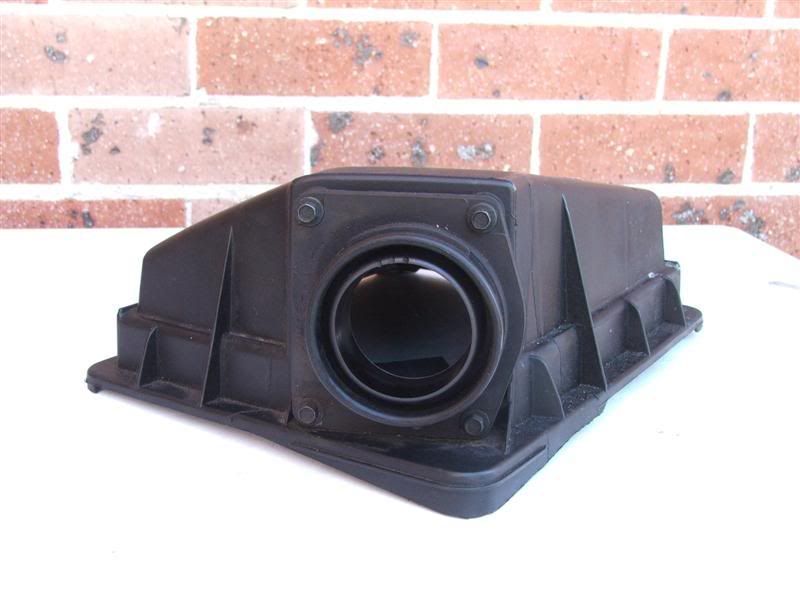
And this is the EF exit pipe - quite a bit larger 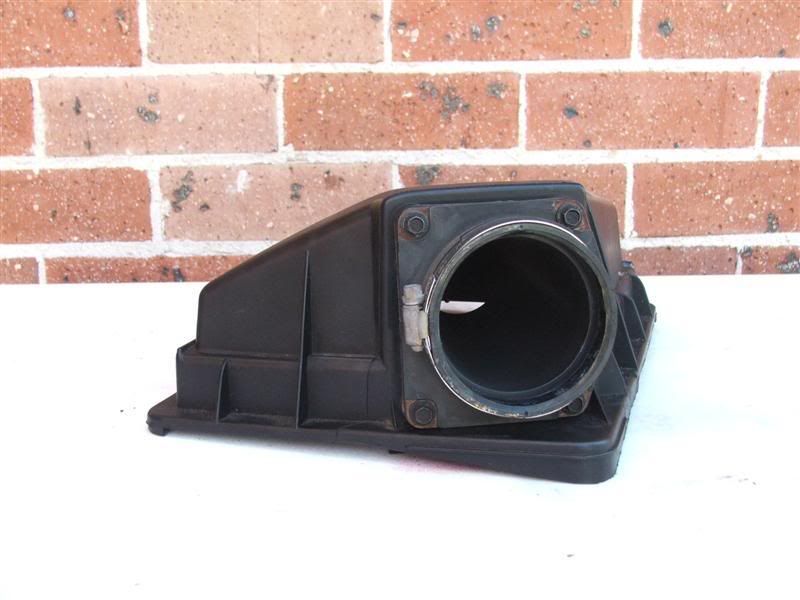
And on the inside, there is quite a substantial difference in the design. EL - internal 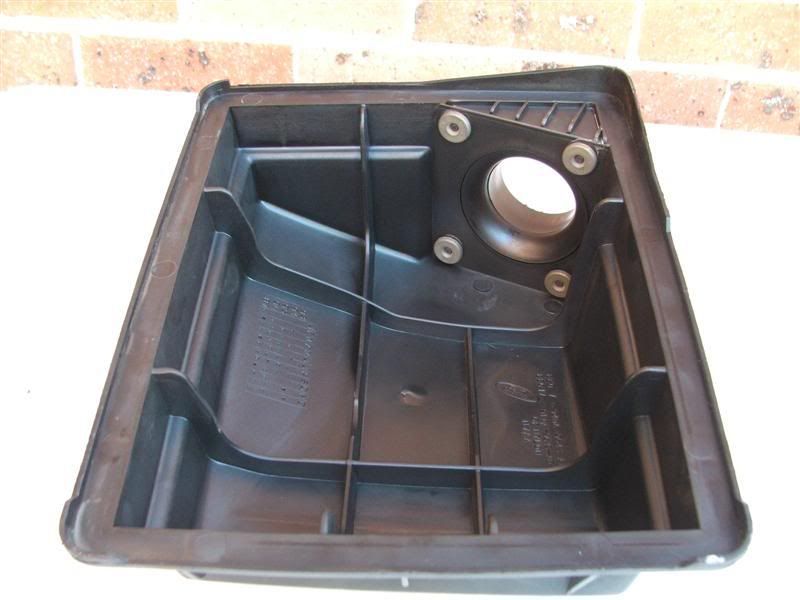
EF - internal 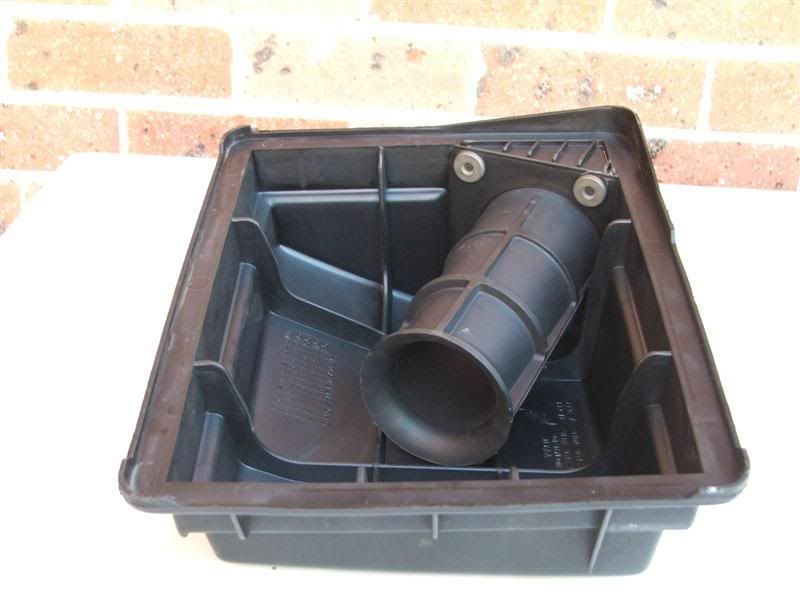
The trumpet design according to flow tests by Autospeed magazine flows around 18% better. So to get the air from the new larger opening I went to Supercheap and purchased a 300mm length of 76mm ID Aluminium Pipe. I cut the end off at around 30 degrees and installed it. Original EL Intake 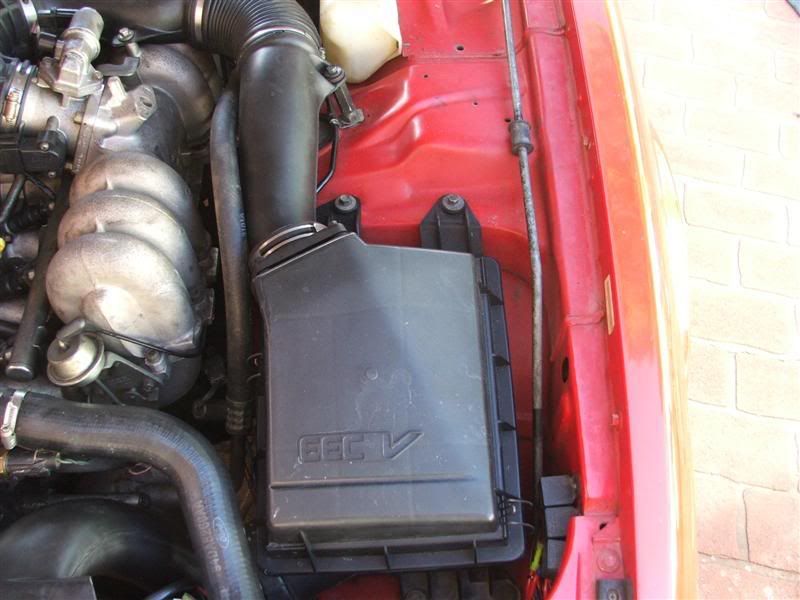
Modified EL/EF Intake 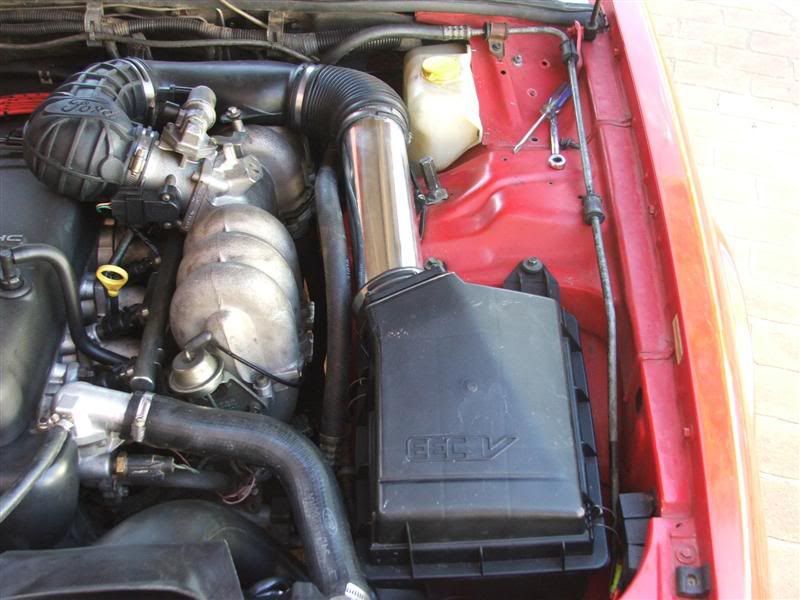
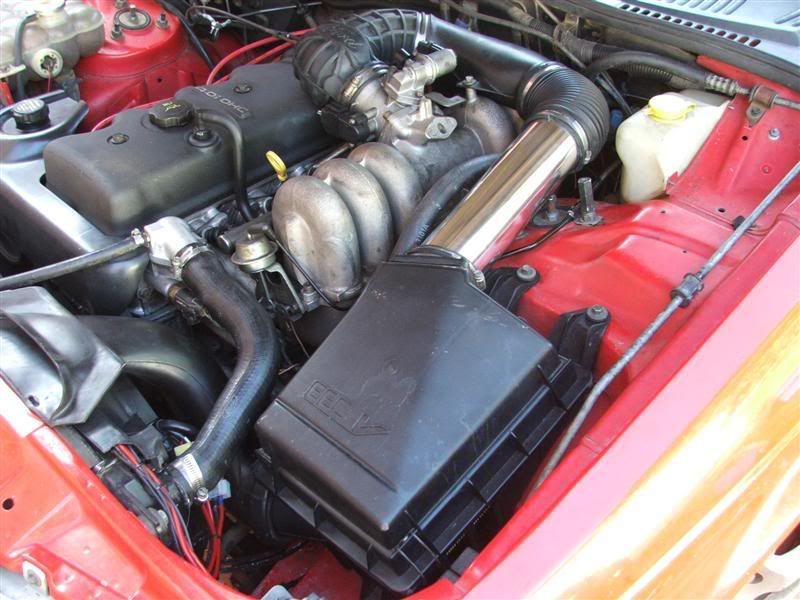
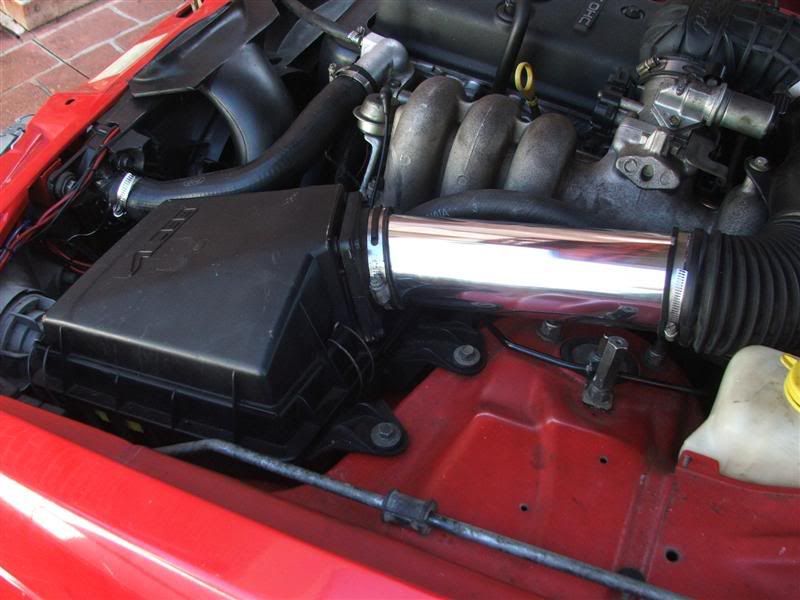
Looks pretty darn good I think. One other mod I had to make was to add two spacers under the plastic cross piece over the BBM manifold to lift it all up around 6mm. This is because the bottom of the new pipe was just touching the top of one of the suspension bolts. I have also cut some extra holes on the passenger side of the lower airbox to improve airflow into the box. Now the big question. Does it make a difference? Yes. Especially at part throttle in the mid range. There is a really noticeable improvement. In standard form, the car sometimes felt like it had a flat spot or hesitant under normal/light accelleration. If I gave it some more throttle, zoom, away it went. With this feeling has gone away. And with the stronger mid range now traction in the wet is an issue. I must get my LSD fixed Cheers to all BenJ
_________________ {DESCRIPTION} - Current Ride |
||
| Top | |
||
| BenJ |
|
||
|
I have been playing around with the steering wheel horn badge. I removed the Autotechnic sticker and tried to find something Ford oriented.
I first tried a small Ghia Emblem 
I drove around with this for a couple of weeks, but in the end decided it stood out too much. So I now have this EL Fairmont Badge. 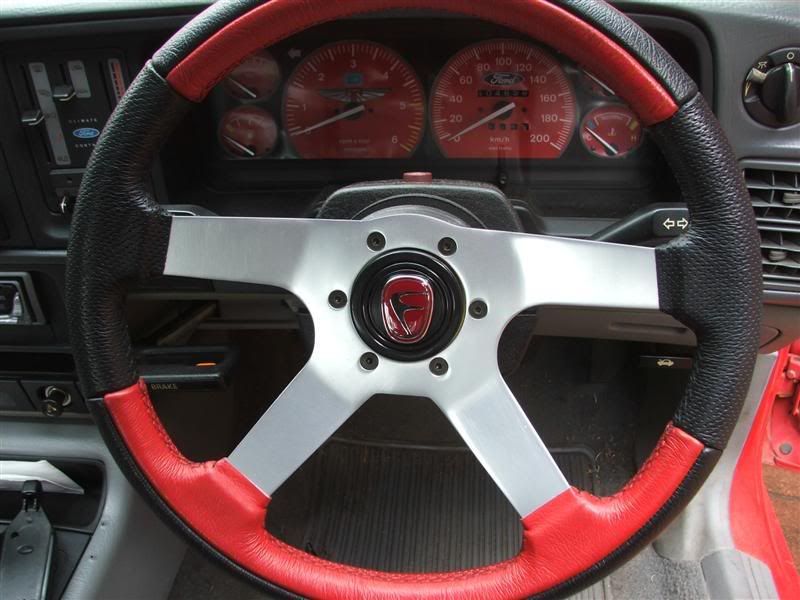
I like this more, as it is more subtle and the colours blend in well. Cheers to all BenJ
_________________ {DESCRIPTION} - Current Ride |
||
| Top | |
||
| BenJ |
|
||
|
I have added a Sprint front spoiler to the car. I picked this up second hand for a really good price off fellow Eseries owner. It was already in undercoat, so a quick sand and some paint, and it was done.
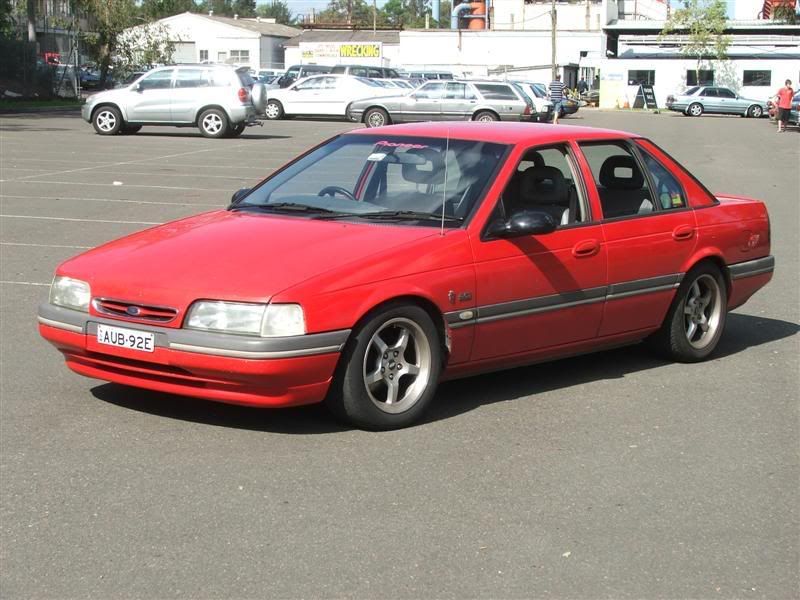
It was just what I was looking for and completes the look I wanted for the EB. There are some minor things to do like painting the B pillars etc. Cheers to all BenJ
_________________ {DESCRIPTION} - Current Ride |
||
| Top | |
||
| BenJ |
|
||
|
So I got bored at work today, and cranked out some more photoshops of the car. Let me know what you think.
1 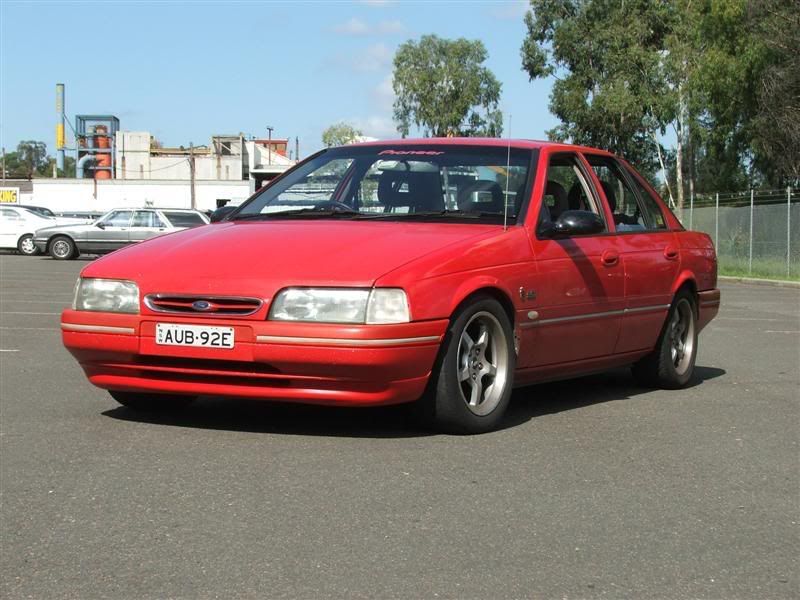
2 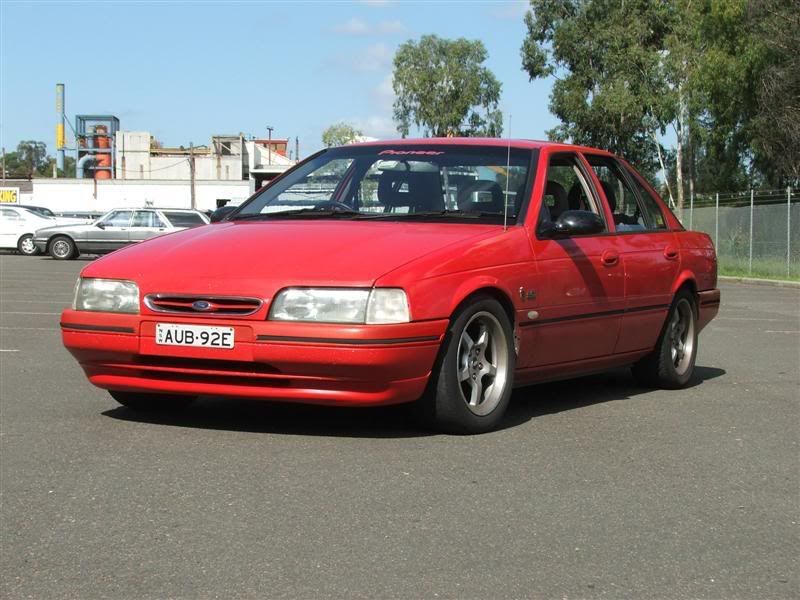
3 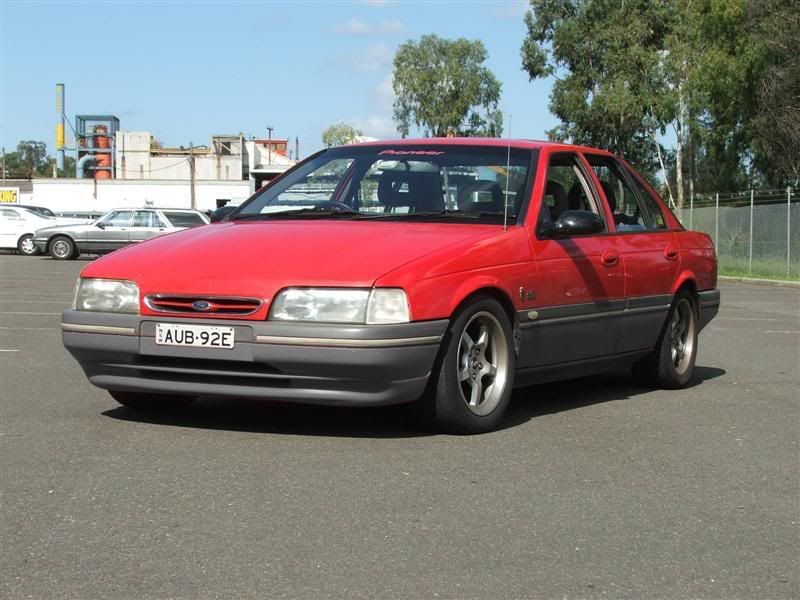
4 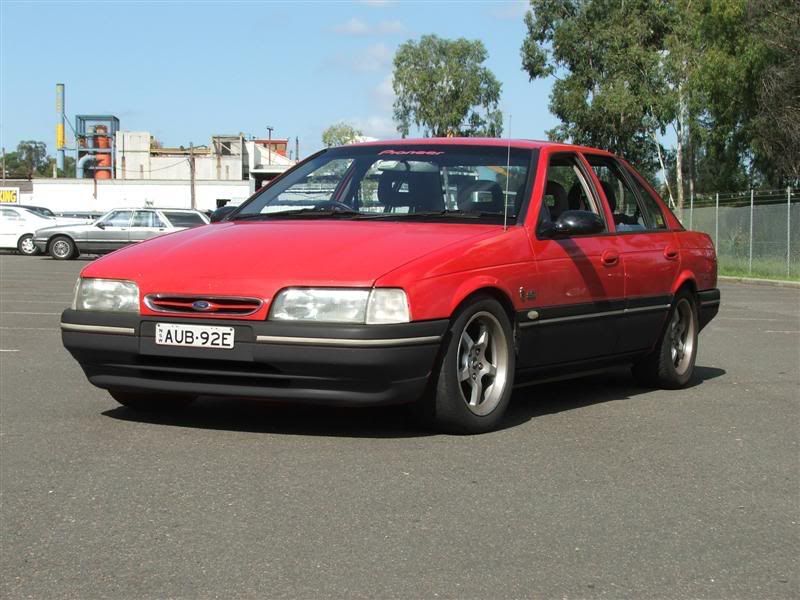
5 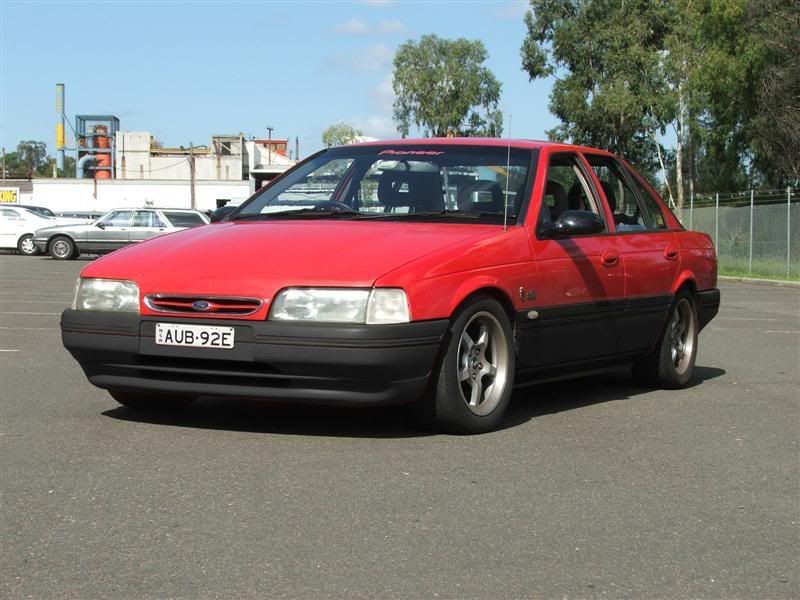
6 
Having done this I favour number 1 and number 4. BenJ
_________________ {DESCRIPTION} - Current Ride |
||
| Top | |
||
| BenJ |
|
||
|
Sneak Preview
Can you work out what this mod in progress is? 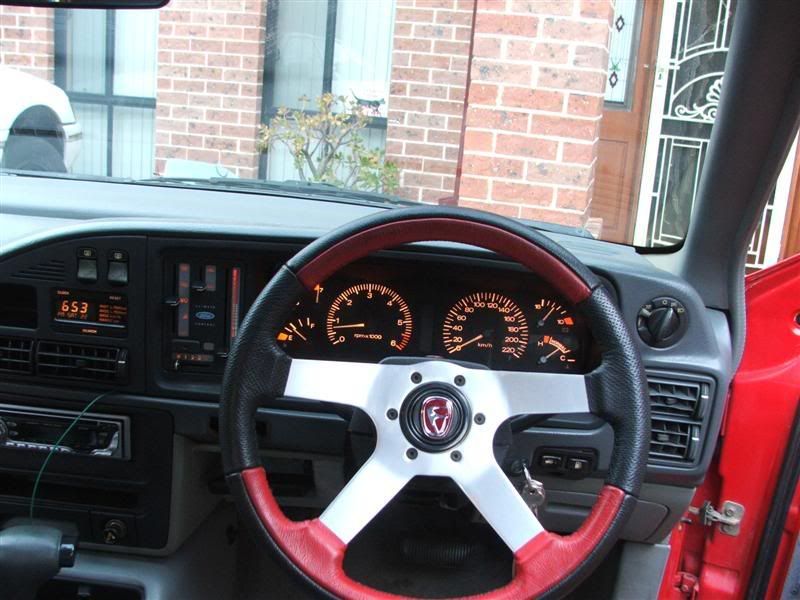
On other news, I drove from Western Sydney to Wagga Wagga and back today. I took my mate Paulmac down to pick up an ED Manual Futurer he bought. The EL engine ran sweet and strong the whole way, and averaged 9.0L per 100ks for the 1000k trip. Very happy. In fact the EB was a pleasure to drive in all aspects. But now I want a T5....... BenJ
_________________ {DESCRIPTION} - Current Ride |
||
| Top | |
||
| BenJ |
|
||
|
OK. This will be long and have lots of photos. So grab your pocorn and coke and get ready for some learnin.
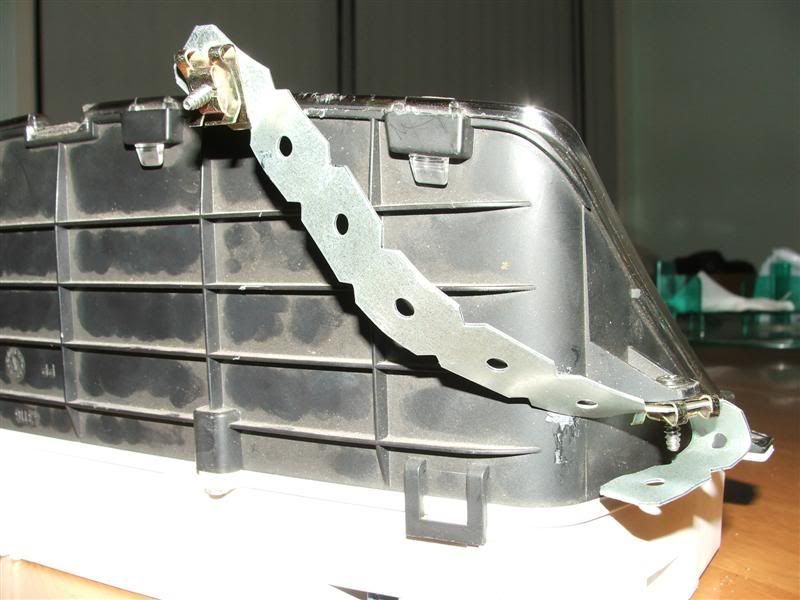
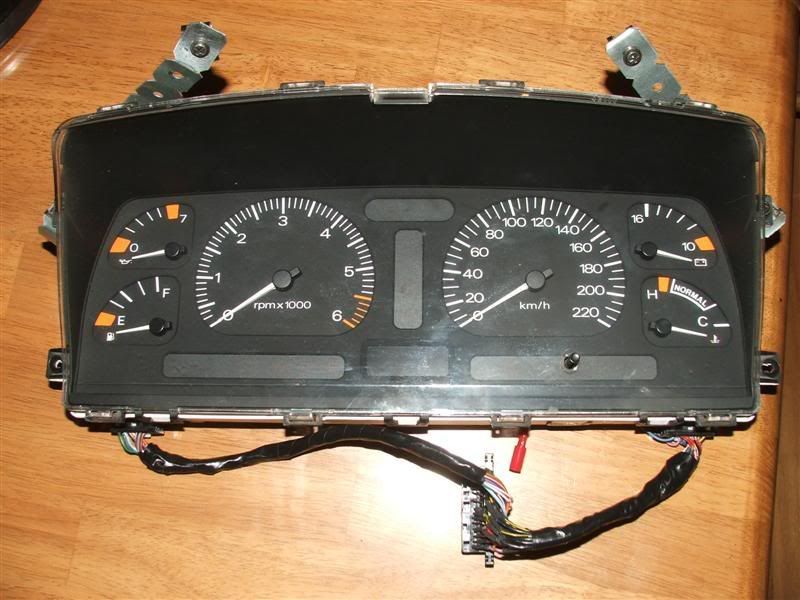
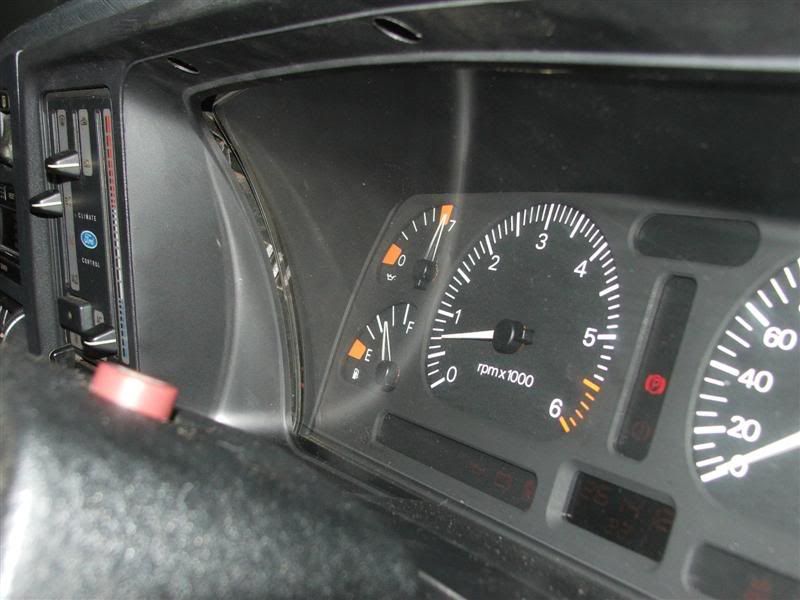
Things you need to complete this mod. 1. EA/EB/ED car, with an EL ECU and Engine - No, you can't just put in an EL ECU with an engine running the Log Manifold. 2. EF or EL Instrument Cluster - In my case an EF Fairmont Cluster 3. A plug off the back of an EA/EB/ED Sports/Fairmont Instrument Cluster - Cut it off close to the cluster leaving as much of the metal as possible. 4. Both Plugs and as much loom as you can get out of an EF/EL Fairmont that plug into the Instrument Cluster 5. 4 metres of Auto wire from Jaycar/d**k etc 6. A selection of Crimp Terminals and relevant tools 7. A Soldering Iron and Solder etc 8. Pinout charts for BOTH Instrument Clusters 9. Metal 'Make a Bracket' strips from Bunnings 10. A good understanding of how all this works - This is NOT a mod for begginers Step One Using the Pinout charts for the Instrument Clusters, create a comparison spreadsheet to match common wires etc from the EB to the EF. This will be your guide for building your own adapter loom. Step Two Create your adapter loom. Now that you know what wire from which connector on the EF/EL side goes to which pin on the plug on the EB side you can start soldering. Carefully match up each wire from the EF/EL plugs to the relevant wire on the EB Plug. Double check everything!!!!!!! At the end you should end up with something that resembles this. 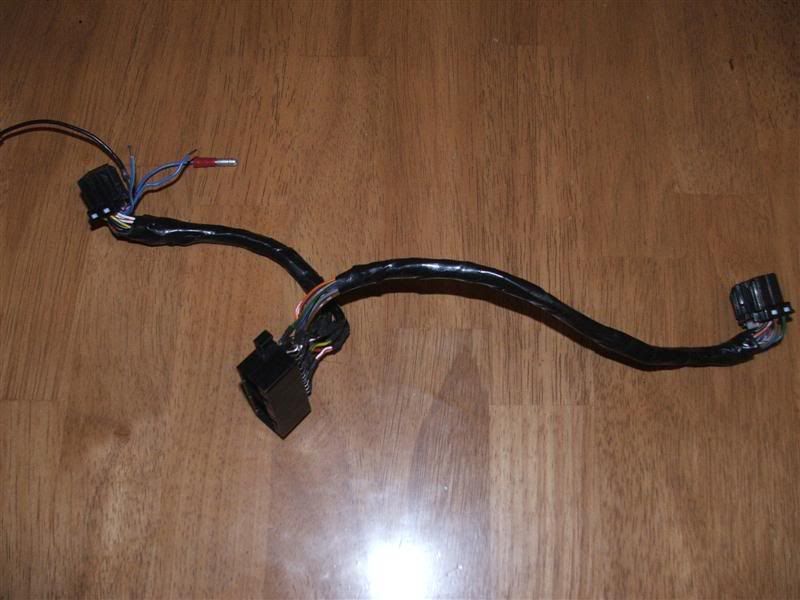
This is the EB Plug 

These are the two EF/EL plugs Left Hand 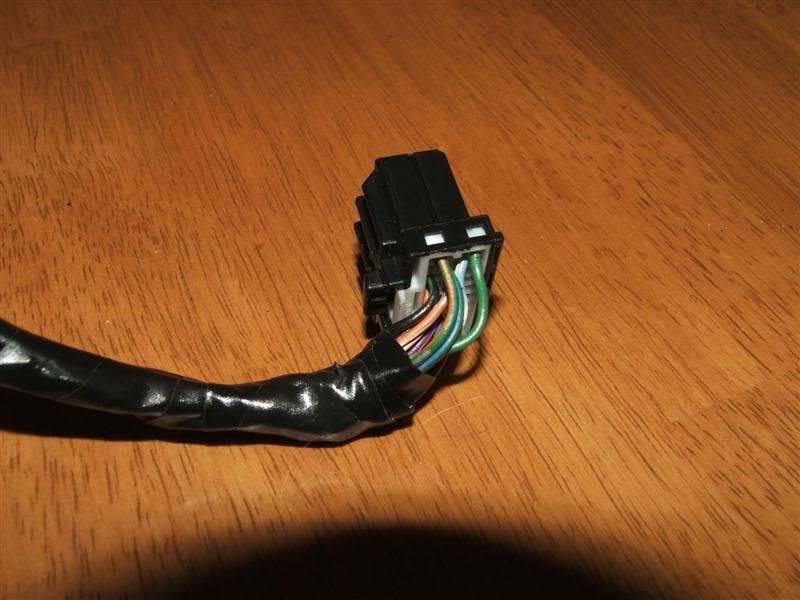
Right Hand 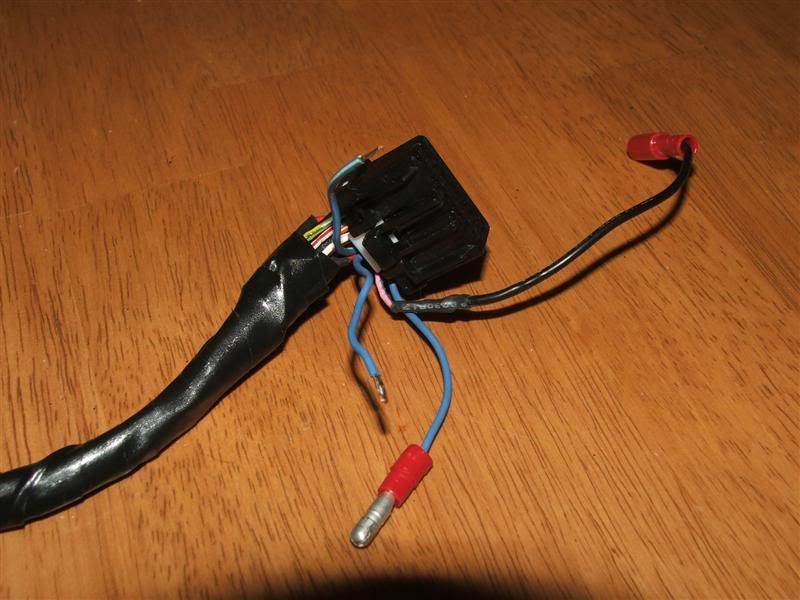
Note there are some wires not in the new loom. Two of these are connected to the ECU. One to the DATA line (Pin 34) and the other to the TFI line (Pin 36). Use 3 metres of the Auto Wire and run two wires from the Cluster area to the ECU and splice the two wires into the relevant ECU wires. I used Crimp Terminals to allow me to unplug/undo all the changes. The other two wires are for the DATA output which normally goes to the EF/EL Trip Computer and for the Smartlock LED. I left them out for use later if I needed them. Here is the loom plugged in to the EF Cluster. 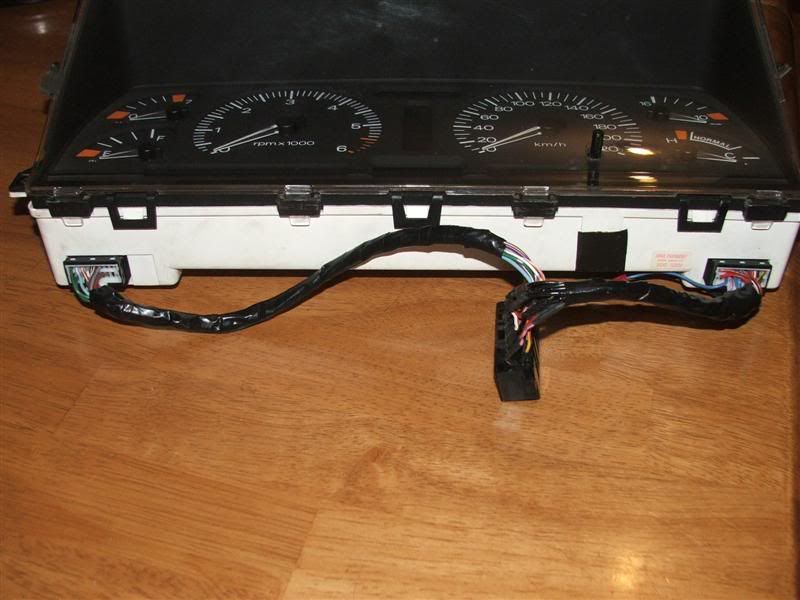
Step Three Make mounting brackets. This is how I have done this. You may find a better way. I still need to work on the placement of my cluster. It is out 5mm to the left, but will work on that another day. I also used the screws and slide on clip thingos from the dash. 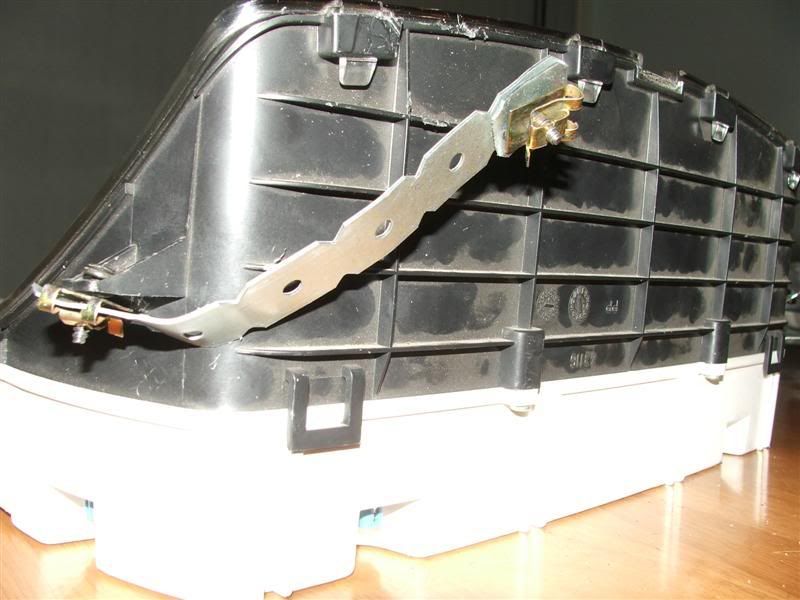
Step Four Place the Cluster in the EB Dash. You will figure it out. It does not just simply drop in. You have to slide and juggle it all. Don't forget to plug in your new loom to the EB cluster loom plugs and the two additional wires connected to the ECU (don't mix them up). Then use the Factory Mounting points for the EB Cluster to attach your new brackets to. Example prior to attaching. 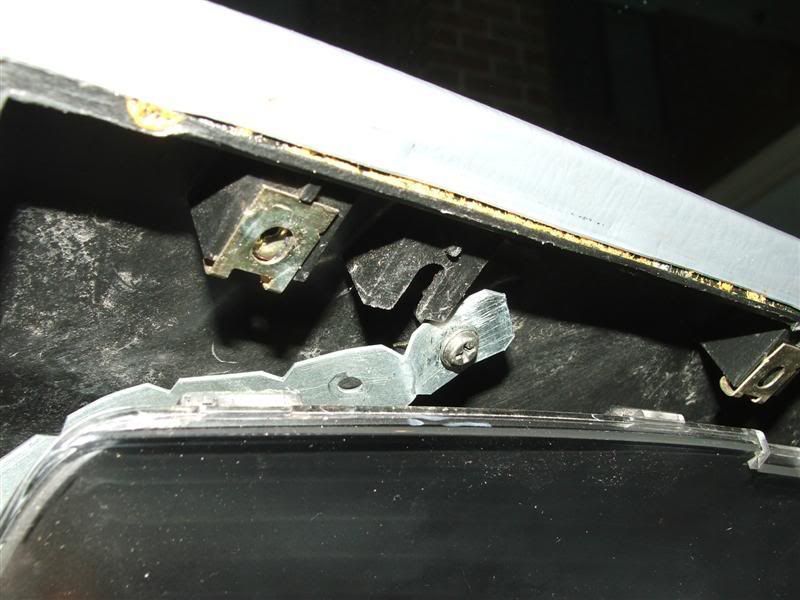
Now reassemble your dash. TADDAAAAAAA Finished. Sounds Easy Huh? So for those who patiently waited for some pics of gaps etc please see the following photos. 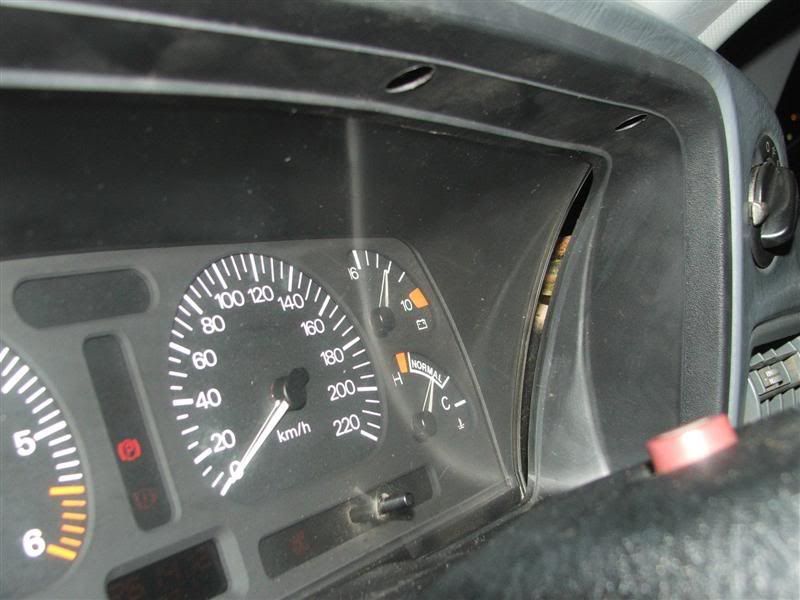
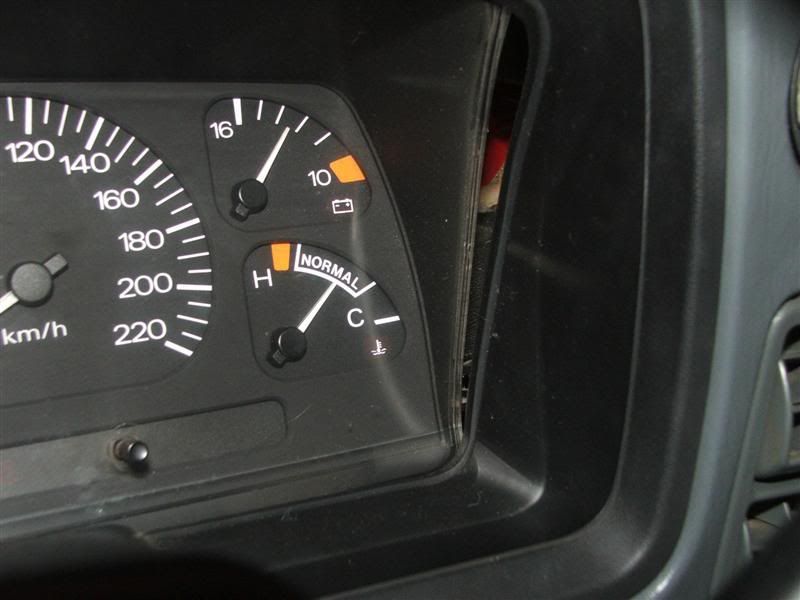
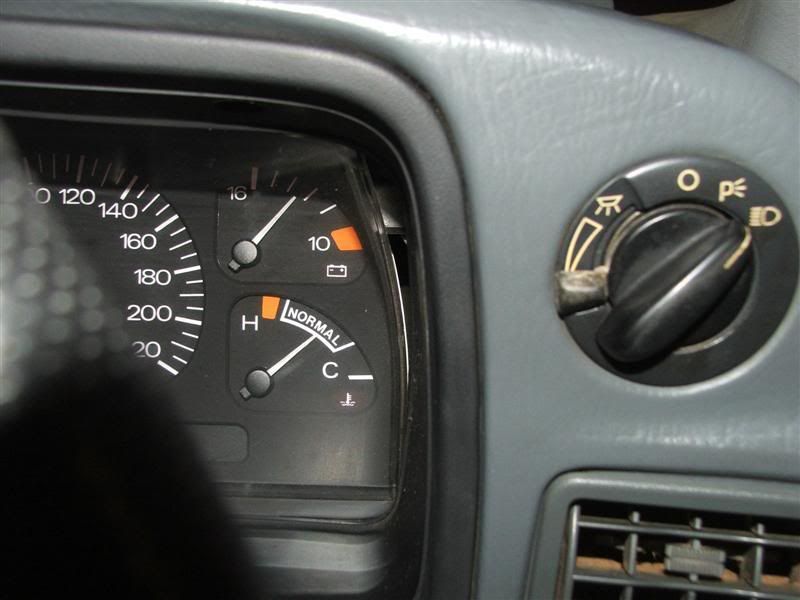
There are some small gaps. But these are only really noticeable if you look for them. I will add some small filler strips later to finish it off. From the drivers seat, I can't really see them. A couple of night shots. Bright Setting 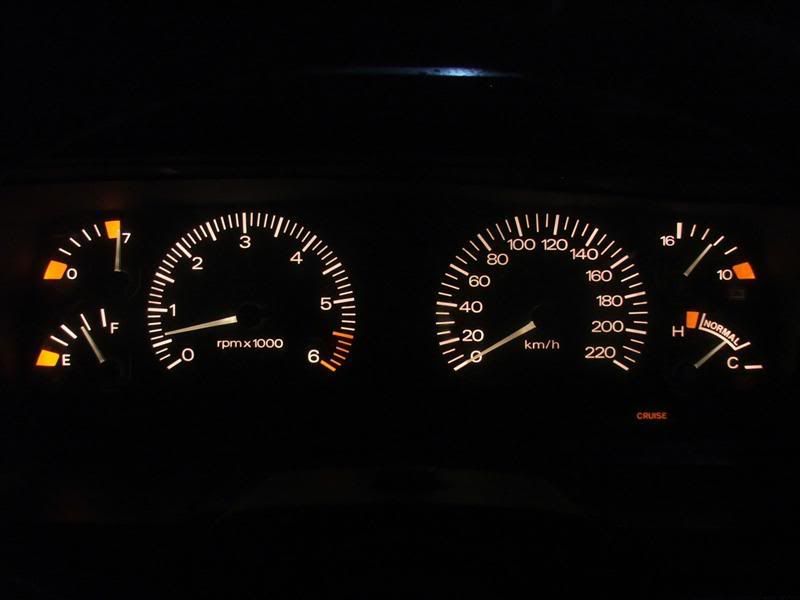
Dull Setting - with all extras on 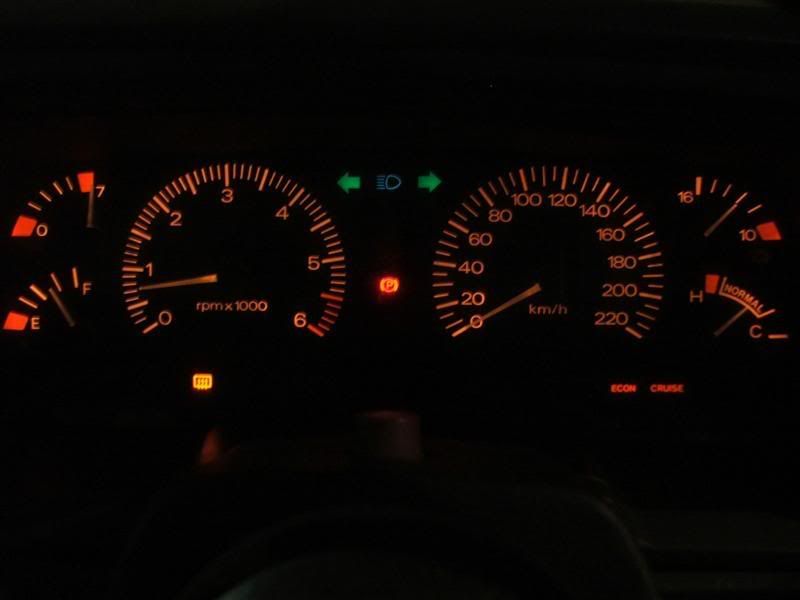
There are a couple of things yet to sort out. The LCD is not lighting up at all yet. I believe this is due to the LCD Dimmer wires not being connect to anything at all. I will try and connect the normal park light wire to the postive side and connect the earth side to ground. Also, the oil pressure guage is still reading hight. I believe the EF/EL cars use a different oil pressure sender to the EA/EB/ED cars. Ford have different part numbers for them. I will try to grab one from the wreckers and see if it resolves the issue. It is also worth noting that the EF/EL Tacho does not use the same source wire as the EB. The EB gets the signal from the TFI module (Pink or Pink/Blue Wire) and the EF/EL gets the signal from the wire going to the TFI module from the ECU (Yellow/Green wire - Pin 36) Thanks snap0964. I hope some of this makes sense. YES, this mod is NOT for the first timers, and requires a variety of skills and tools to complete. Please contact me if you are serious about doing this and I will help you out. Regards BenJ
_________________ {DESCRIPTION} - Current Ride |
||
| Top | |
||
| BenJ |
|
||
|
Hi All, small update
I swapped some parts (cheers snap0964) a couple of weeks ago for an EL Ghia Tickford ECU and I finally got around to putting it in yesterday. Did it make much difference? Bloody Oath it did. Mid range is much stronger and the top end is better too. Very happy chappy now. The new fuel and ignition maps seem to make the most of the intake and exhaust addons. And when I add a cam in the not to distant future, it will be very nice. I took the car on the South Coast Cruise today and had a ball. I also was able to push the car a bit more. The Ghia ECU revs out further than the GLi one. 1st to 2nd now changes at 5400rpm where is used to change at 4800. The change itself is much firmer and gives a nice push as it goes into second. So overall, another excellent mod, and a very happy modder. Regards BenJ
_________________ {DESCRIPTION} - Current Ride |
||
| Top | |
||
| Who is online |
|---|
Users browsing this forum: No registered users and 0 guests |