|
| cwhitz |
|
||
|
yeah i had the J3 already
and yeah he basically charges per hour i walked in with 150rwkw and walked out with 156.2 using 40% less fuel i was only getting about 250kms to a tank and he say the AFR's were all over the place ill put a dyno video up soon
_________________ {DESCRIPTION} |
||
| Top | |
||
| cwhitz |
|
||
|
Engine bay pic. Kept as standard looking as possible so the po po cant tell

_________________ {DESCRIPTION} |
||
| Top | |
||
| cwhitz |
|
||
|
{DESCRIPTION}
dyno video for those who are curious
_________________ {DESCRIPTION} |
||
| Top | |
||
| B Bear |
|
|||
|
Got to be happy with that mate ! More power and less fuel, plus a good amount of power out of it too.
Nice clean looking engine bay ! Just watched the video too. |
|||
| Top | |
|||
| cwhitz |
|
||
|
Thought I might upload a picture of my other toy
2009 husqvarna te510 converted to a motard More fun then you could imagine to ride {DESCRIPTION} Uploaded with {DESCRIPTION}
_________________ {DESCRIPTION} |
||
| Top | |
||
| cwhitz |
|
||
|
Ok, so im sure most of you other boxcar owners with a manual know how crap the engine mounts are. Especially when you 245's on the back. Drop the clutch a few times are they are destroyed. ive changed the passenger one (more regular as its the side the motor pulls from) about 4 times
and the drivers side twice, breaks from compression lock ups. {DESCRIPTION} Uploaded with {DESCRIPTION} So ive finally had enough and decided to make up some brackets out of pieces of scrap my dad had left. they were already offset to suit pretty well, gotta be lucky sometimes. {DESCRIPTION} Uploaded with {DESCRIPTION} {DESCRIPTION} Uploaded with {DESCRIPTION} Now, i expected increased vibrations, but holy flying ape testicles, not as much as there was. In an attempt to reduce it i took off the driver side. It helped a little. But still no good So back to the drawing board on that one. Might have drill them out a lot bigger and put some grommits in, so it can flex but cant snap What have other people done to prevent the snapping?
_________________ {DESCRIPTION} |
||
| Top | |
||
| eed-250 |
|
||
|
I've never had a problem with mine. I've always used genuine ford ones..
Why are you doing compression lockups anyway? |
||
| Top | |
||
| TROYMAN |
|
||
|
best method is stop using cheap s**t engine mounts...
|
||
| Top | |
||
| cwhitz |
|
||
|
By cheap s**t ones what brand do you mean?
These are the kelpro polyurethane ones from repco. I've broken a genuine ford one...
_________________ {DESCRIPTION} |
||
| Top | |
||
| cwhitz |
|
||
|
Also update. As some of you would have seen I have a e series brake upgrade kit in the making.
My dad is currently drawing up a hub to retain the eseries offset. I also managed to find some r32 gtr sumitomo 4 piston front 2 piston rear calipers on gumtree for 180 bucks. Bargain in my books. They are a fairly decent size. Way bigger then the s**t ford one. I'll post a pic up soon. Also gonna cut up an old ford rotor and see if you can turn that into a hub and use this skyline setup. I know others have already used the old rotor to make a hub. But it pushes your offset out by the thickness of the disc. Which is not much. Other issue that also might come up is whether this style of hub will fit inside the skyline rotor. Skyline share the same stud pattern of 114.3 x 5 and have fairly cheap rotors. Around the 200-220 mark for a pair of drilled and slotted front rotors. They standard gtr sumitomo measure 296x32mm discs. The v-spec version uses a 324x30mm rotor with brembo calipers. Which are 500+ for a set. So they sumitomo was a better option for me at 180. Still being a massive upgrade. In the process of working out the biggest disc I can run with these. Might work out to work ok with a larger one. If not I'll make the standard disc work. At 296 it isn't as large as the UPC kit. But being a 4 pot piston I think it will still out-brake it. Also going to paint them red and I am considering leaving the Nissan logo on. Thanks. Callum.
_________________ {DESCRIPTION} |
||
| Top | |
||
| cwhitz |
|
||
|
DIY SUNROOF INSTALLATION
Ok, so I purchased a sunroof out of an EB ghia last november for $200. Happy with that. Only catch was I had to go and remove it. Which was fine by me because I got to test it was working and see how they installed it. I'm gonna make this as detailed as I can, so all you other E-series owners have got a good guide to look at it if you're game enough to attempt this yourself. Bit of background before I start. Ford did not actually install these sunroofs. If a customer ordered one it was sent elsewhere to have an aftermarket one installed. I can tell you one thing about the installation of a sunroof. It isn't hard, I dont know what people are so scared of. The lack of care I saw that was put into it makes it very obvious that these were smashed out as fast as possible. There a 3 parts to the sunroof. The upper frame/lip that goes onto the top of the roof. The lower frame which is riveted to the upper frame. And then the sunroof cassette which bolts to the lower frame. The cassette has several brackets around its perimeter that are used to support it, they are just riveted on. Lets get to it! Tools needed Drill Grinder + cut off discs Chisels Screw drivers Stanley knife Hammer Easier with no interior in the car Step 1 Remove the headlining. Pretty self explanatory but ill go through it anyway. You need to remove all the pillar trims and roof lining trims. Then you can pull off the roof lining, which has probably sagged as they just stuck it to a piece of foam rolled over the top of the sunroof, and hacked up original headlining. The only pieces they use of the original headlining board is the centre light, which gets moved back and all the roof handles, which were just cut around and tec-screwed on. As I said not much care taken. Once this is out you will be able to see the sunroof in all its glory. The wiring loom and the drain hoses are all exposed. The hoses literally just run into void sections in the pillars(will have pics on install). Wiring loom is a switch that goes next to the rear demister switch and runs to 3 relays down in the kick panel(will have pics on install). Step 2 Remove lower cassette. To remove the cassette you need to take off the various brackets around the outside. These are riveted on with big a** rivets and are a prick to get off. Some I managed to drill the centre out of and could then pop the head off with a screw driver/chisel. Others I had to cut the heads off with the grinder then pry them off with a screwdriver. {DESCRIPTION} Uploaded with {DESCRIPTION} Once these brackets are off you can remove the cassette from the lower bracket. It is Screwed up with some short philips head screws. (Will show a pic on install). Once all undone it should just lower down. Good to have an assistant for this part as it is awkward. Once this is out you're left with the lower and upper frame of the sunroof. Removing lower and upper frame I didn't have time to remove this at the wrecker so I just cut around them and took it with me to pull apart at home. Be careful not to cut the frames if you're going to do the same. 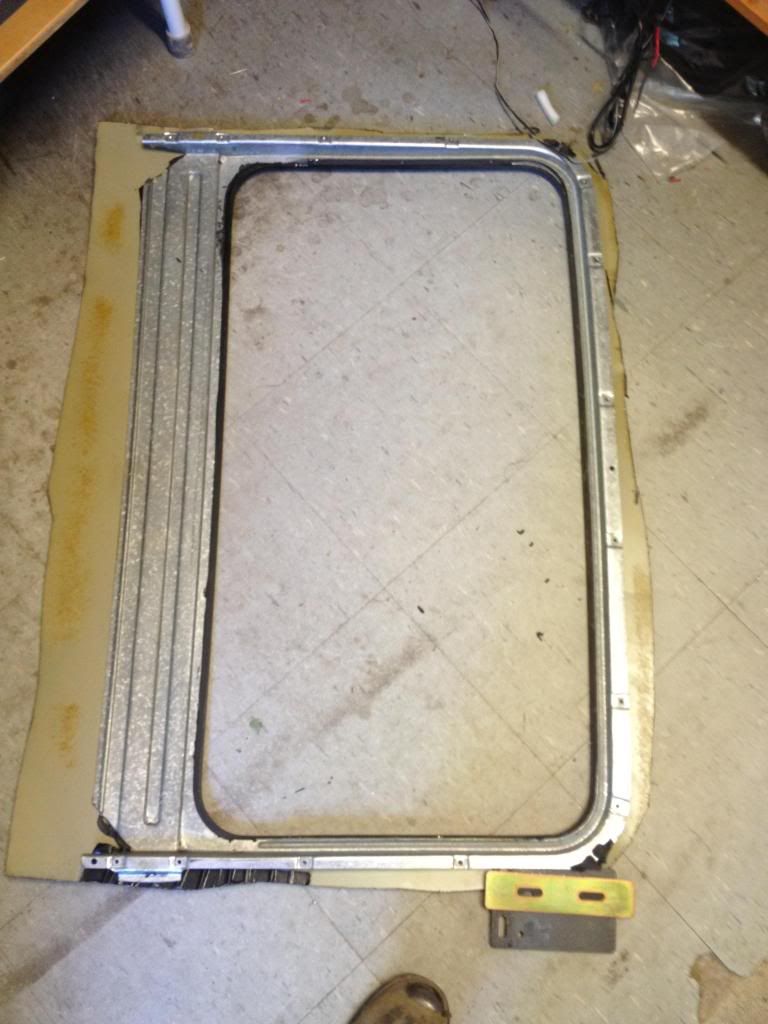 Now to pull the frames apart is a delicate process as they are stuck together very well with poly-urethane. I went around the outside with a stanley knife and tried to cut into as much of it as I could before levering the lower frame up on 2 steel plates I had lying around, this forced them apart nicely as trying to lever against the thin roof metal is useless. Once you break the seal its easy to move you're way around the frames and peal them apart. On the rear section of the frames the upper interlocks with the lower with a U shaped lip. This is the most difficult part to separate without bending them. So what I did was separate the frames except for the rear section and put a wide paint scraper into this U shaped lip and tapped the scraper with a hammer to break the seal and then they came apart. WOOHOO! Now to clean them up I used a Gasket Stripper from repco. Not cheap at $16 a can, But holy s**t its strong stuff. Peels all the paint and everything off. So I cleaned all the old poly-urethane and paint off and resprayed it. you must get it 99% clean to ensure a good seal when re-installed. If it leaked it would be a nightmare. That's it for now, ill make the installation half once ive installed, which will be around the easter weekend. Various pictures below. Cheers, Callum. {DESCRIPTION} {DESCRIPTION} {DESCRIPTION} {DESCRIPTION} {DESCRIPTION} {DESCRIPTION} {DESCRIPTION} {DESCRIPTION}
_________________ {DESCRIPTION} |
||
| Top | |
||
| Six |
|
|||
|
Looks good mate, how did you go with the brake upgrade?
_________________ MGW Short Throw Shifter, CVE Cam, CVE Head, SS Big Mouth Air Intake, Pacemaker Headers, 3" Exhaust, 3" Varex, 3" Cat, 19" Silver Agents, EMS Stinger 4424, 42lb Injectors and Walbro 255lb Fuel Pump |
|||
| Top | |
|||
| cwhitz |
|
||
|
Getting the old rotors machined and using them as they are 25mm think so gonna machine off the thickness. and using a 324mmx30mm r32 gtr v-spec rotor with the sumitomo 4 piston caliper. once i get the hub all bolted on with the rotor ill have to draw up some mounting brackets for the calipers
should work out well in the end. definitely doable and hasn't cost all that much
_________________ {DESCRIPTION} |
||
| Top | |
||
| cwhitz |
|
||
|
thickness of the disc*
_________________ {DESCRIPTION} |
||
| Top | |
||
| wagonstyle |
|
|||
|
How's the sunroof instal going mate?
I've just picked up a full dl roof with sunroof that ill be fitting into my ef wagon though its different to the old boys sunroof were the motor is at the rear and button at the front instead of motor at front like mine and button on dash. Got some good tips from your write up but more pics as well as an instal write up would be handy.
_________________ ..wagonstyle.. |
|||
| Top | |
|||
| Who is online |
|---|
Users browsing this forum: No registered users and 0 guests |


