

|
| EALCON 3.9 |
|
||
|
if it makes u feel better i bought the Nason timing chain kit aswell off ebay. received it about 2 weeks ago
|
||
| Top | |
||
| EFFUTURA4.05SP |
|
|||
|
{USERNAME} wrote: {USERNAME} wrote: Can i just ask why are you rebuilding it? Are you planning on boosting it? If not just go to the wreackers and buy a EF-AU motor,Seems quite pointless to rebuild your engine unless you just wanna throw money around.. I'm doing it because I can...mainly for personal accomplishment and wanting to learn and understand things better. Yes I know I can fetch a cheap E/AU-series motor, but why would I get another motor when I have a spare motor I can work on over time that will be better than the ones wreckers supply with no idea of history. With the money I'm spending, I will also gain knowledge and experience...not sure when I will use this knowledge next, but I like to know and learn things that interest me (not as a job, as a hobby). Also completing a project that actually works after putting in the hard yards is one of the best feelings. Hey Phongus, I agree totally with you.. I started my engine for the first time today and after a year and a bit, lots of money and hassles, It was still worth every bit! It was soooo good to hear that engine run and knowing that I put together the whole thing myself (successfully) was extreemly satisfying. I hope you enjoy the experience as I did... Good luck!
_________________ 1996 EF Futura factory manual |
|||
| Top | |
|||
| EFFUTURA4.05SP |
|
|||
|
If you can be effed shopping around it will pay off as there is so much stuff required to rebuild an engine (remember tools if you dont have em - Ring expander and compressor, torque wrench ect..)
All the fluids, Hoses & clamps, leads, spark plugs, filters, electricals, DEGREASER!! (I went trough 30 odd cans) Also budget money for misc goods as there was so many things I forgot about or broke while I was removing and installing the new engine. Cheers
_________________ 1996 EF Futura factory manual |
|||
| Top | |
|||
| hans hartman |
|
||
|
hold back on the acl race kit untill you know bore size,then hone or bore the cylinders to suit the pistons and check that aux shaft crap
_________________ R.I.P HANS HARTMAN |
||
| Top | |
||
| phongus |
|
|||
|
{USERNAME} wrote: If you can be effed shopping around it will pay off as there is so much stuff required to rebuild an engine (remember tools if you dont have em - Ring expander and compressor, torque wrench ect..) All the fluids, Hoses & clamps, leads, spark plugs, filters, electricals, DEGREASER!! (I went trough 30 odd cans) Also budget money for misc goods as there was so many things I forgot about or broke while I was removing and installing the new engine. Cheers Thanks for that. Yeah I have most the tools I need, probably just need ring expander and piston thingy that holds the whole thing together when you put the piston/conrod assembly in. Miscellaneous stuff is always in the budget, but I don't really have a budget, it's build as I go/can afford and document the cost just in case some others might want to try and see what is actually involved. The only weekend where I am not doing anything, so going to be servicing my bike and probably start pulling things apart to bare block {USERNAME} wrote: hold back on the acl race kit untill you know bore size,then hone or bore the cylinders to suit the pistons and check that aux shaft crap Yeah I didn't realise this until I spoke to the guy at the engine rebuild place. He told me to buy the rebuild kit after you get the block checked, honed/bored etc. I wasn't going to buy the kit till after everything else...mainly because I can't afford it since it will probably cost 50% of the total cost of the parts list. I will most likely get the engine rebuilder to buy it in for me, so at least I know they are the right size Cheers Phong
_________________ phongus = Post whore 2006 |
|||
| Top | |
|||
| hans hartman |
|
||
|
now we have a sticky,if the engine guy assembles the rings to pistons,crank and bearings,you may get warranty-mine does a he knows my work,or if hes not busy he will do a short assemblyand i throw the heads and the rest on,i work for him sometimes.fittimg rings is not fun and has to be correctly done,same with the install and gapping positions.if you break any l dont know if you can buy them easy,he can.
_________________ R.I.P HANS HARTMAN |
||
| Top | |
||
| phongus |
|
|||
|
{USERNAME} wrote: now we have a sticky,if the engine guy assembles the rings to pistons,crank and bearings,you may get warranty-mine does a he knows my work,or if hes not busy he will do a short assemblyand i throw the heads and the rest on,i work for him sometimes.fittimg rings is not fun and has to be correctly done,same with the install and gapping positions.if you break any l dont know if you can buy them easy,he can. Funding is slow, thus the project will take a while to complete. I would leave this as a normal thread until it is actually being completed, then hopefully get and admin to "sticky" it Regarding assembly, I will see how things pan out. Firstly need to pull everything off the motor and send it over to the engine rebuilder to get cleaned up (hot bath/acid wash/caustic wash <----are they the same thing with just different names? What's it actually called?), surface checked and straightened (is calling this part "decked" a wrong term?) and cylinders honed...bored if needed according to engine rebuilder. If I can spare some money and the builder gives me a good price, might get them to put it in, but I prefer to do it myself. After that I will most likely have to wait for cash flow to get the rebuild kit...and it will be a while, unless I win the lottery. Anyways thought I'd put up some pictures and my progress. Pretty image heavy, but will be using this in the technical document. Sorry if my descriptions are a bit crap and hopefully somewhat understandable. Firstly here is how it looked like when I just got it to my house from my parents, after sitting for about 4 years.  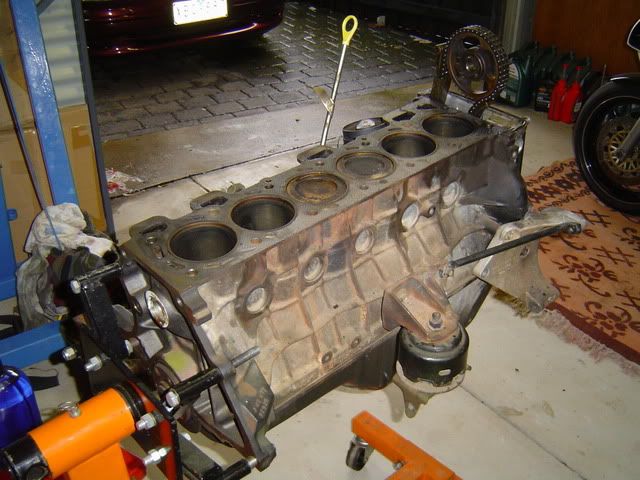 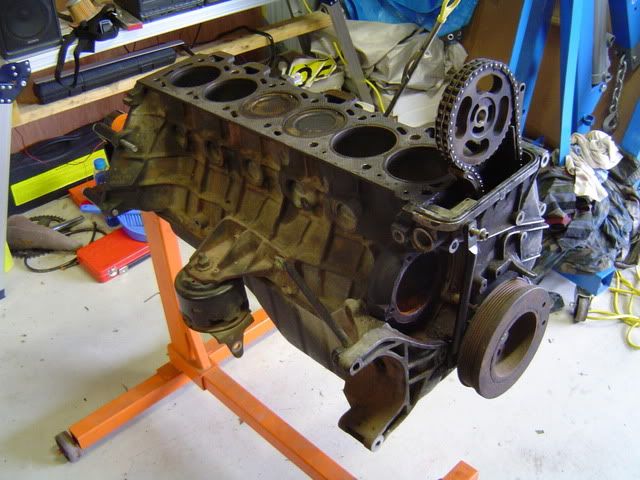 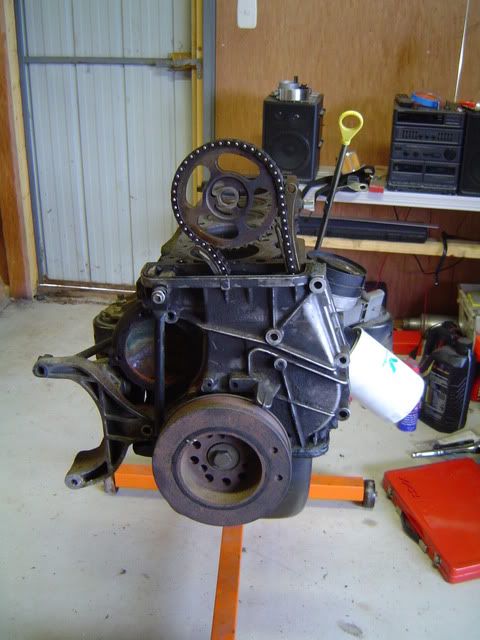 The head was already removed when I took the engine out. Sitting somewhere in my garage but if you want to see how a head is removed off the block, you can read the head gasket replacement guide ({DESCRIPTION}) Then I removed the Crankshaft Pulley (a.k.a Harmonic Balancer) off the crankshaft. This required a bit of effort and since the engine is sitting on an engine stand, it was hard to stop the crank from rotating as I try to undo the bolt, this made it harder since the flywheel was not attached. According to the manual, the bolt is tightened to 120Nm of torque, so pretty damn tight. I ended up using two of the stabilizing rods/bars for the alternator and attached them to the other end of the crankshaft (flywheel end) so that the bars got caught on the engine stand and stopped it from moving. Using a T-bar, 22mm impact socket and a 1m extension rod on the end of the T-bar, I managed to get the bolt off. Once the bolt was removed, a pulley remover was required. Fortunately I had one, unfortunately, it was a crap cheap one that didn't fit on the harmonic balancer (HB)...refer to image. 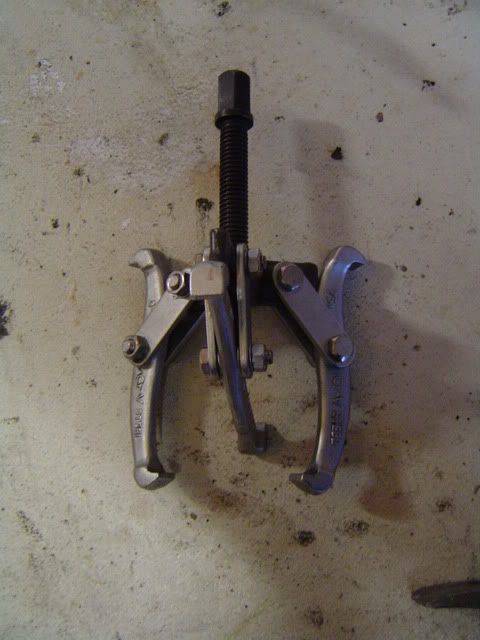 I didn't want to go out and buy another pulley remover, so I thought about tinkering with what I had. After some thinking and tinkering, I came up with the following... 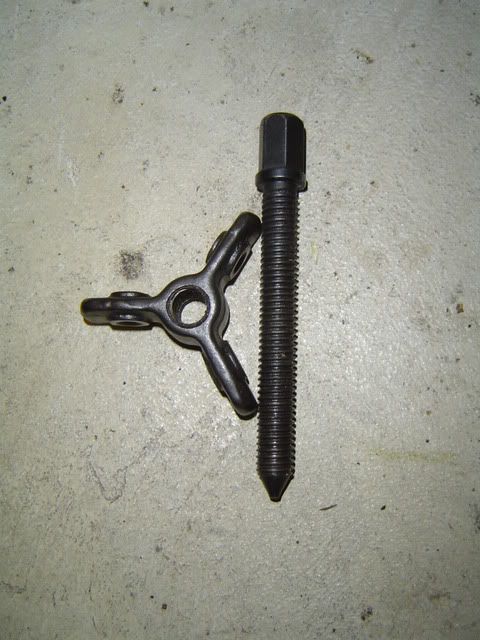 I removed the arms off the cheap pulley and used the centre bit only. The centre bit is a 3 armed piece of metal which fit perfectly inside the HB and had pretty good spacing for the bolt holes. So I used some bolts off the block (13mm bolts used on brackets around the block) which fit the bolt holes, tightened them on the HB with the centre bit of the pulley remover. I positioned the pulley remover so that when I tightened the centre bolt, the centre piece would rotate onto the bolt thread, rather than away...that way the centre piece doesn't slip out since it is only held in place by the bolt head. As you can see from the image below, the arms are to the left of each bolt thread since I'll have to rotate the centre bolt clockwise to stop it from slipping. 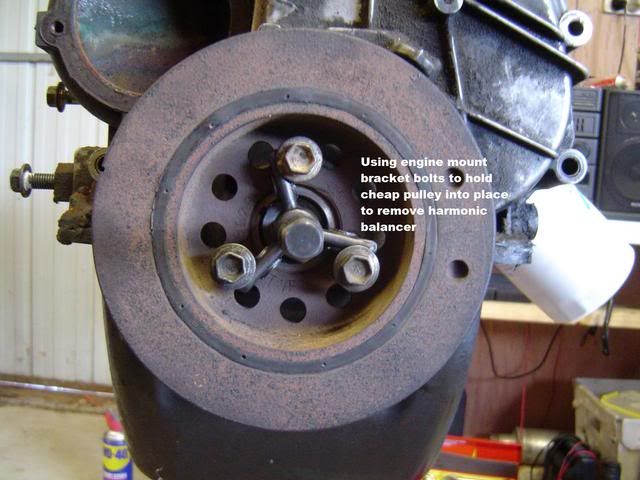 This is after the harmonic balancer removed. 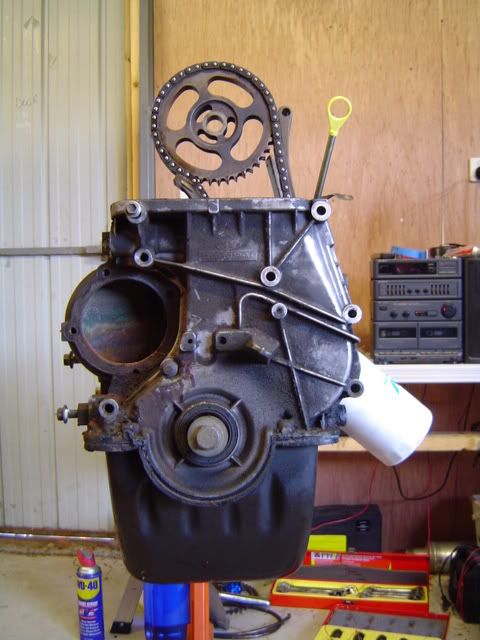 You can probably see that the timing case bolts have been removed...I removed them long ago before I even transported it to my house, but I'll get back to that later. Anyways after removing the HB, I removed the sump. There were a total of 24 x 8mm bolts holding the sump to the block. If it has never been removed before, you might need to use a flat head screw driver to pry some areas off once bolts removed. Make sure when you remove the sump that you drop it slowly, you might have some left over oil in the there. 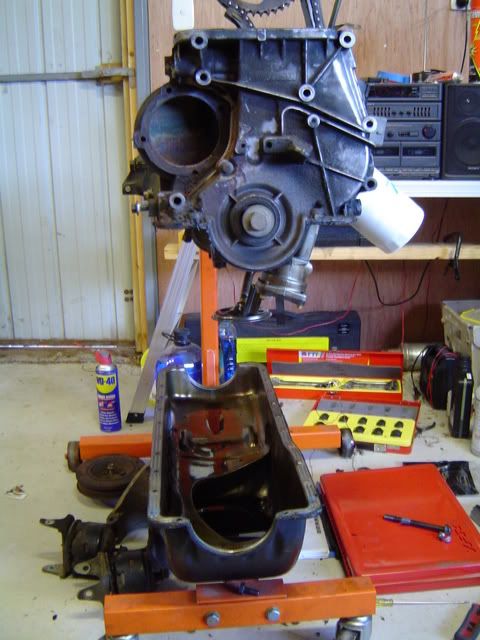 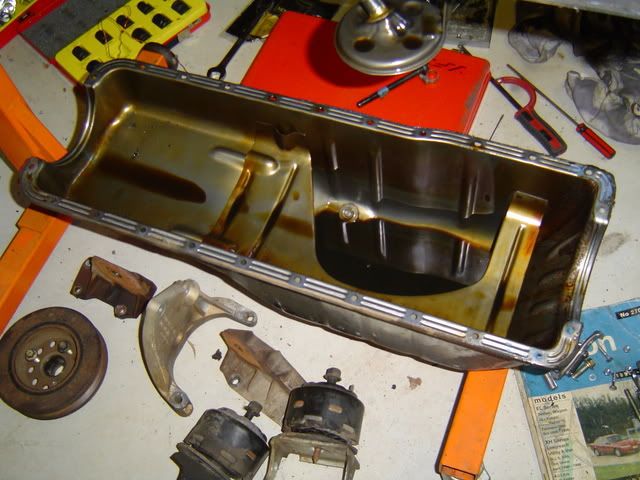 Once cleared of sump and dripping has stopped, I removed the timing case. Before I removed it, I rotated the engine to let more oil drain out. It also made it easier since the chain wouldn't just drop with the camshaft sprocket once case is removed. I believe the bolts were 10mm and there are 8 of them holding the case to the block. The timing case is held in place by 2 locating rings and they are a snug fit, so you have to pry it off the block. I used a flat head screw driver and gently tapped between block and timing case from the top. Came off pretty easily after that. There was also a small cylinder, piston type thing sitting just above water pump cavity on the block side. I assume that's for some sort of hydraulic tension? (if looking at the image below, it is below the water pump cavity) This is how it looked like. (NOTE: Engine is upside down) 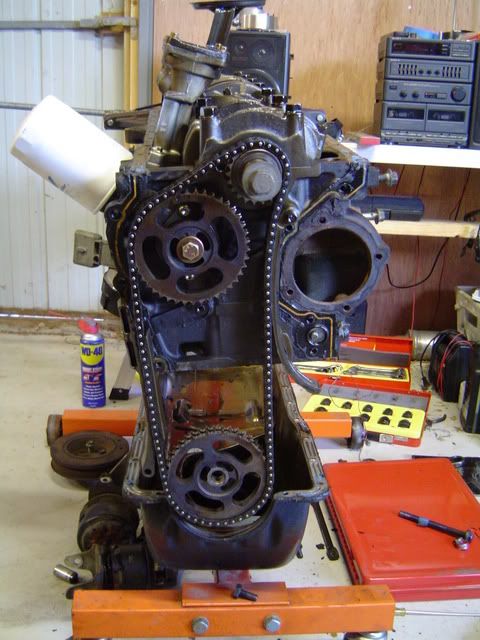 This is what I removed from the block. Timing case, camshaft sprocket, chain and 3 guides. 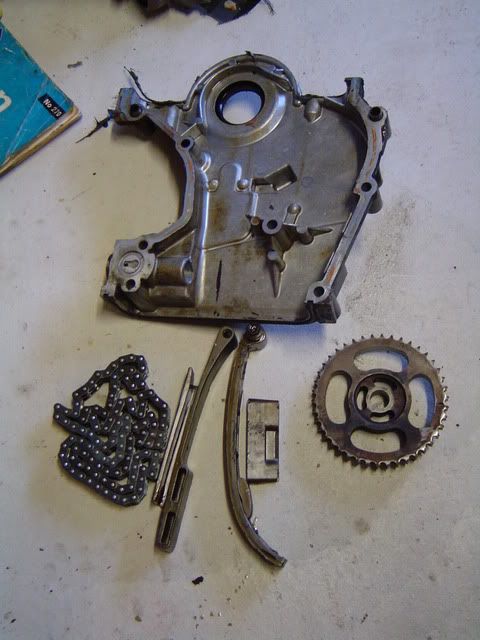 Rotated the engine back the right way up. 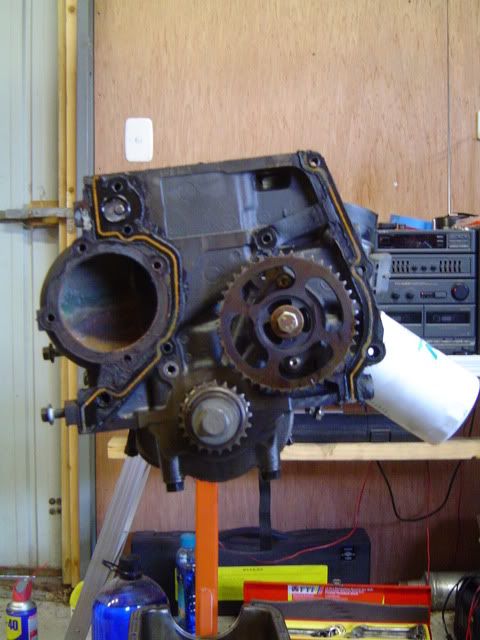 Took a photo of the crankshaft while it was upside down as well for anyone wanting to see. 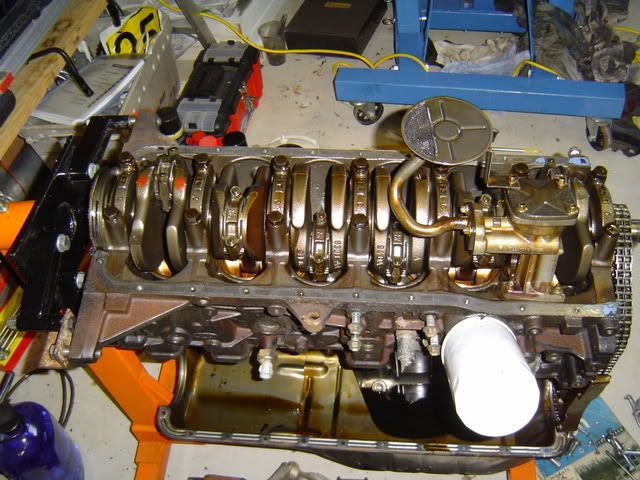 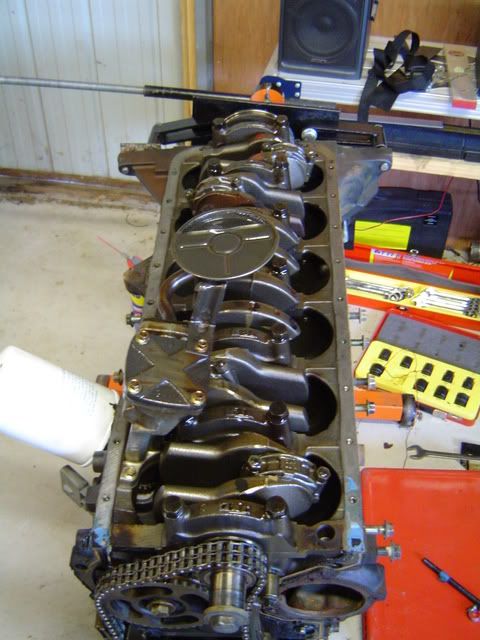 Well that's as far as I have gotten on a lovely Sunday. Will probably remove the pistons, conrod and crankshaft next weekend if I have nothing else to do. Also maybe remove all the old gaskets that are kind of stuck nicely to the block. QUESTIONS: Also I found something rather odd behind the timing case. The auxillary shaft had a lot of play in it...from my experience there shouldn't be any play in anything rotating, up/down/side to side...maybe a bit forwards and backwards, but side to side kind of got me worried. So to my questions...is this normal? If not does this mean it is f**k or was the cause of the motor to die in the first place? Do I need to find a new shaft or can I replace a bearing or something? It feels as though the bearings/guide or whatever has broken into pieces...but I don't know. Thanks in advance. It was rather fun removing everything, can't wait to have everything nice and shiny and put back together now Cheers Phong
_________________ phongus = Post whore 2006 |
|||
| Top | |
|||
| xr6_corbin |
|
|||
|
I don't know if anyone has answered this but that heater pipe that comes out of the back of the waterpump and around the block can only be bought genuine from ford. Cost me about 60-70 bucks trade price.
_________________ Just Falcon Around. |
|||
| Top | |
|||
| EFFUTURA4.05SP |
|
|||
|
Decking of the block it machining material from the head gasket mating surface to ensure a good head seal.
Also, If you plan on stoing your engine ensure you give it a good spray with WD40 every couple of weeks to stop the raw steel surfaces and components from rusting. Also in regards to the heater pipe, I just gave it a good sand, clean, new O rings, and paint and she is as good as new
_________________ 1996 EF Futura factory manual |
|||
| Top | |
|||
| EFFUTURA4.05SP |
|
|||
|
The Aux shaft is "bearingless" so it may be wear in the block.
There shouldnt be any play as the inner and outer journals for the Aux shaft are quite tight
_________________ 1996 EF Futura factory manual |
|||
| Top | |
|||
| phongus |
|
|||
|
{USERNAME} wrote: I don't know if anyone has answered this but that heater pipe that comes out of the back of the waterpump and around the block can only be bought genuine from ford. Cost me about 60-70 bucks trade price. Thanks for that, I just found I kept my old one and seems to be still in good nick EFFUTURA4.05SP. I have been spraying it with some WD-40 to keep rust to a minimum, so hopefully it will be okay. In regards to the auxillary shaft...I will take a video of it when I wiggle it and then remove it to see if anyone can diagnose the issue. If the block has been worn out...does that mean I need a new block or can something be pressed in (by the pros of course). Cheers Phong
_________________ phongus = Post whore 2006 |
|||
| Top | |
|||
| hans hartman |
|
||
|
strip the block and check with the engine shop on aux shaft wear,can they fit a bearing-white metal,other wise it maybe scrap==kills the blocks from what i read.
_________________ R.I.P HANS HARTMAN |
||
| Top | |
||
| phongus |
|
|||
|
Here is a short video of the auxillary shaft play...it only moves in one direction. Up and down it is fine, side to side it is rather crap. I think the tensioner was too tight and cause the auxillary shaft to eat away at the block (or block eating shaft) causing spark and oil pump failure which killed the engine?
Woops, forgot to link the video. {DESCRIPTION}
_________________ phongus = Post whore 2006 |
|||
| Top | |
|||
| EFFUTURA4.05SP |
|
|||
|
If that is the play between the journal and bearing its f**k BIG time!!
It isnt a loose retaining plate?
_________________ 1996 EF Futura factory manual |
|||
| Top | |
|||
| phongus |
|
|||
|
{USERNAME} wrote: If that is the play between the journal and bearing its f**k BIG time!! It isnt a loose retaining plate? From what I could see...the plate doesn't seem loose, but then again I may be thinking of a different part. I'll probably remove the sprocket tomorrow and see how it looks like behind it. Pretty sure the block is buggered.
_________________ phongus = Post whore 2006 |
|||
| Top | |
|||
| Who is online |
|---|
Users browsing this forum: Facebook [Bot] and 58 guests |