
|
| rhys.c |
|
||
|
Well this is my very first doco and I was quite pushed for time while I was doing it so hopefully I managed to get adequate info.
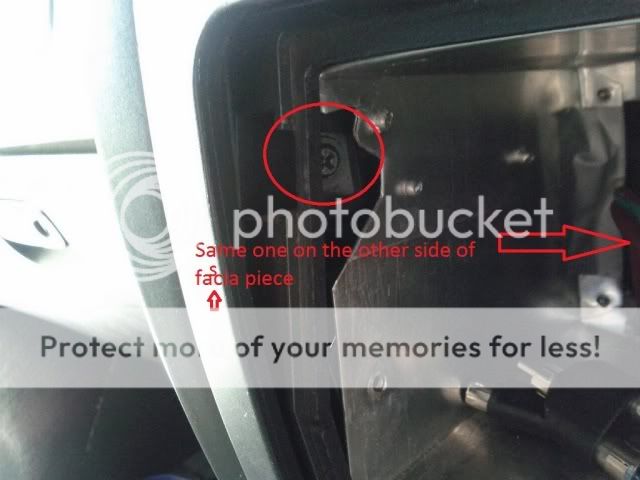
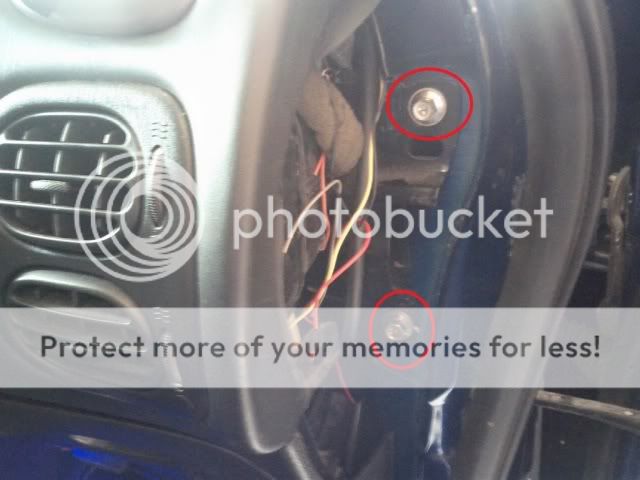
The caption referring to each picture will be ABOVE the image it refers to. First start by removing your radio (sorry not pictured as I didnt have one in at the time) and then the screws which support the fascia piece.  lol at paint spelling mistake.  Next remove the cover plate which runs along the windscreen. Pretty simple so only one pic of that.  Now you can get access to remove the three mounting points at the back of the dash.   This last one is a bit confusing. Red = where the bolt should be. Blue = an earth strap, DO NOT FORGET THIS BEHIND THE DASH WHEN REASSEMBLING or you will need to bring dash forward to access it again. Pink = the mount point for the cover we removed previously. Green line = where my dash was broken upon moving it when I bought it  Remove the centre console, sorry no pics but there are 6 mount points. 2 under drink holder area, 2 under cigarette lighter area and 2 bolts which mount next to the front seats rear mount points. Once removed you will have access to the two mount points under the dash as seen below.   Now there are only 4 mounting points left which are the main ones. Try to disconnect as many wires as possible at this stage. Although its easier when the dash is slightly brought forward your helpers will be cursing you while you fiddle around they hold the dash up. Here are a couple of plugs shown close up to see how they work. See later pictures for overview of where plugs are. But for an idea, you need to unplug: ECU, Vacuum lines on heater box, white plug right next to vacuum line plug on the passenger side. Now on drivers side you need to unplug 2 big white connectors, one orange plug next to upper white one, main power supply to fuse box only and any crap coming down from steering wheel. There are more going up there than you would expect, maybe 5-6 plugs.     The pic below will help when disconnecting wires as well as with heater box and steering wheel. I neglected to mention that you needed to drop the steering wheel down prior to removing dash so in the approximate position of the two green circles there were two 10mm bolts holding it up. The red circles show the points where the heater box was mounted and the blue circle shows an area that takes some care before removing the box. Lots of little clippy things  Before tugging away at the box there are three points which must be disconnected to allow it to separate from the firewall. The blue circle shows an area which is hidden by the washer bottle, it carries the vacuum through the firewall so that you may change the area where the air comes out. The red is the air con, this should be degassed prior to disconnection as its illegal to vent this to the air because it destroys the o-zone layer. When you take it apart a small amount of gas will still come out but will only last a few seconds. Finally there are two hoses which go into and out of the heater core. These are not shown but are most easily accessed from below. They are quite tough to get off so do yourself a favour and jack the car up, its worth it. My heater core had been bypassed because the leak was massive so no coolant was in the hoses. But if yours has not been bypassed you will need to drain the coolant first.  And here is the final product. I didnt show how many screws to undo cos its a piece of piss. There are 22 screws to take out. One is hidden in a recess so be careful. There is a goo-ey black silicon type adhesive along the bottom of the box only. This needs to be separated very very carefully as the plastic is brittle and snaps really easily. And that could ruin everything as a new heater box lid wont be easy to find, take your time with this. We used a really small flat head to pry it open and a stanley knife to cut the goo as we went. It easily peels off when warmed. The blue area is where the A/C evaporator sits and the red is where the heater core sits. - Clearly we had to clear out lots of crap from the box and evaporator.  Final note: the box has 4 locating tabs for when you put the lid back on, when its all assembled make sure you check the operation of the white tab which flaps the door inside around (between red and blue square). If these 4 tabs arent aligned the door wont go! If I didnt test this would could have easily installed the whole thing back in only to find it was stuck one way meaning you get only hot or cold air from it. And thats all the pics I have for now. I uploaded all pics except one because it wasnt sent to me from my girlfriends phone so ill pop that up tomorrow. It just showed the difference between cores and where mine had failed. I hope this is able to help someone out in future. I would allow two full days to tackle this if it was your first time. Make sure you get some soft sealing goo to reseal the box properly at the base. Im sure ill be making some edits to this but if you have any questions please let me know. |
||
| Top | |
||
| Valen |
|
||
|
This looks great and will be very helpful to me shortly lol
Quick question, how long did it take? (How long out then how long back in) |
||
| Top | |
||
| Who is online |
|---|
Users browsing this forum: No registered users and 0 guests |