|
| KWIKXR |
|
|||
|
This is a little handy work i did this long weekend so i thought id do a write-up for others who may be interested in giving this a go on their T/B or a spare T/B. The one i used is for EF and EL 6cyl models, but i imagine EB-ED and maybe AU 6cyl models would at least be similar. This mod is all about optimizing the flow of a stock standard throttlebody, using the stock sized bore and stock sized butterfly. After all, this is one of the main components controlling the air flowing into the engine so its not a bad idea to improve it somehow.
Tools i used for modding the T/B include: various files, air grinder or dremel or both with various grinding stones, cutting disks, buffing/polishing attachments etc, air gun, screwdrivers, circlip pliers, various grades of sandpaper, ranging from 100 grit up to 800 grit, a scribe for marking purposes, mini hacksaw, a drill with drill bits, autosol metal polish and lots of rags, bit of thin cardboard from a cereal box or similar to make up any new gaskets that may need to be renewed (T/B to plenum gasket, ISC gasket), vernier caliper for measuring purposes if you want to get things to a certain size.. I have tried to get this as accurate as possible even though i have a pretty s**t memory and have tried to document every step with as much detail as i can with heaps of pics so if anything is unclear please let me know Well here goes.. Obviously, the first step is to remove the throttlebody from your car or have your spare throttlebody in front of you. First i cleaned the T/B out using carby cleaner, and removed any components attached to it - in my case a spare ISC and the TPS. Since im going to be grinding out the entrance a fair bit and smoothing it so its basically a 1 angle instead of the 2 angle entrance with a bit of a step it has when stock, i took care of this first. First i roughed the lip down a bit with a file, then I grabbed out the air grinder with a decent sized grinding stone, fired up the air compressor and started grinding away at the opening. The first part was concentrated on making the leading lip of the entrance almost "knife-edged" since the T/B opening sits inside the air intake piping, i wanted to make the easiest possible transition of air into the T/B by grinding this lip down so there isnt as much of a step now. The way i see it, air will flow into it much better if there isnt as much of a lip obstructing the flow so by grinding this lip down to an almost sharp edge and shaping it to blend into a constant angle into the bore, the air will flow into it smoothly. Here you can see the leading lip into the entrance, so imagine the lip that the air is bouncing off when entering the T/B.. 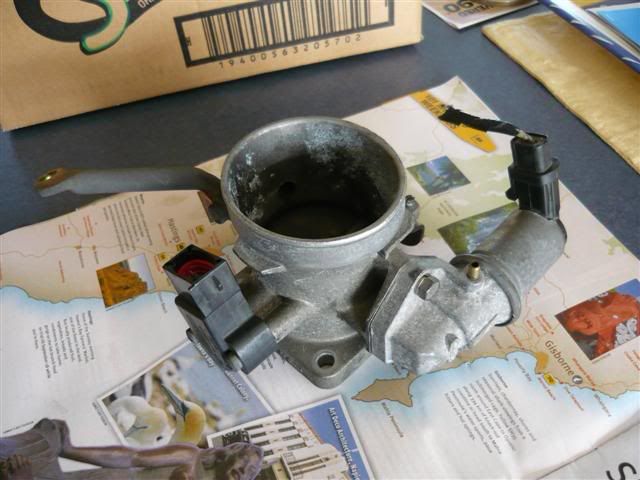 Heres is an after shot, after a bit of filing down and evening out with the grinder 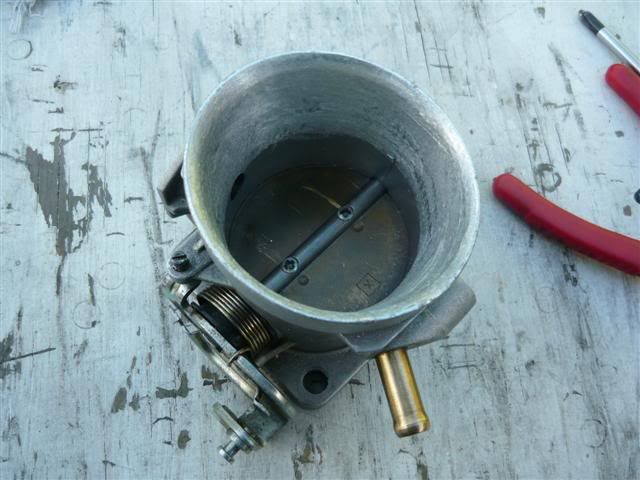 Anyway, next step was to blend the opening into the bore - from factory the opening meets the bore at an angle so you want to smooth this down to blend into one angle for even smoother flow. NOTE: The important part here is to leave the butterfly in place in the T/B, do not remove it - reason for this is so that you do not get too trigger happy with the air grinder and start grinding the bore out where the butterfly sits, because once this happens you will be left with a slightly larger diameter, out of shape bore that the butterfly cannot completely block off when the throttle closes. This is bad because then the engine will be idling high because in a way it will be like its at part throttle. Therefore you only want to smooth out the opening into the bore and up to where the butterfly sits, this ensures that only the entrance up to where the butterfly sits is enlarged and the area where the butterfly sits is not affected in anyway. What you can do here after shaping the entrance to a consistent angle is smooth it down with a few grades of sandpaper to make sure there isnt any bumps etc as there is usually a bit of a bump on the upper and lower areas of the opening. I started off with 150grit to grind it down as smooth as possible, then went to 240, 320, 600 and then topped it off with 800 and 1200 grit to get the suface ready for polishing. Now to smooth out the other end. As you can see from the exiting end of the throttlebody, there is a bit of a lip from where the bore which has been machined, meets the original casting. I took care off this using the dremel and a small cone shape grinding stone and ground the lip down so that it blended together nicely and became one with the bore, so now the air flow wont just drop off once it hits that area.. 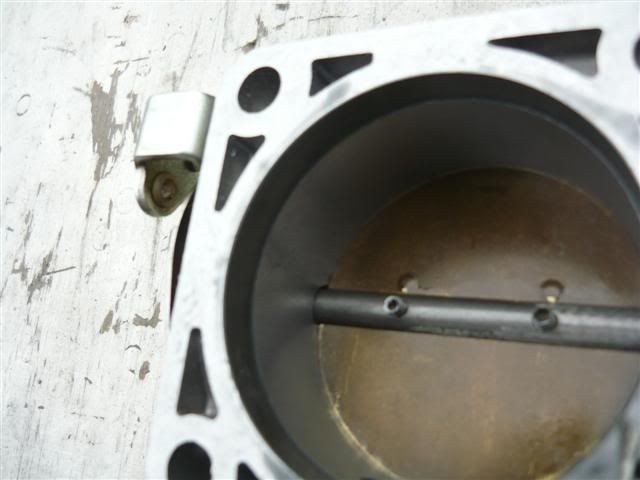 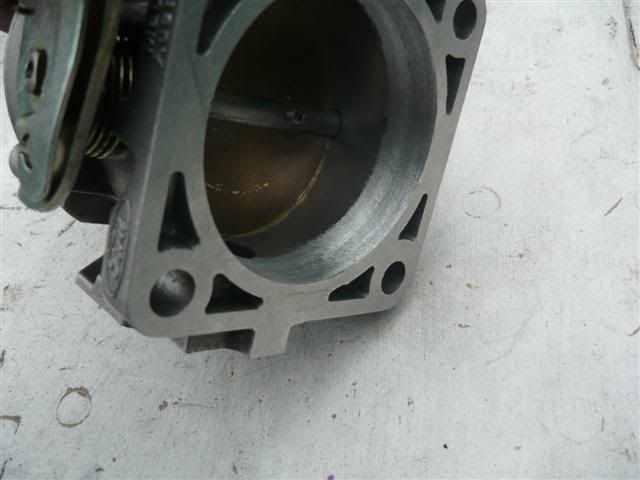 Once you have blended that lip, sand it down smooth following the above procedure with the different grades of sandpaper you have used for the opening. A pic comparing a stock exiting end to the blended one.. 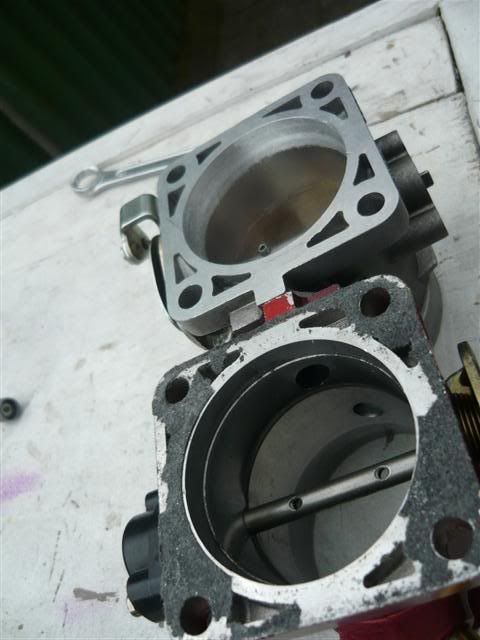 Next i moved onto removing the butterfly, there are 2 phillips head screws holding the butterfly plate to the shaft. Unscrew these, turn the throttle lever to fully open and slide the plate out through the opening - you may find that the plate is a bit difficult to slide out sometimes if it turns slightly and if its anything like my one, it starts to get stuck against the bore as it slides out towards the opening leaving a bit of a scratch, but not to worry, you can sand these scratches out later when you begin the polishing stage. The key is to keep the plate in the same position in which it bolts to the shaft i.e try to line up the holes on the plate to the holes on the shaft as you slide it out and you shouldnt have a problem as this is the only way it can go in and out without touching the bore. Now with the butterfly plate you will see that the edges are pretty much a straight flat edge. What you want to do is grind or taper both faces of the leading edge to a point where it meets the edge of the plate, effectively making it a "knife edge" without altering the diameter of the plate - this allows the plate to kind of slice or cut through the air flow rather than having a blunt edge meeting the air flow. For this, you can lay down a sheet of course sand paper, hold the plate on a sharp angle and try to get the plate as close to being parallel to the sandpaper as possible so that the edge blends into the plate and to make sure you dont grind down the edge itself. Start moving the plate back and forth against the sandpaper to bring both faces of the plate to a point while. Or you could also use the sanding roll or grinding stone in a air grinder or dremel to do the same thing.. Once the leading edge is done, do the same thing to the trailing edge (in other words the other end) to ensure air flows off the rear of the plate just as well as it flows over it. Once again - NOTE: While doing this take care, and try not to grind down the actual edge itself, but rather grind down the face to meet the edge at a point. I didnt do this to the butterfly on this T/B as i have already done one which is currently residing in the T/B on my car now so here is a pic of that one. You can see both ends of the plate have been ground down. 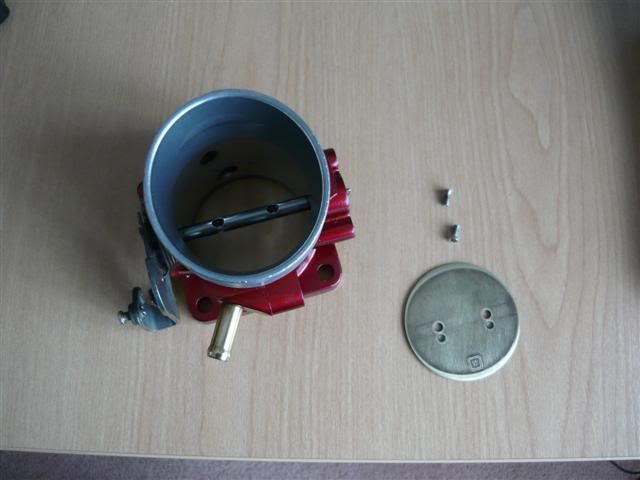 Then give both sides of the plate a smoothening over with a few grades of sandpaper, and if your keen, polish it to a mirror finish - but do this last. 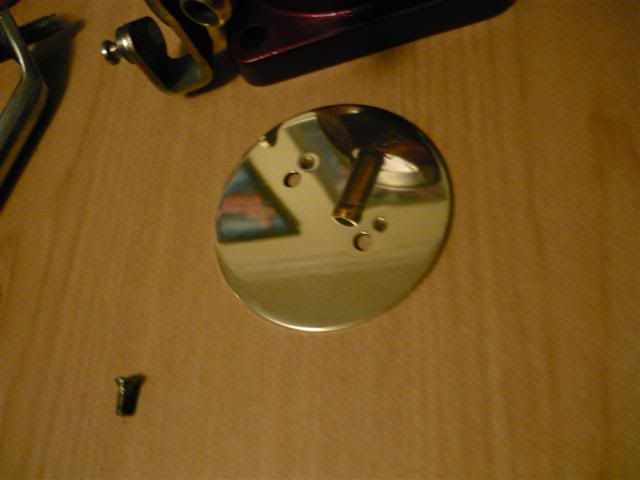 Once thats done and dusted, its time to modify the shaft. So the T/B should be left looking like this now.. 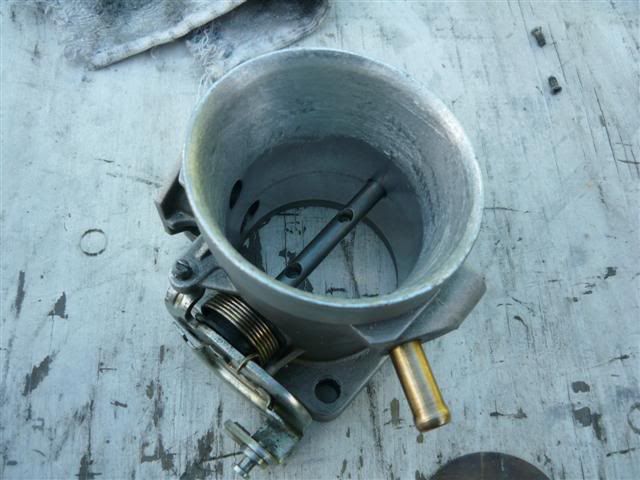 Time to remove the shaft. Before removing, get a scribe or a sharp nail or something similar and mark the ends of the shaft inside the throttlebody bore where the shaft meets the bore. Next, look at the side where the TPS is mounted and you'll see where the part of the shaft sticks out, which fits inside the mechanism on the TPS to show the throttles position. You will see a little black circlip around this end of the shaft with a little washer underneath it. Get your circlip pliers and remove the clip, now wriggle the throttle lever a bit and the entire shaft with the lever should slide straight out. NOTE - Take note of where the washer is and the little black seats that sit where the throttle lever sits against the T/B housing and also the position of the lever spring. Its pretty simple but you can never be too careful. Now you should end up with this.. 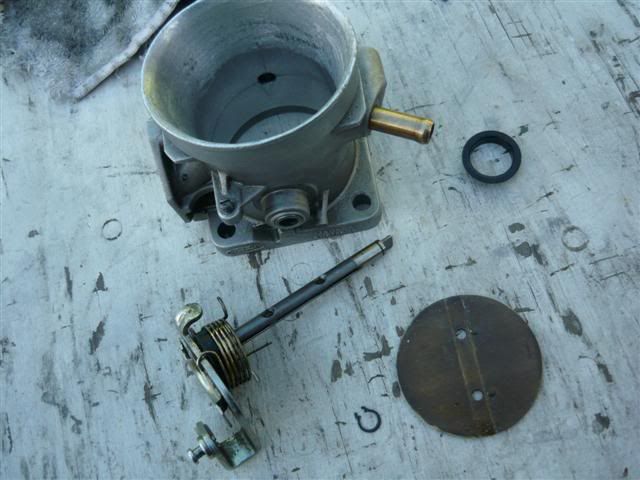  What you want to do now is cut the top half of the shaft off so it will become half shafted. NOTE: make sure its the top half you cut off i.e the half with the counter sunk holes, not the bottom half with the threaded holes as this is what the plate is bolted to. By doing this the air has a bit more area to flow and wont have the speed bump on top of the shaft to contend with. The marks you have made earlier are where you will cut to remove the top half off the shaft, so grab your dremel and cut off wheel or clamp the shaft to something so its secure and grab your mini hacksaw and start cutting where you've marked. Once this is done you should gone from this.. 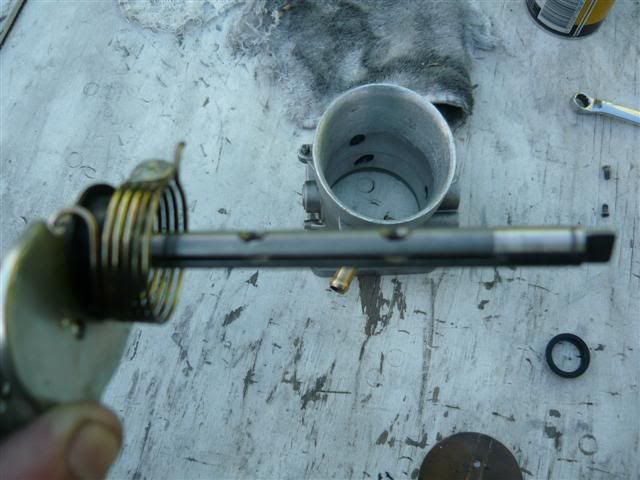 to ending with something like this.. 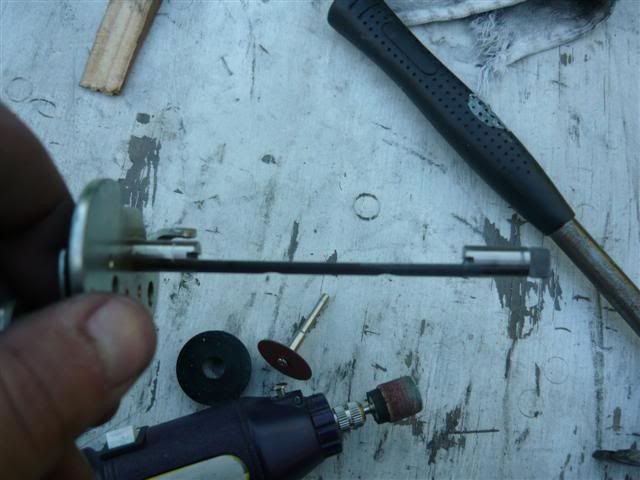 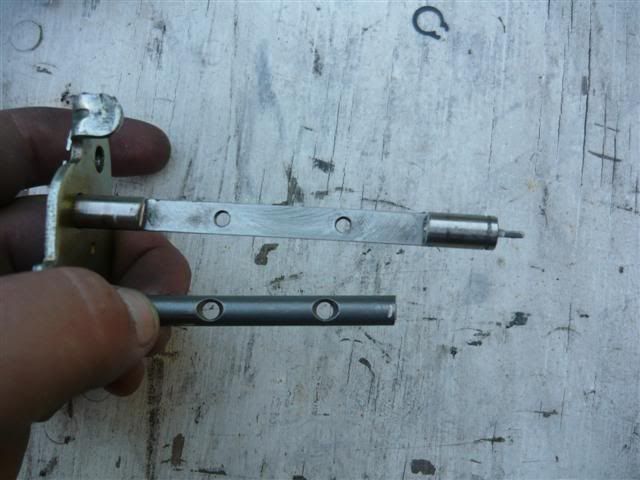 Now deburr the edges where you have cut to ensure that the shaft does not get stuck when the throttle is operated. So you should now be able to slide the shaft back in, with all the above mentioned parts i suggested you make note of, refitted in the correct postion. Now bolt the plate back onto the shaft and check that the throttle lever can be operated smoothly and doesnt get stuck at any position. A few before and afters of the half shafting Before - Complete shaft at fully open position..  After - Half shaft at fully open position.. 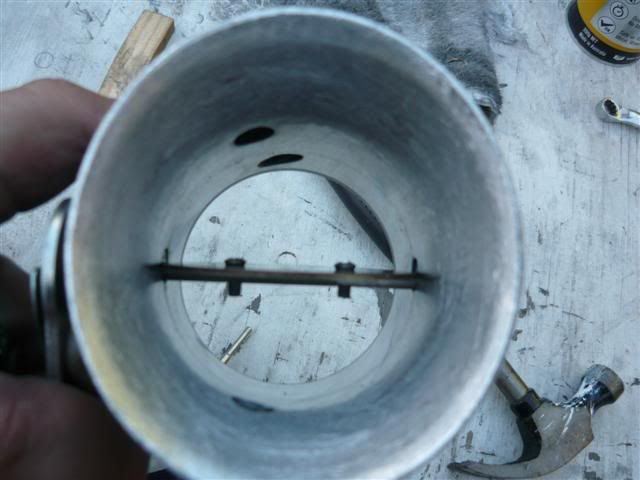 Before - Complete shaft at closed position.. After - New look with the half shaft at closed position.. 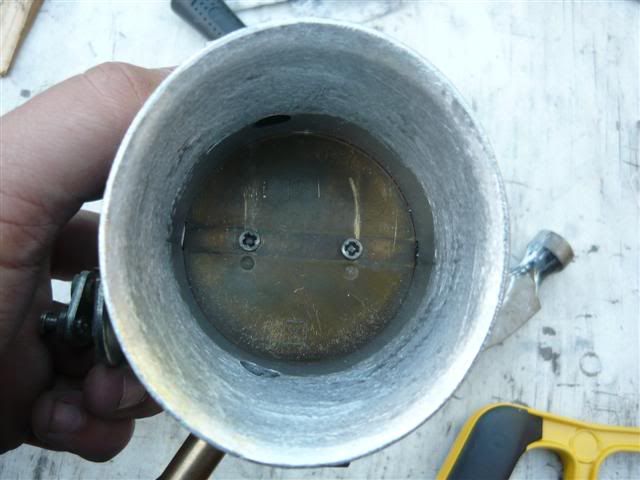 Now this is where you can grind down the screws to the appropriate length so that they dont stick out like they do in the picture above. You can also countersink the holes on the plate a bit using a drill with a drill bit a few mm bigger the the hole so that the heads of the screws dont stick out as much either. Like i said before, every little bit helps, and if you are going to this extent, why not. Cant see it much here but here is my polished plate with countersunk holes.  In fact if you want, you could always buy a couple of screws with a flat heads rather than the rounded head so it sits inline with the plate, it isnt totally necessary but if you want to, go for it. Now before getting onto the next step, you want to clean the throttlebody of any dust and filings, either using an air gun which is by far the easier or a just a clean rag. Make sure that there isnt any crap inside the bearings where the shafts sits and clean out the ISC air paths and the pipe for the breather hose. Next step is polishing (optional). With the butterfly and shaft removed, grab the Autosol and start polishing the throttlebody bore to a mirror finish, you can also start polishing the buttefly plate too if you havent already and if you want, polish the shaft while your at it.. 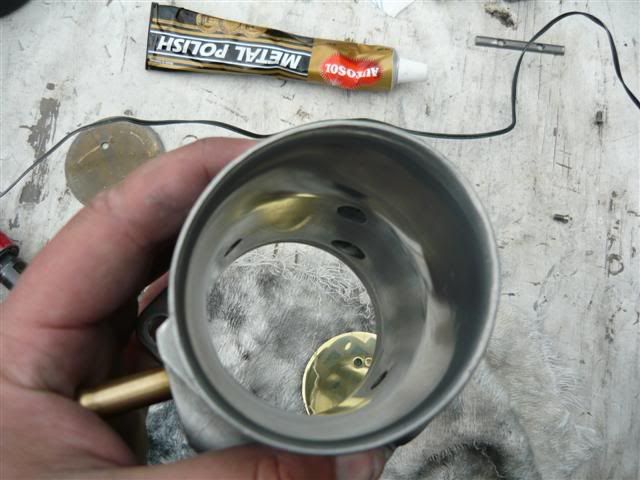 Once it is polished, clean out any excess metal polish that may be built up in any of the holes. Get yourself a tiny bit of grease and apply it to the bearings for the shaft to ensure they are properly lubed. Assemble all the parts of the throttlebody, check that the throttle lever operates as per normal, and fully opens and fully closes. 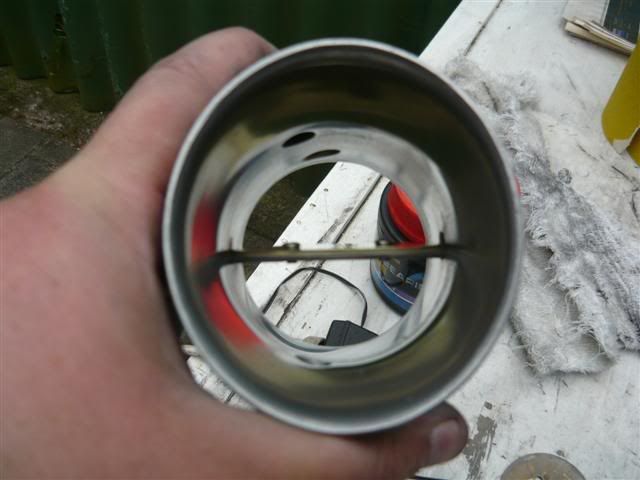 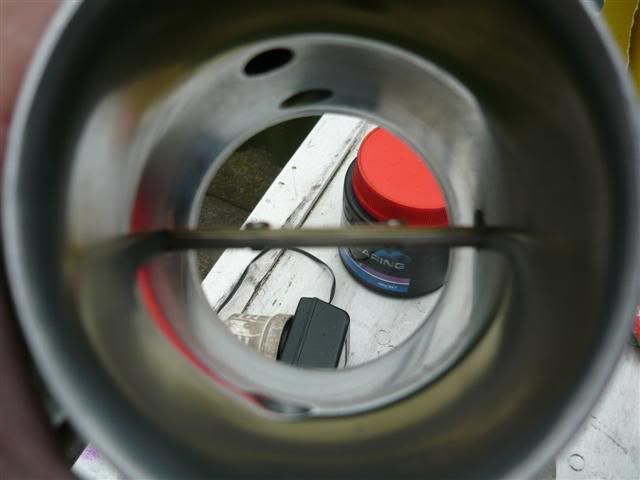 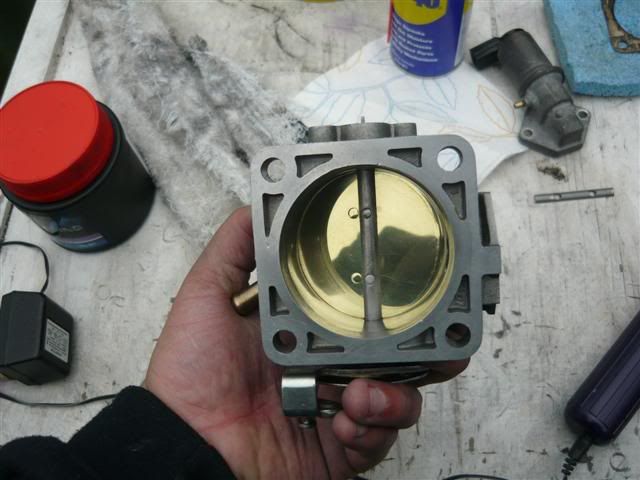 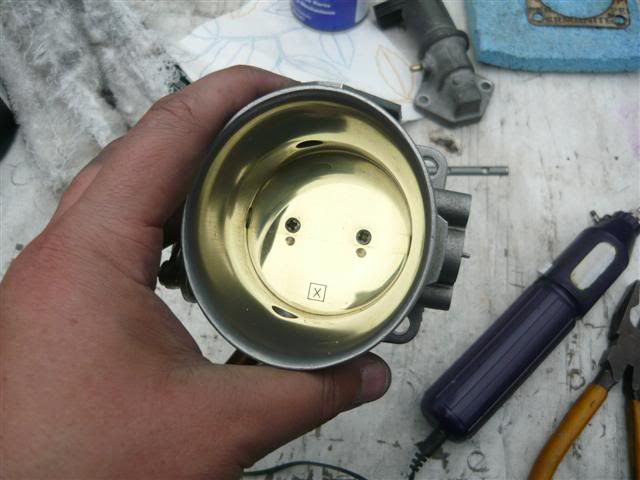 Stand back, relax, and then have a cold one Now go and fit it back to the car with new gaskets (just make them out of thin cardboard or some gasket material), bolt everything back up, adjust the idle if need be, just incase you may have twisted the screw or something while working on it. Take it for a drive and enjoy Last edited by KWIKXR on Sat Jun 05, 2010 4:36 pm, edited 1 time in total. |
|||
| Top | |
|||
| KWIKXR |
|
|||
|
Heres just a few pictures comparing a stock one to the one i modded
Stock on the left, modded on the right 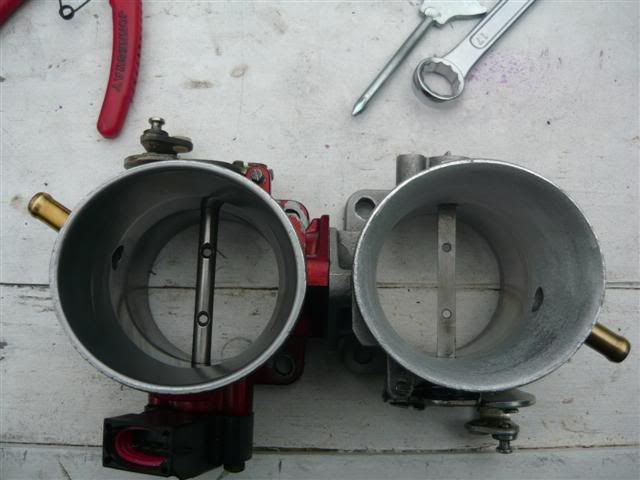 Stock opening 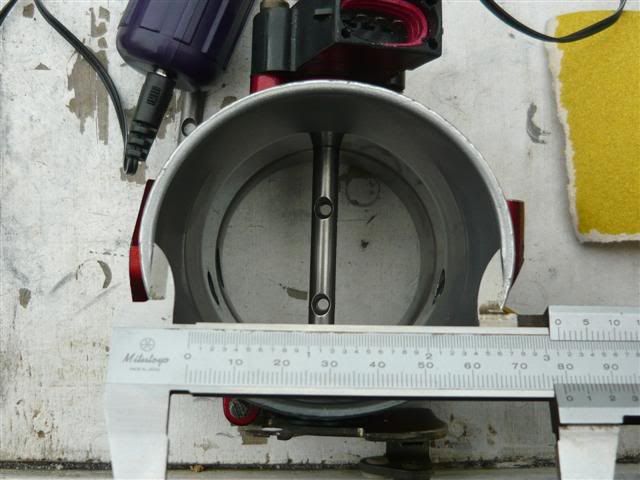 Modded opening (about 4mm bigger than stock from top to bottom and around the same from left to right) 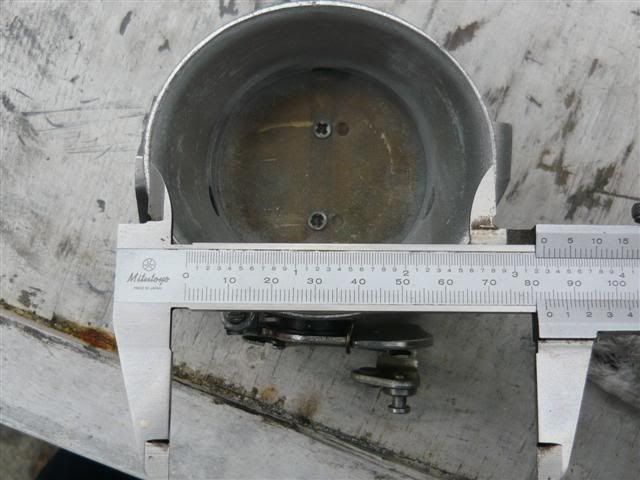 Havent got any measurements of the internal bore after the flared out opening up to the butterfly, as i dont have any calipers that will reach down that far, only had this vernier one on me today. But at a minimum it would be at least 3-4mm larger than stock overall till in starts tapering into where the butterfly sits, i spent quite a bit of time with the air grinder taking out as much as i could before the butterfly to get the flared opening to have a consistent curve all the way up to there. Seat of the Pants Results Without having a proper dyno to measure how much of a difference this has made, the seat of the pants dyno tells me there is a difference in response off idle, feels a bit more snappier than before and is more willing to rev out than before. Midrange throttle repsonse has improved quite a bit especially noticeable once it hits 3500rpm up to around the 5000rpm mark, which is the range where my cam is bringing on the torque so combined with that it hauls quite well. After 5000rpm feels very much the same, maybe a slight hint of difference in response but nothing to write home about, anyways, its not like you will need much response up that high in a street car cause a few hundred rpm later and its time to shift into the next gear. If you are after more response up high, id definately suggest one of FAST-XR's 68mm units as i believe this is what will net you the response up high with the increased size of the bore and matching butterfly plate. Would be interesting to put it on a dyno with the stock T/B and then run it again with the modded on so if that ever happens, i'll post more results. All in all, after fitting it and taking it for a few quick laps around the block, i can honestly say the car has never felt stronger and was worth every bit of time i put into it. Quite happy with the results, and with a few basic tools and the cost of consumables, i reckon it is a cheap, easy effective mod for anyone on a budget. Last edited by KWIKXR on Tue Oct 27, 2009 9:26 pm, edited 1 time in total. |
|||
| Top | |
|||
| Froudey |
|
||
|
STFU!!!!
Giving me ideas lol..... Damn it... Good write up, send link to Happy to get converted to a tech doco.
_________________ R.I.P Tobias my son. |
||
| Top | |
||
| KWIKXR |
|
|||
|
LOL cheers Froudey, might send him the link and see if he has time to put it in there for me - i know theres probably a few others out there wanting their write-ups put in there too.
|
|||
| Top | |
|||
| XR-Lane |
|
|||
|
{USERNAME} wrote: STFU!!!! Giving me ideas lol..... Damn it... Good write up, send link to Happy to get converted to a tech doco. Pfffft Happy has not added a doco in like 12 months, Ive been waiting 6 months, along with others. Very good work Nath, less restrictive and a nice gradual taper to the butterfly for smoother air flo. Top job, Ill give it a go when I get around to it Cheers Josh |
|||
| Top | |
|||
| KWIKXR |
|
|||
|
Cheers Josh, yeah should be good for a bit more throttle response through-out the rev range, would be interesting to put it on a dyno with the old one on and then the modded one just see if there is much of a difference in terms of KW's. There is definately a little something extra there as its a bit more snappier than it was before but wouldnt have the slightest clue on any figures - will be getting the car put on the dyno for a quick power run and AFR check in a few weeks so we'll see if the guy would allow me enough time to swap the T/B and do some tests
{USERNAME} wrote: Pfffft Happy has not added a doco in like 12 months, Ive been waiting 6 months, along with others. LOL, im content with it being in here so its all good. Thanks again for pointing this tech doco forum out to me mate, probably still wouldnt of known about it if you didnt mention it |
|||
| Top | |
|||
| luke111 |
|
|||
|
This would have to be one of the dumbest posts i've seen for a while.
Got any dyno results before & after??? |
|||
| Top | |
|||
| dsyfer |
|
|||
|
{USERNAME} wrote: This would have to be one of the dumbest posts i've seen for a while. Got any dyno results before & after??? This would have to be one of the dumbest replies i've seen for a while. |
|||
| Top | |
|||
| luke111 |
|
|||
|
dsyfer you must be as dumb as he is.
Porting/polishing throttle bodies??? You've gotta be fcuking kidding me. Dyno results before & after improvement would equal 0. Flow bench testing would also equal 0. You'd be better off polishing the muffler bearings. |
|||
| Top | |
|||
| dsyfer |
|
|||
|
{USERNAME} wrote: dsyfer you must be as dumb as he is. Porting/polishing throttle bodies??? You've gotta be fcuking kidding me. Dyno results before & after improvement would equal 0. Flow bench testing would also equal 0. You'd be better off polishing the muffler bearings. I had my muffler bearings chromed, so no need to polish them.... |
|||
| Top | |
|||
| KWIKXR |
|
|||
|
{USERNAME} wrote: This would have to be one of the dumbest posts i've seen for a while. Your entitled to your opinion, i really don't give a f**k about it to be honest.Got any dyno results before & after??? I'd possibly class myself as being dumb if i had paid someone a huge amount of money to carry out this work, but i didn't, was pretty much free as i had all the materials laying around and only took up my spare time. I originally posted this for people who may have thought about doing it to theirs, this post would show them what's involved if they wanted to go ahead with it. No, there was no actual "dyno" testing as stated in one of the posts. I did have plans of getting it tested back to back on the dyno but plans fell through due to time limitations and booking dates so have since forgot all about it really. Would be interesting to test your theory with flow testing though. Way i see it, being half-shafted would equal a tiny bit more cross sectional area through the throttlebody which may equal a slight increase in flow - who knows? |
|||
| Top | |
|||
| Papa Smurf |
|
||
|
{USERNAME} wrote: dsyfer you must be as dumb as he is. Porting/polishing throttle bodies??? You've gotta be fcuking kidding me. Dyno results before & after improvement would equal 0. Flow bench testing would also equal 0. You'd be better off polishing the muffler bearings. It takes little intellect to rubbish another person's achievement but, seems you have the corner on that. You should also check your spelling and grammar because it is a little less than average. Remember the old saying, if you have nothing constructive to say, don't say anything. |
||
| Top | |
||
| finnigan001 |
|
|||
|
{USERNAME} wrote: This would have to be one of the dumbest posts i've seen for a while. Got any dyno results before & after??? ford-parts-for-sale-f17/fs-68mm-throttle-body-with-modified-shaft-t73199-144.html stupid haters... only want to hate.
_________________ 1995 EF Futura |
|||
| Top | |
|||
| thepistonhead |
|
|||
|
{USERNAME} wrote: {USERNAME} wrote: This would have to be one of the dumbest posts i've seen for a while. Got any dyno results before & after??? ford-parts-for-sale-f17/fs-68mm-throttle-body-with-modified-shaft-t73199-144.html stupid haters... only want to hate. Apologies for this interjection, but:  LOL
_________________
|
|||
| Top | |
|||
| tickford_6 |
|
||
Posts: 6449 Joined: 11th Nov 2004 |
I just sat down with a calculator for a while and worked out some basic areas for stock and modified TBs
All are worked out based on an 8mm shaft. Stock 65mm tb has an area of 2798mm squared stock 65mm tb with half shaft mod has an area of 3058mm squared 70mm tb with full 8mm shaft has an area of 3288mm squared 70mm tb with half shaft has an area of 3568mm squared. For what is a free mod, it's a decent increase in TB area. |
||
| Top | |
||
| Who is online |
|---|
Users browsing this forum: No registered users and 0 guests |


