|
| tarzandaddyman |
|
|||
|
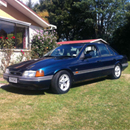
KWIKXR's 8 year (and counting) mod of his Fairmont has inspired me to share my own project, "Falcon 2 Raptor", with everyone. Hopefully, someone will learn something from my journey; maybe avoid some of the pitfalls; and maybe even be inspired to pick up the tools themselves.
A bit of background: my first car was an XB GS. Over the years, I have restored an absolute smorgasbord of beautiful cars: 5 XB Hardtops, a HQ and a HZ Monaro, 3 Mustangs, 2 Corvettes, a '67 Camaro on av gas, the list goes on. Back then, you could pick up these cars for under $5K. I had a guy who sold me his Hardtop contact me last year and offer me $80K to get his car back. Broke my heart to tell him that his car now calls the good ol' US of A home as a Mad Max replica. Then along came the wife, the mortgage, and the kids. These things force most of us to give up our projects - at least in the short to medium term. Anyhow, the kids are a bit older now, the mortgage is manageable, and sure enough, the resto bug is back. This time; however, I want to do something completely different. I was watching YouTube videos a couple of weeks ago and I stumbled on this little beauty: https://m.youtube.com/watch?v=giuJhqyDaFE Now, I belong to the old "there ain't no substitute for cubic inches" school of thought, but there was something about the whistle of the Raptor that caught my imagination. So I started doing a bit of research, and that was when I happened upon KWIKXR's 109 page FordMods garage forum carefully and meticulously detailing every up and down in his 8 year journey. Yes, I read the whole thing! Last week, a 1995 EF GLi came up for sale locally. Below is the ad as it appeared on Gumtree: needs rear brakes/head liner needs putting up/two windows tint removed then is ready for rwc this is a solid car no oil leeks straight body interior good will need new battery as has sat for month or so..Urgent sale will except any reasonable offers you have to remove!!!! Also has viper mags and all round good tyres I didn't haggle over the price, and $300 later the bomb was being unloaded at my place. The algae and the rodent poo was complimentary. The actuators hammer like crazy. But the body is very straight, the windscreen is new, the interior is excellent (apart from the rodent damage to the rear seat), the engine runs strong and sweet despite the oil looking more like tar than amber fluid. Step 1. Strip the interior completely, replace the broken side mirror, replace the actuators. Actually, if anyone has ever removed the SmartLock system, I'd like to know what's involved. Replace the oil, filters and coolant. Luckily, a nice bloke is parting out an EL just up the road. $70 later, I have all the parts that I need. The guy even pulled them out for me. Some people are just really nice and genuine. So here I am: my eldest and I start tomorrow. Wish us luck and check on our progress regularly. PS: I don't really want or need cruise control. Does anyone know what's involved it removing it? Last edited by tarzandaddyman on Tue Aug 26, 2014 12:59 pm, edited 3 times in total. |
|||
| Top | |
|||
| tarzandaddyman |
|
|||
|
Day 1. New battery installed.
Oil and filter replaced. The filter is a pig to get at if it's been done up too tight. Eventually, I did manage to get my oil filter wrench on it and loosen it. Check out the old sludge. Coolant replaced. OMG what a debacle. I had hoped that the radiator would have a drain plug. Not so. Even if it did, it would not have been accessible as the radiator sits squarely on top of the front cross member. So off with the bottom hose. Sounds easy enough, until you realise that the hose clamps have a metal cap on them that has to be removed before you can get at them with a screw driver or a socket wrench. Of course the battery is in the way as are the two auto pipes. At this point my eldest lost interest and proclaimed "I'm bored!" Out with the freshly installed battery. Finally, after a good hour of cursing and swearing, I finally managed to wrestle the cap off with a pair of long-nosed pliers. Needless to say, the metal caps are not going back on. On flushing the radiator I discovered that the car does not appear to have a thermostat installed. So there's a little project for another day. Turn the key and the old banger fires up immediately. She sounds dry for less than 10 seconds. Then the new oil starts to circulate and the engine begins to purrs like a kitten. This afternoon we pulled all of the door trims off in preparation for the replacement of the actuators. We started removing the dodgy tint - some came off as a single sheet, some came off in tiny strips. Nothing is ever easy. Finally, we installed the replacement driver's side mirror. Not a bad first day effort if I may say so myself. Last edited by tarzandaddyman on Sun Aug 24, 2014 8:20 pm, edited 1 time in total. |
|||
| Top | |
|||
| tarzandaddyman |
|
|||
|
Day 2. Finished removing the dodgy tint from all but the rear glass. Still pulling the interior out. Check out these rusted out original door speakers.
I suspect Ford might have used some adhesive that has reacted badly to the metal basket (I think that's the correct technical term. I've never bothered with sound systems in cars - the roar of the engine is all the in-car entertainment I need). Keep getting distracted. Fitted interior roof globe. Noticed that the damn thing stays on even when all four doors are closed. And yes, the interior light switch is not in the "on" position. Removed, cleaned, tested and refitted all four door switches. Removed, cleaned and refitted the door detent rods at the same time. These came up nice and shiny. The actuators are still playing up, but the symptoms are different from before (they we're hammering like crazy and the horn was beeping), now they work as intended when using the key in the driver's side lock, but lock and unlock when using the key in the passenger side door. I suspect the lock on that side is buggered. There is no clicking noise when I unlock the car on the passenger side. I shall have to investigate further. In the mean time, I've had to remove the roof globe in order to avoid flattening the battery. With the globe out, the smart locks hammer twice, i.e. Lock/unlock/lock. My research suggests that I can reset the system by leaving the key in the ignition for 30 minutes in the "on" position. I'll keep you posted. Last edited by tarzandaddyman on Mon Aug 25, 2014 5:30 pm, edited 2 times in total. |
|||
| Top | |
|||
| Mad2 |
|
|||
|
doing well mate
|
|||
| Top | |
|||
| tarzandaddyman |
|
|||
|
Day 3. Replaced actuators. Based on everything that I'd been reading, I was prepared for the worst. As it turned out, it wasn't so bad. Here's how I went about it: I unplugged all 4 actuators and hooked up the 4 replacement ones, just leaving them sitting on the floor of the car. I tested the system, perfect. Now, there's an old adage: it it ain't broke, don't fix it. That certainly applies here. So I plugged the original left-hand rear actuator back in and tested the system again. No problems. Same again with the original right-hand rear actuator. Same result. Left-hand front actuator - hammering. Hooked up replacement unit again. Same again with the right-hand front actuator. Hammering. So by a simple process of elimination, I'd determined that the two front actuators were the offending parts. Here's the best bit: Forget everything you've read about having to tap out rivet centres and having to drill out the rest. I found that a 3/16 socket could be used to undo the 3 screws that attach the actuator to its rectangular metal bracket:
The left-hand door was easy - 5 minutes flat. The right-hand door was trickier, but only because I'm right-handed. Grab a left-handed buddy, and he'll knock it over for you in five. Otherwise, it'll just take a bit longer. Offending actuators out Replacement actuator in It gets better, my research last night suggested that the interior light is supposed to stay on for 20 seconds, and then turn off automatically. Well, that's exactly what the system is doing now. Happy days. |
|||
| Top | |
|||
| tarzandaddyman |
|
|||
|
Day 4. Stripped and cleaned boot. Nothing to it really. Just a bit of elbow grease.
Wasn't happy with the condition of the boot rubber - so a replacement was sourced and fitted. Front indicators replaced. Boot struts replaced. This is a 2-man job. A boot lid without struts slams shut with the same force as the jaws of a fair-sized croc, and will break your hand or fingers easy. Do not use brute force to try to remove the old struts. If you do, you risk breaking the strut mounting. You don't want that. Instead, simply insert a flat-head screw driver as shown below and the retaining clip will pop off and the strut will then fall off its ball mounting. Easy. |
|||
| Top | |
|||
| tarzandaddyman |
|
|||
|
Day 5. Door trims re-fitted. Prior to doing so we sprayed WD40 on the door locks, door handles and window winder mechanisms inside the door cavities; we sprayed the window runners and door detent rods with lithium grease and the glass tracks and door locks with graphite powder. You don't need power windows when things are as smooth as this.
|
|||
| Top | |
|||
| tarzandaddyman |
|
|||
|
Day 6. Interior stripped (front seats out, centre console and carpet removed). Floor thoroughly cleaned to remove any dirt, grime, old glue, etc.
Transmission tunnel moulded rubber sound deadner refitted. Transmission tunnel centre console plastic mould refitted. Last edited by tarzandaddyman on Sun Aug 31, 2014 8:44 pm, edited 1 time in total. |
|||
| Top | |
|||
| bry40l |
|
|||
|
So rather than restoring a car your saving one with a clean up? Nice work, seems like a good base to start with.
_________________ BF XR6 |
|||
| Top | |
|||
| bennettpr |
|
|||
|
Awesome start!
I'm interested in how you fixed your actuator issues. Mine were working fine then I unhooked the boot lock actuator cable as, for some unfathomable reason, the boot opened EVERY TIME you opened the drivers door (!). Then I gave the car a clean, with a normal hose that has a far bit of pressure and now none of the actuators work. ??? I re clipped the boot actuator back in (in case it was some kind of weird circuit issue) but this had no effect. Now I can only lock the drivers door - none of the other doors lock, and the EL Fairmont has no manual locking switches on any of the other doors (genius). Fortunately the interior is gutted, so the car isn't exactly a thief magnet at the moment... Interior light still seems to be tripped OK when door opens (works sometimes with drivers door but all the time with other doors) Any tips on where I should start? Seems like some kind of circuit issue, but I'm not electrically minded so any tips welcome...
_________________ {DESCRIPTION} |
|||
| Top | |
|||
| tarzandaddyman |
|
|||
|
Day 7. Hired carpet and upholstery cleaner from Wollies. Thoroughly cleaned carpet and seats, and left them to bake in the sun for several hours. Fitted carpet, centre console and front seats. Greased up the seat runners before installation. It's all coming together very nicely.
Last edited by tarzandaddyman on Thu Sep 04, 2014 8:37 pm, edited 1 time in total. |
|||
| Top | |
|||
| REW93N |
|
|||
|
Looks the goods mate,
Get it back to that factory floor feeling.
_________________ Blue blooded. |
|||
| Top | |
|||
| bry40l |
|
|||
|
I would love to do this but i lose interest quickly with cars. Or things dont go to plan and cost 70x more than it should.
_________________ BF XR6 |
|||
| Top | |
|||
| tarzandaddyman |
|
|||
|
Day 8. Removed head lining.
The trick to getting it out of the car without damaging it is as follows: hand brake off, gear selector all the way back (1), drivers seat reclined as far as it will go, right hand rear door open. The head lining can then be removed through the passenger front door! The motor trimmer collected the old lining, and 2 hours and only $130 later we installed our beautifully retrimmed head lining. Looks amazing. We reinstalled all of the trim pieces and put the back seats back in. Apart from the stereo, which I want to replace with an original unit, the interior is now sorted. |
|||
| Top | |
|||
| tarzandaddyman |
|
|||
|
Day 9. Shipped the car off to the mechanics to find out what it needs for a roadworthy. Quoted $600 to do the brakes (rotors, calipers and pads) and a tune up (plugs, leads). And that's all she needs. Got the panel and paint guy to come over and quote on fixing a bit of rust in the bottom of the doors, the boot lid, the bonnet, and under the drivers side scuff plate. $1000. It's beginning to add up. The rust is not structural, so I need to decide if we're going to leave it for the time being or not.
|
|||
| Top | |
|||
| Who is online |
|---|
Users browsing this forum: No registered users and 49 guests |