|
| street_xh |
|
|||
|
if anyone is still reading this thread..
 ^^^ this is how the Ute looked when i got back to Albury two weeks later |
|||
| Top | |
|||
| Mad2 |
|
|||
|
?
how is it getting cool air in? |
|||
| Top | |
|||
| street_xh |
|
|||
|
the plan is to make a box in-front of the turbo if it needs it, although the entire area seems to get a lot a airflow as it is. I've been working on venting for the fans on the underside of that radiator pictured. I'll post about them in my next update. Once i can drive it again ill have a look at what sort of intake temps its seeing and go from there
|
|||
| Top | |
|||
| shipo_1150 |
|
||
|
Thats ummm different, im liking it though, very subtle.
Makes my want to do something with mine. That can be hidden from prying eyes |
||
| Top | |
||
| markr1967 |
|
|||
|
Very entertaining read, you definitely have some amusing literary skills!!
Definitely an interesting build, and good that Snort have been so involved & helpful. You in WA or Melbourne?
_________________ Hot Chilli Red EL XR6, 5-spd manual, with BF F6 TYPHOON motor and supporting mod's, 3" exhaust etc.. |
|||
| Top | |
|||
| street_xh |
|
|||
|
@shipo_1150
Do it! It would be good to see more people having a crack and remote setups. I'm just hoping i can pull it all off now. The turbo is hidden well, however its not particularly subtle when driving around. I think that I'm going to have to look into ways of reducing the exhaust and turbo noise later on... @markr1967 Thanks mate, there is no way i would have attempted this without Snort's help, he has been instrumental in getting me this far. Yeah, I'm in Melbourne, have been here for the last three years now, I'm looking at moving up to Queensland in the next few months. You had your beast put together over here didn't ya? |
|||
| Top | |
|||
| street_xh |
|
|||
|
updates coming
|
|||
| Top | |
|||
| street_xh |
|
|||
|
Chapter 6
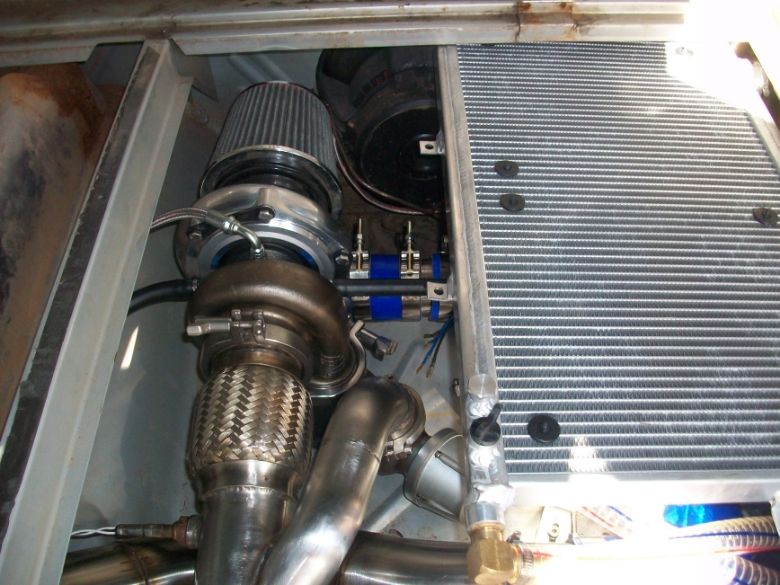
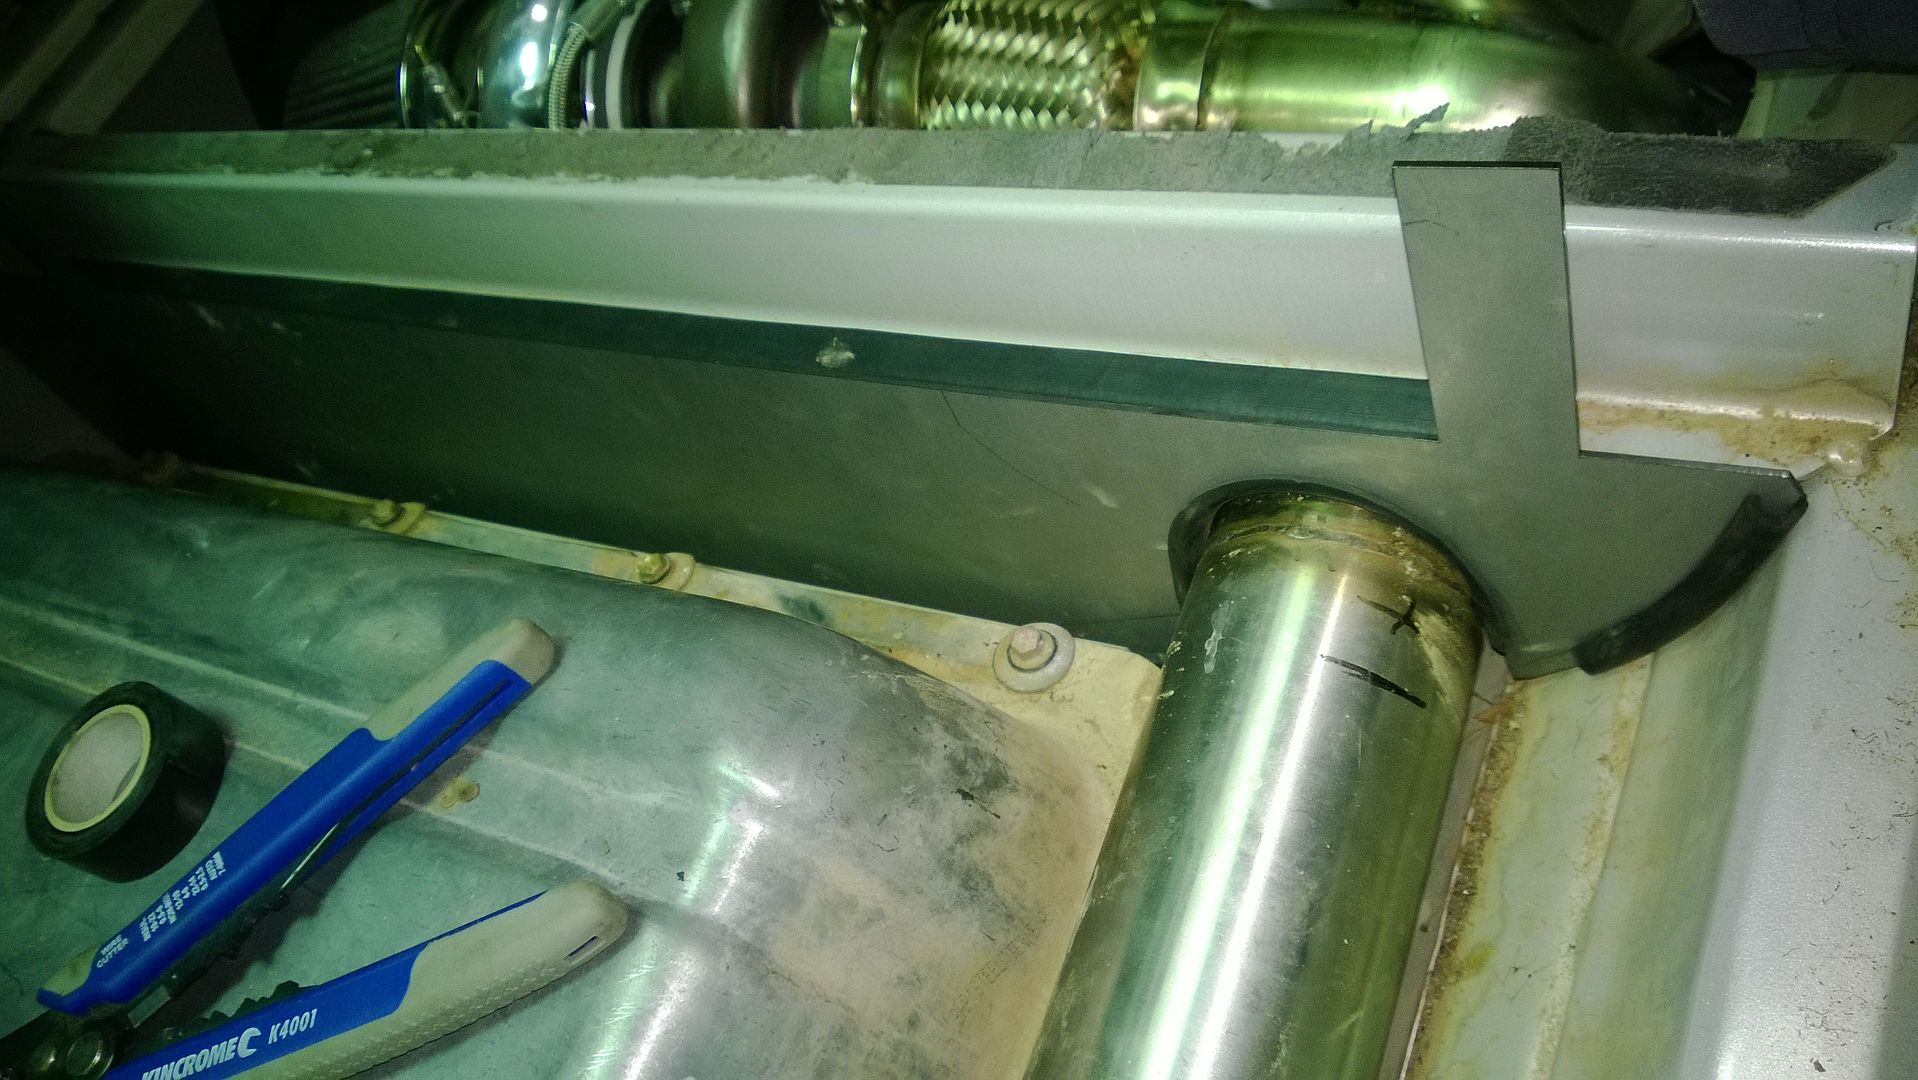
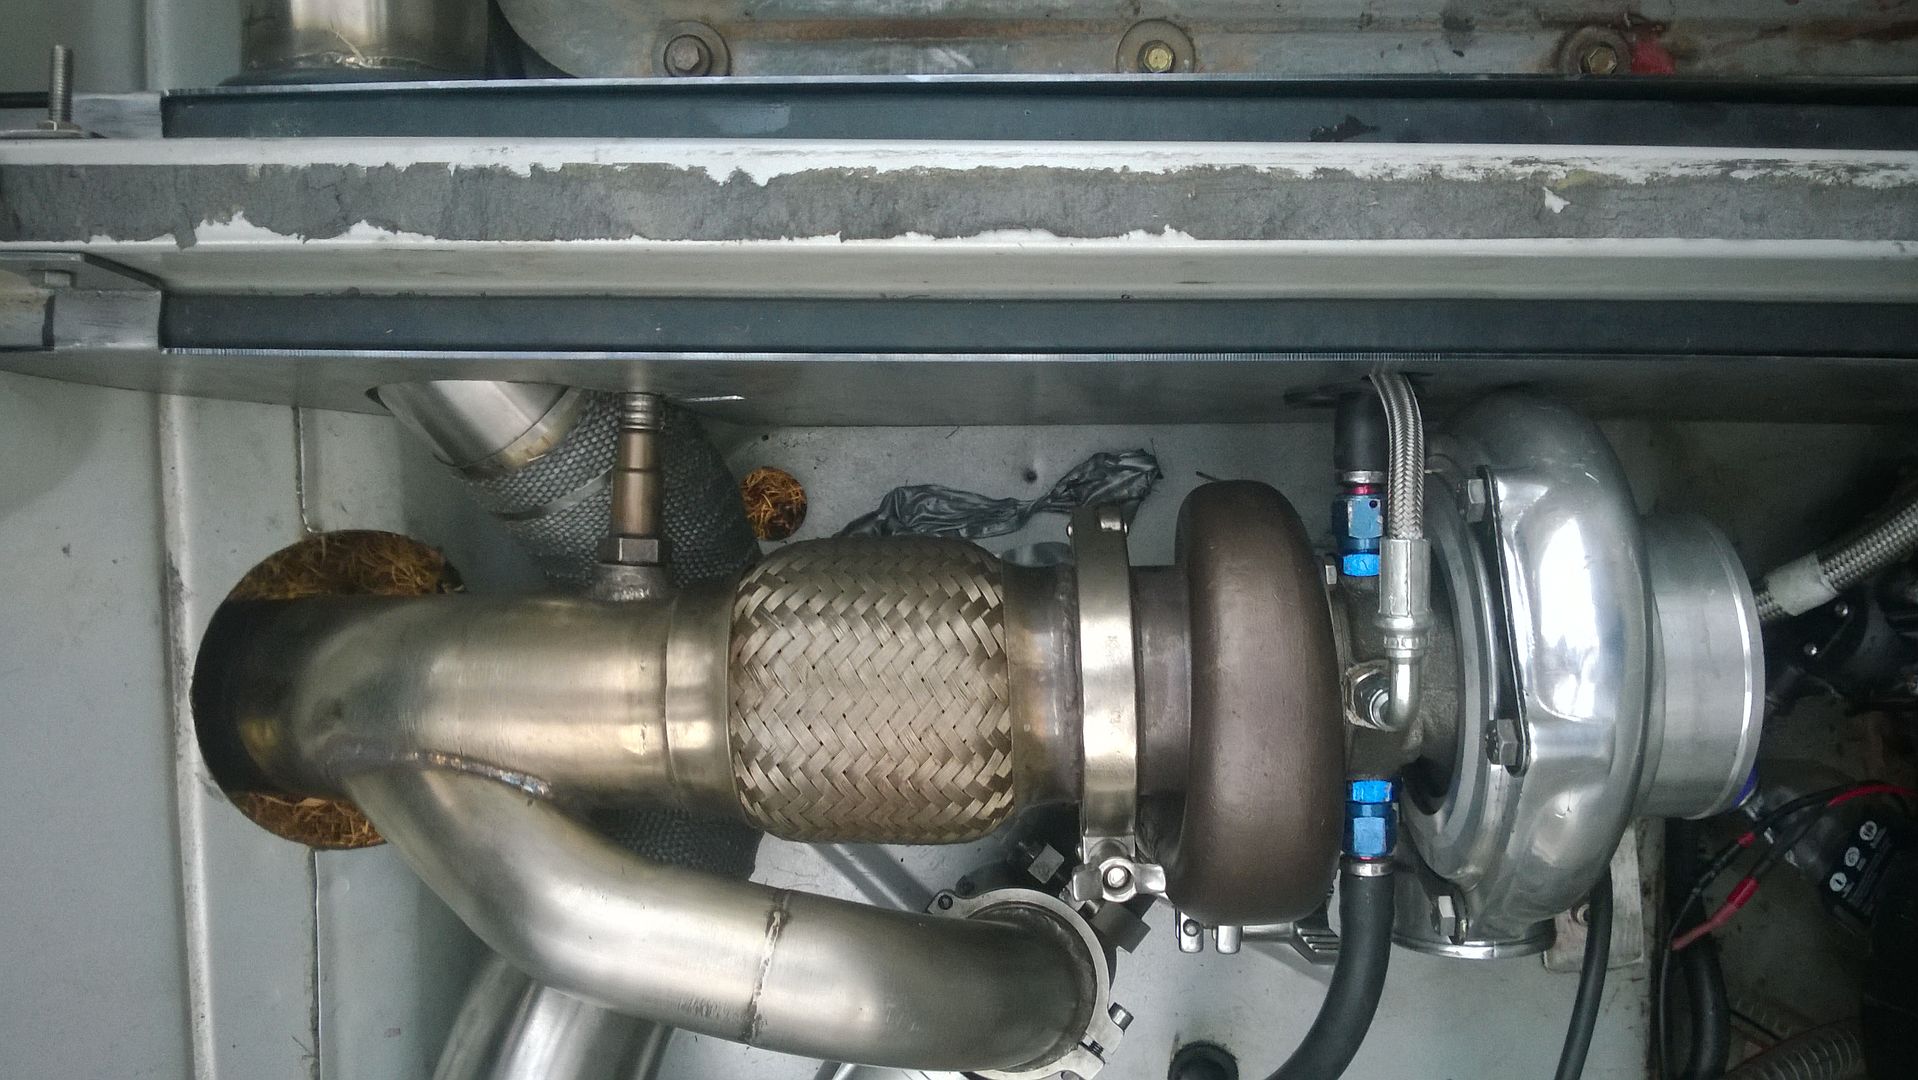
First steps It was two weeks before I could get back to Albury. In the mean time I went about acquiring a few of the necessary components for the build, specifically: the muffler, catalytic converter, an oil scavenger pump, second throttle body and various other small items. I sourced the exhaust components from tuffcarparts and had them sent straight up to Snort. These arrived the next morning, pretty impressive for an online parts supplier. The oil pump is from injectors online, it is a VDO 160 litres per hour pump and, according to the VDO information page, can be ran dry without it being detrimental to the pump. I had already installed a fitting in my sump for the oil return (a painful experience) so we had all bases covered. The next Saturday I took the train back up and Snort met me at the station. After my arrival, we went Tour-de-Albury collecting water hose, oil hose, fittings for various pumps and piping, a new oil pressure switch (I snapped the old one two weeks earlier), a tank and fittings for the water system and some thick walled stainless pipe for the exhaust. As I got to work mounting the heat exchanger in smuggler’s area, Snort was sussing out the exhaust (mainly the Cat.) As we had suspected, squeezing in the exhaust (Cat. and muffler included) before the rear of the car reeked of effort. From the dump pipe we had to go over the rear diff, around the spare tyre, then to the correct position in the back panel. All with 3 inch pipe. The mini-exhaust was born: 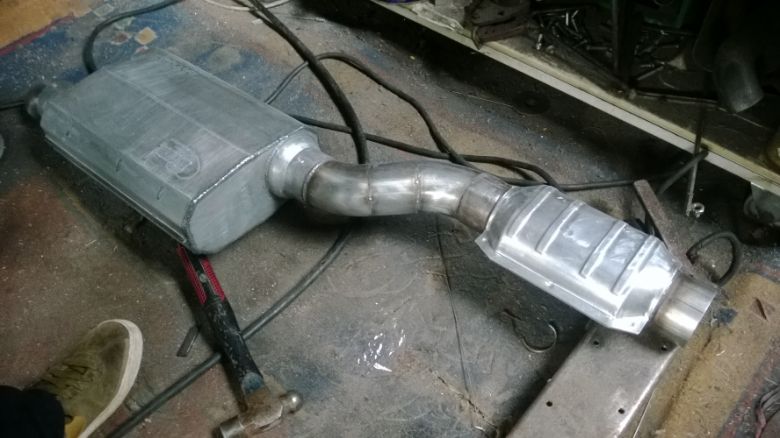 ^^^^ This took hideously long and we did the whole lot on our backs on the ground! Most of our troubles were with getting around the spare tyre. On our first attempt 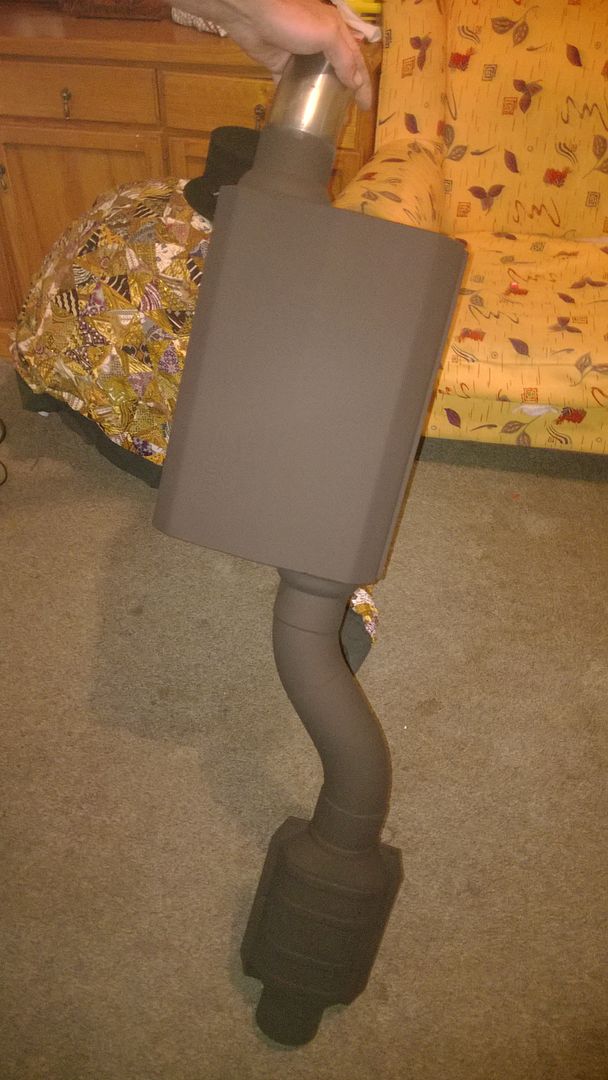 Next I added a hanger for the turbo housing to reduce stress on the headers, While Snort built an additional hanger and mounted it to the cross member (under the transmission) where the standard Cat. had been hung. Snort kindly gave me a water pump for the cooling system and we dummied up the intercooler setup to check it all fit and would work nicely. This, for the time being, was left uninstalled . It is now Sunday afternoon. Exhausted, we didn’t even make it out for dinner, and I fell asleep on the couch. So Monday morning we got up early, Snort went shopping for a few odds and ends that had been over-looked, and I started running water and oil lines, as well as wiring in a relay to control the oil pump. At 11.30am we started the Sleepy Grey XH. I wanted to get a fire extinguisher from repco, so we took it for a test drive there.. ..No boost!  Back to Snort Performance HQ where we started looking over the car, the standard log-style manifold has two large vacuum lines attached to the rocker cover, one of these connects to the throttle body. We had disconnected this vent, however we hadn’t blocked off the fitting. So we basically just had a massive air leak. We decided this was not too much of a worry, the turbo wasn’t over spinning. It just meant that the sleepy Ute was pretty much naturally aspirated. There was some oil residue that we put down to the system surging as the system was self-bleeding, so we cleaned it up and hit the road back to Melbourne. By this stage is was about three in the afternoon. We were in a bit of a hurry. After about half an hour we pulled in to see everything was alright. The car had been running a little hot. Upon inspection the engine was running cleanly, and water level seemed fine. The more worrying factor was the oil in the back. There was heaps of it. I checked and topped up the engine; it took about 200mls. It was everywhere! We did our best to clean the hot pipes with a rag but there was no hiding the smell! Snort has used VDO pumps before so we knew it can handle the task of returning oil, however there are two factors we hadn’t considered. Firstly, when rebuilding my engine the oil pump was upgraded to a better, higher-pressure one. Secondly, not having any experience fitting turbo kits before, I had installed my oil return fitting far too low down the side of the sump. This meant that the pump required more head to push the returning oil. *160 litres per hour with minimal resistance under optimum conditions - must be written in the VDO fine print! We had installed a 4mm reducer to the turbo when fitting the oil lines. This lowers the oil pressure entering the turbo and is usually required. A 4mm reducer is ok under normal circumstance, however with higher pressure oil Snort suggested a 1mm reducer might be in order. Snort had one of these with him, and he had fitted one previously in a similar situation (so we knew it would still work). The turbo was so bloody hot. Burning our hands we swapped it over and half an hour later we were back on the road without any more oil loss. Except the hundred mills or so that had ran down my right hand leaf spring Back in Melbourne my first task was cleaning up the oil. Next was to weld an exhaust hanger on to the top of my muffler, as this was still swinging from the V-clamp at the dump pipe. Once this was fitted I spent a Sunday re-running my oil and water lines neatly. Time for another decent mod. I was a bit worried about the fuel tank being so close to the turbo. I decided on fitting a firewall between the two, however the floor in the smugglers den isn’t very uniform. I drew these panels up in CAD and decided on getting the laser cutters to make them. 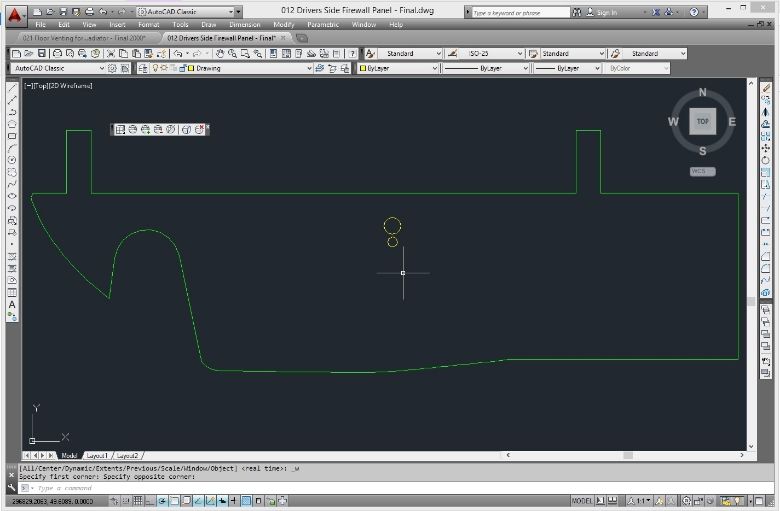 While I was at it I drew up the front panel from the floor of the tray. This has re-enforcing on the underside so I included that too. Then I added some venting on the right hand side if the panel for the radiator. 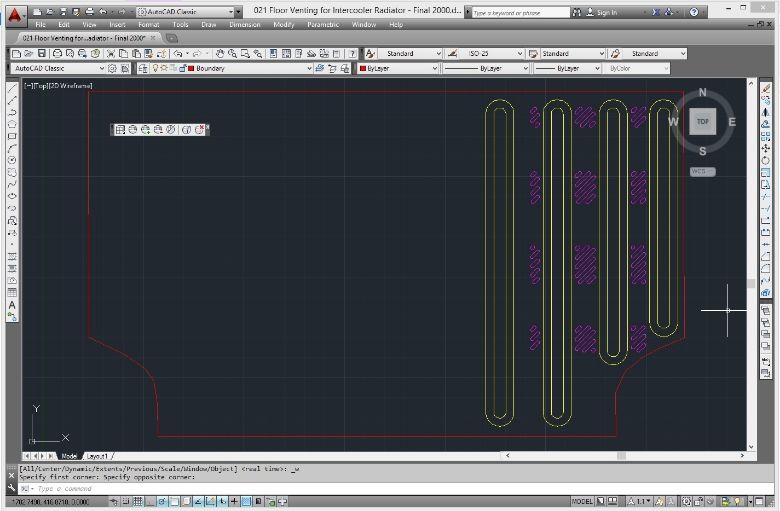 I’m still undecided whether I want to set the fans to suck cool air from the tray, or blow how air from the smugglers area. From what I have read it is possible to do either without much loss in efficiency. The area is getting heaps of airflow, the air is traveling through the holes we cut when installing the system and through the existing ones kindly installed by ford. One factor is my dog. Perhaps I’m better of pulling more air into the compartment than blasting him with hot air. I suppose once I get the engine management sorted I’ll try it either way and compare intake temps. So I took my panel and drawings into Mitcham Laser Cutting and showed them to the boys there. They loved the remote idea and had my panels built the next week. Here’s how they turned out: 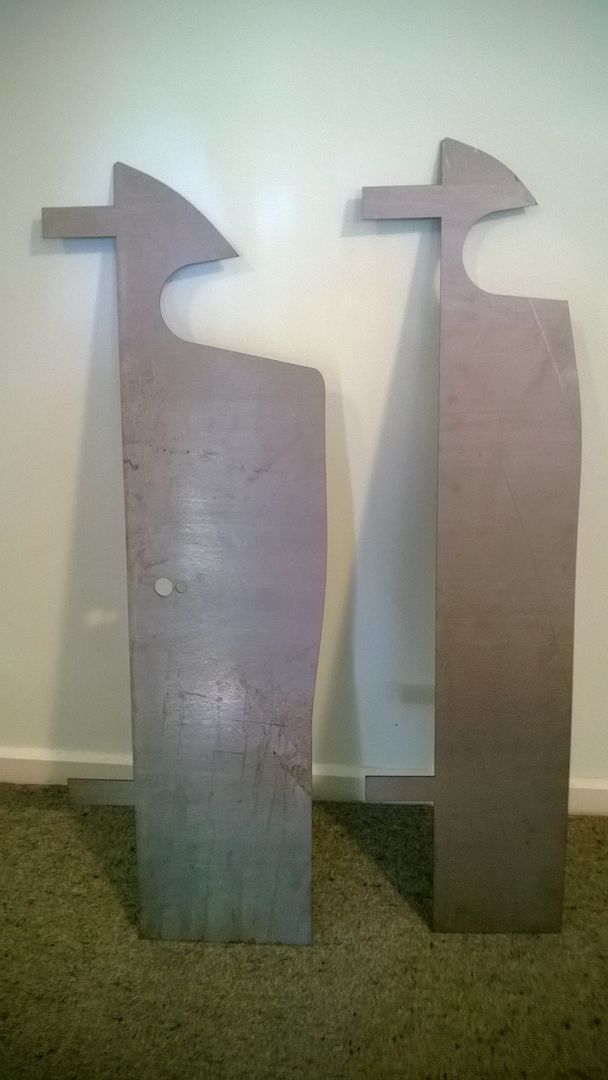 And the vented tray: 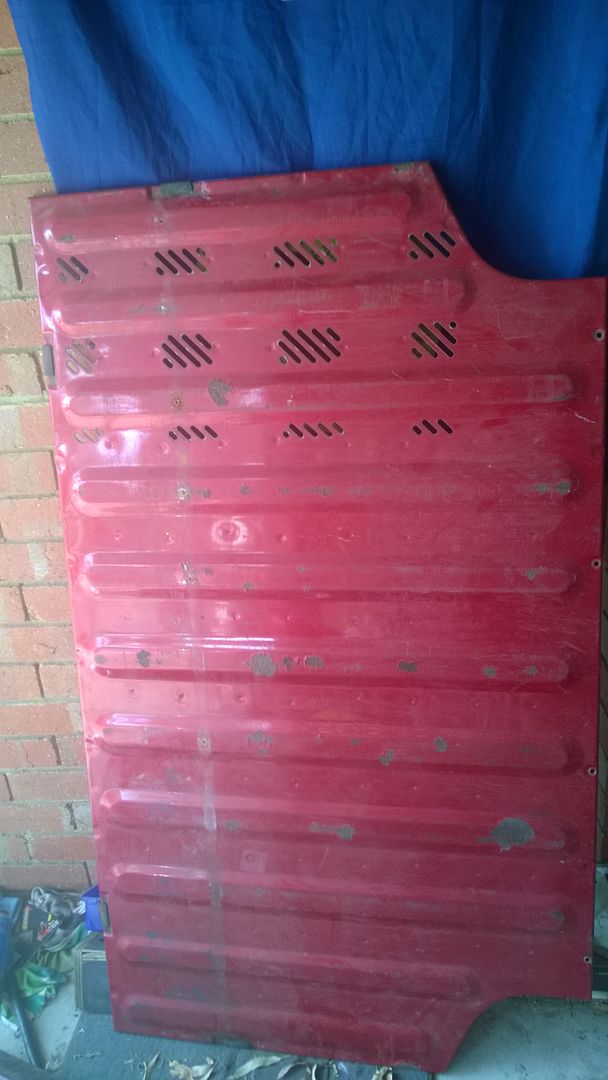 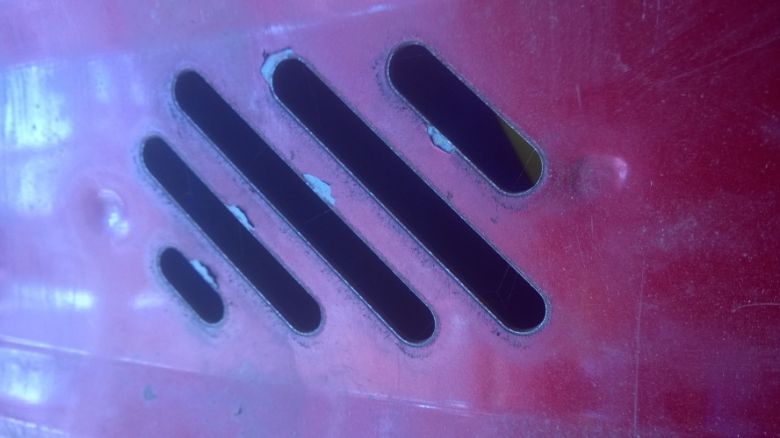 Still needs a sandblast and paint |
|||
| Top | |
|||
| frankieh |
|
|||
|
+1
Just FYI, If you size your images at 780px wide it won't truncate your text anymore. That is my experience anyway. |
|||
| Top | |
|||
| street_xh |
|
|||
|
fixed.
cheers frankieh, i thought it was just the forum doing it.. |
|||
| Top | |
|||
| street_xh |
|
|||
|
just finished off installing the double firewall this afternoon,
|
|||
| Top | |
|||
| Matt_jew |
|
||
|
Very very impressive.
_________________ {USERNAME} wrote: More people paid for a ride in a VT commodore then an AU Falcon so the VT is superior.
Based on that fact my Mum is the best around! |
||
| Top | |
||
| street_xh |
|
|||
|
Chapter 7
The Sleepy Ute lives Work has been busy and progress on the Ute painfully slow. I have spent my free time building an extension loom for my computer, I made this from another el falcon (60pin) computer and loom, the idea is that I can plug it in and tune the car, but still use the standard computer on week days, at least until I have it running reasonably… At first i cut apart an ef computer that i had in the shed to see what i was in for. Most of the pins on the female plug were a few centimeters long so i figured it couldn't be too hard to solder another male plug onto them. I tried a few and used a test light. Then i just went down to pinch-a-part and got a 60pin computer and the first 200mm an el loom. I then wired the ems stinger into my mini loom. So this is how the loom turned out 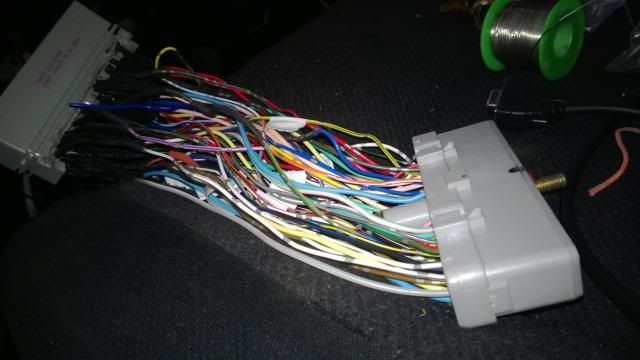 It is definitely not the prettiest piece of wiring. I have the EMS Stinger running ignition, fuel, thermo fans and idle control. Everything else is being looked after by the standard computer. Sensors are all piggybacked so that my dash works, ignition and fuel are directly controlled by the stinger. I’d like to set it up for lambda adjustment later on. One thing at a time.. 1st start: {DESCRIPTION} {DESCRIPTION} I’m not tuning the car here per se, just using fuel trim percentage to get her running After our oil spill on the freeway i was keen to find a more permanent solution that a 1mm reducer. One option was relocating the oil return but this would be a huge outlay of time and we weren't even sure it would work. Snort found a heavy duty pump for the oil return, it was the simplest option and works great: 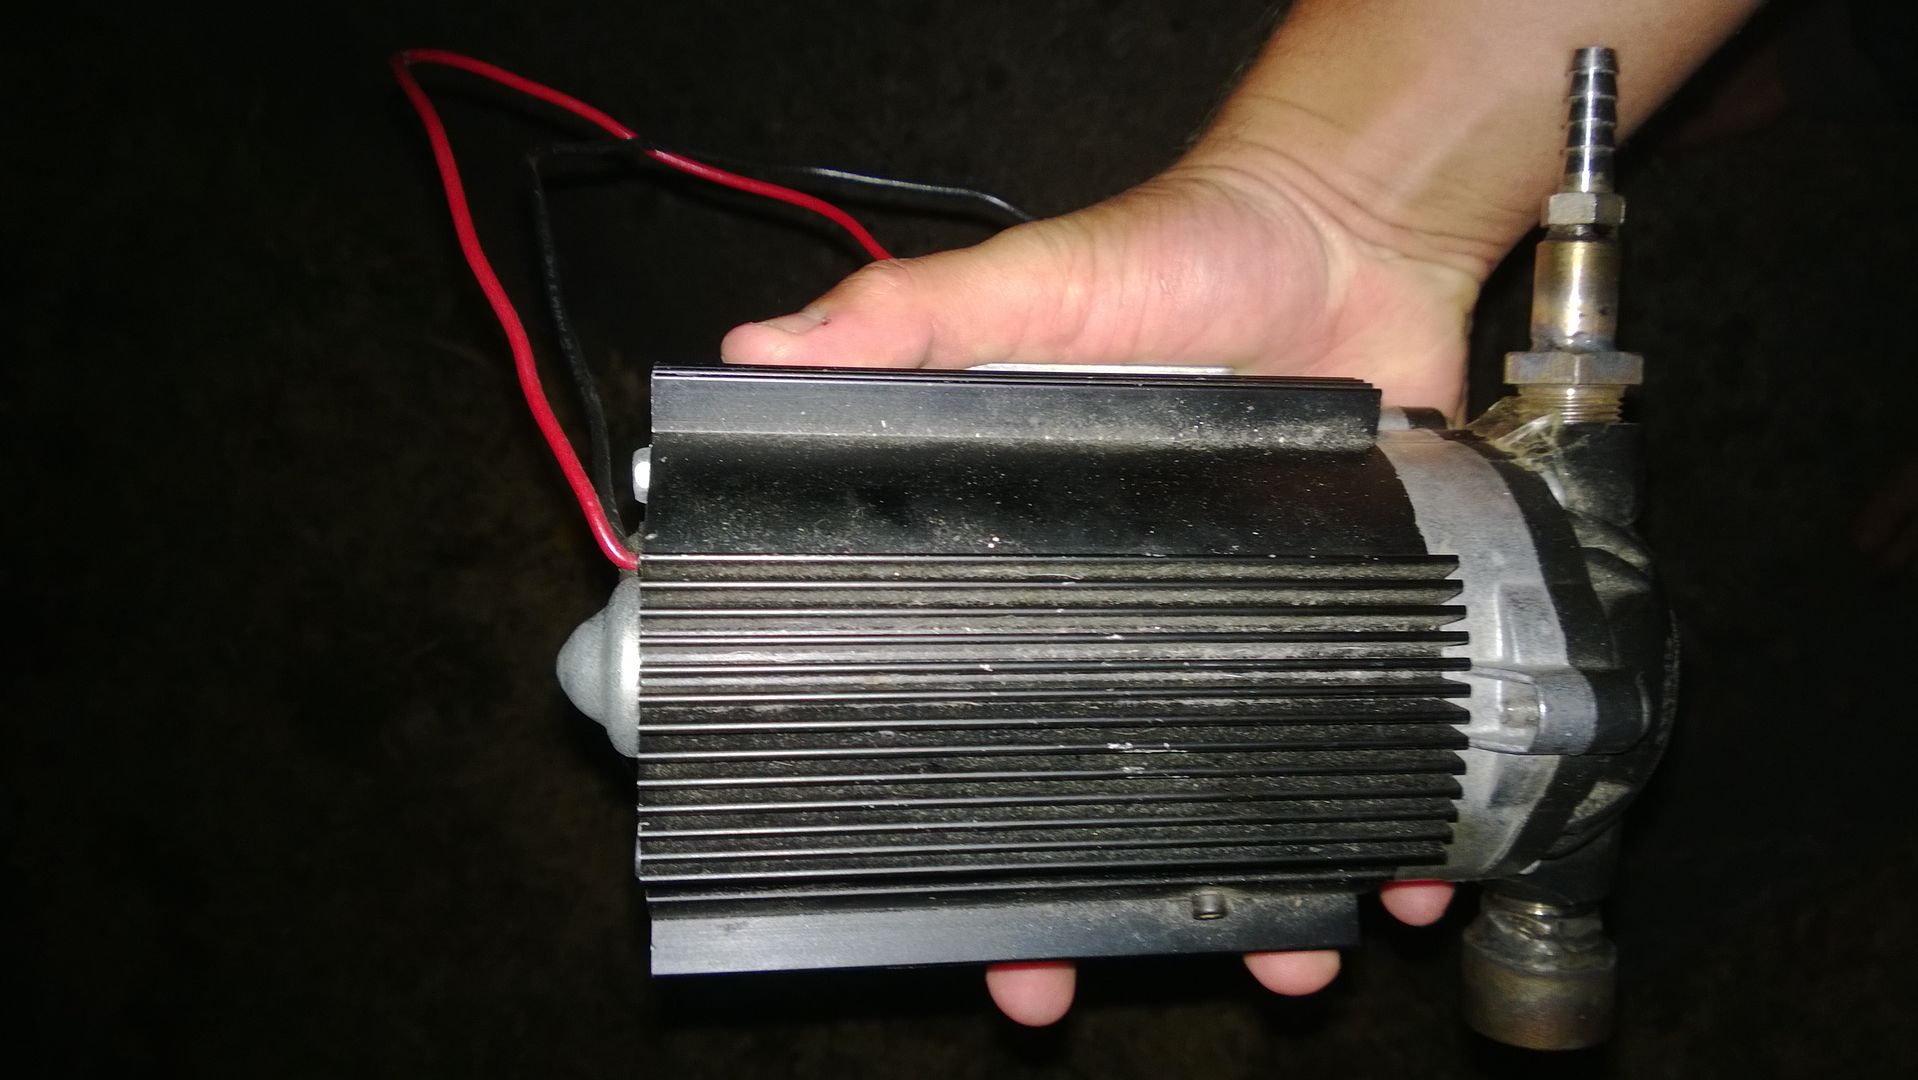 I have just sort of shoved this under the sub for now and need to look at a more professional way to mount it in the future. I really want to remove the sub, and fit some 6x9s in the parcel shelf. This would provide me with plenty of space to mount the pump. For now the focus is on getting the car going as we are looking at moving to Queensland in the next few weeks... It was time to start plumbing up the water to air cooler; I wanted to make it as simple as possible. This reservoir gravity feeds down to the pump: 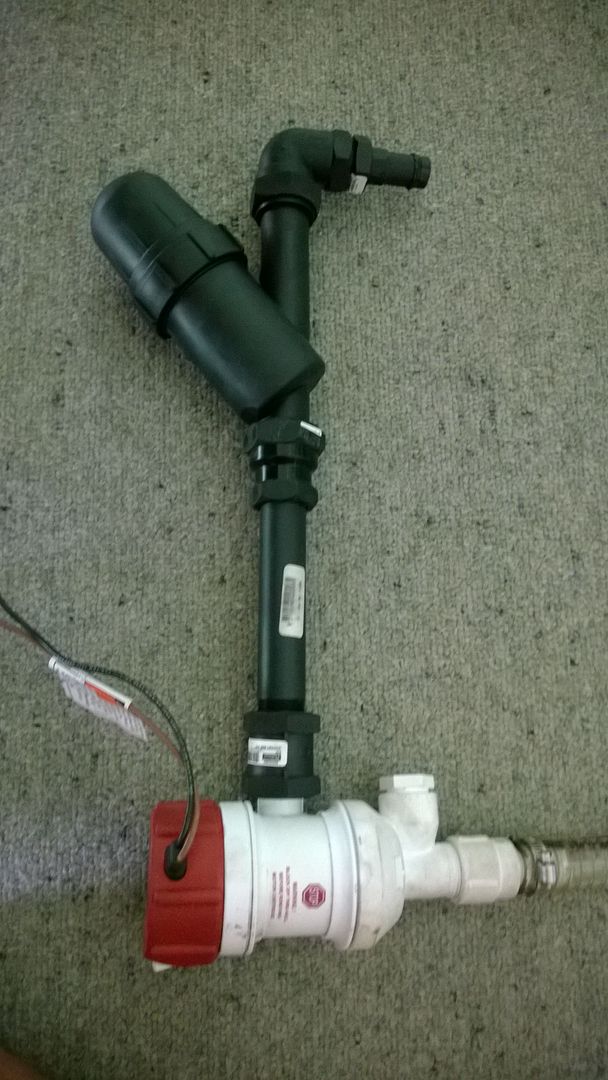 It will be accessible through one of the panels on the side of my tray, so I don't have to remove the floor to inspect it. It’s finally time to start sorting a basic tune out on the street. I’m in a little bit over my head atm but this is what I’ve come up with. 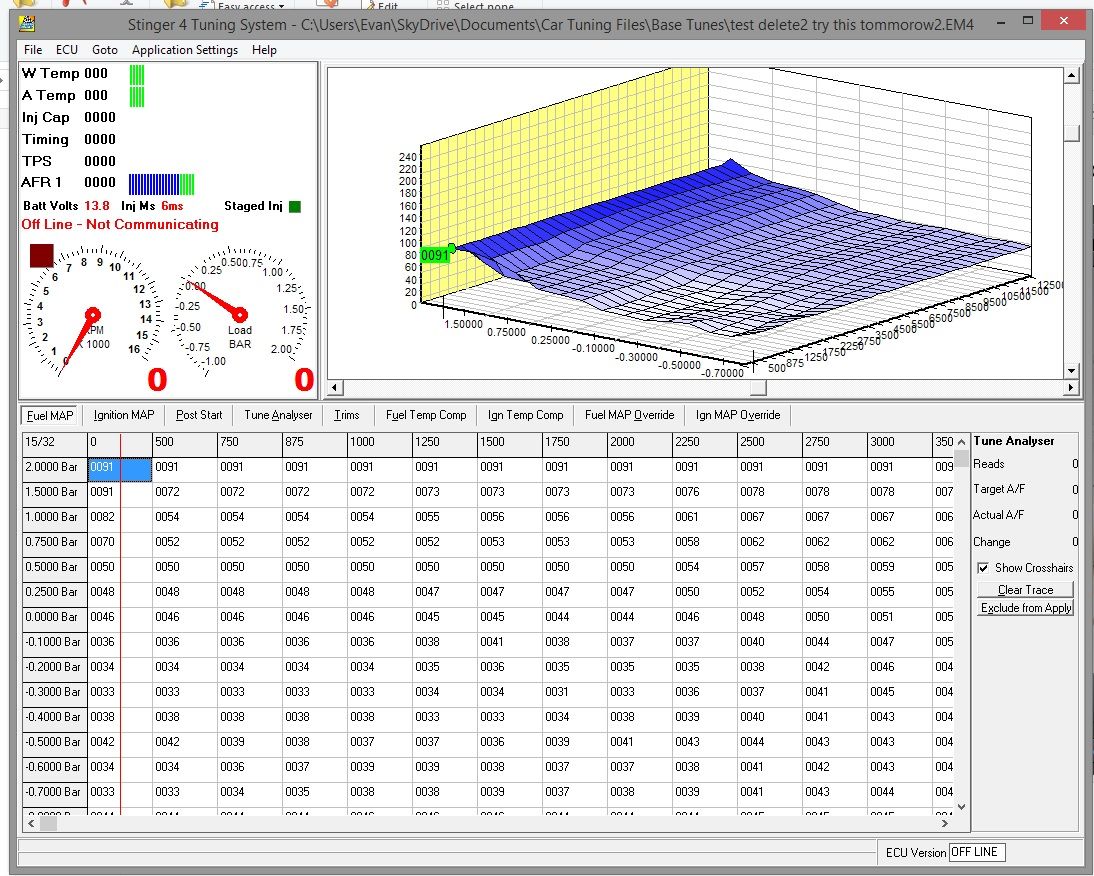 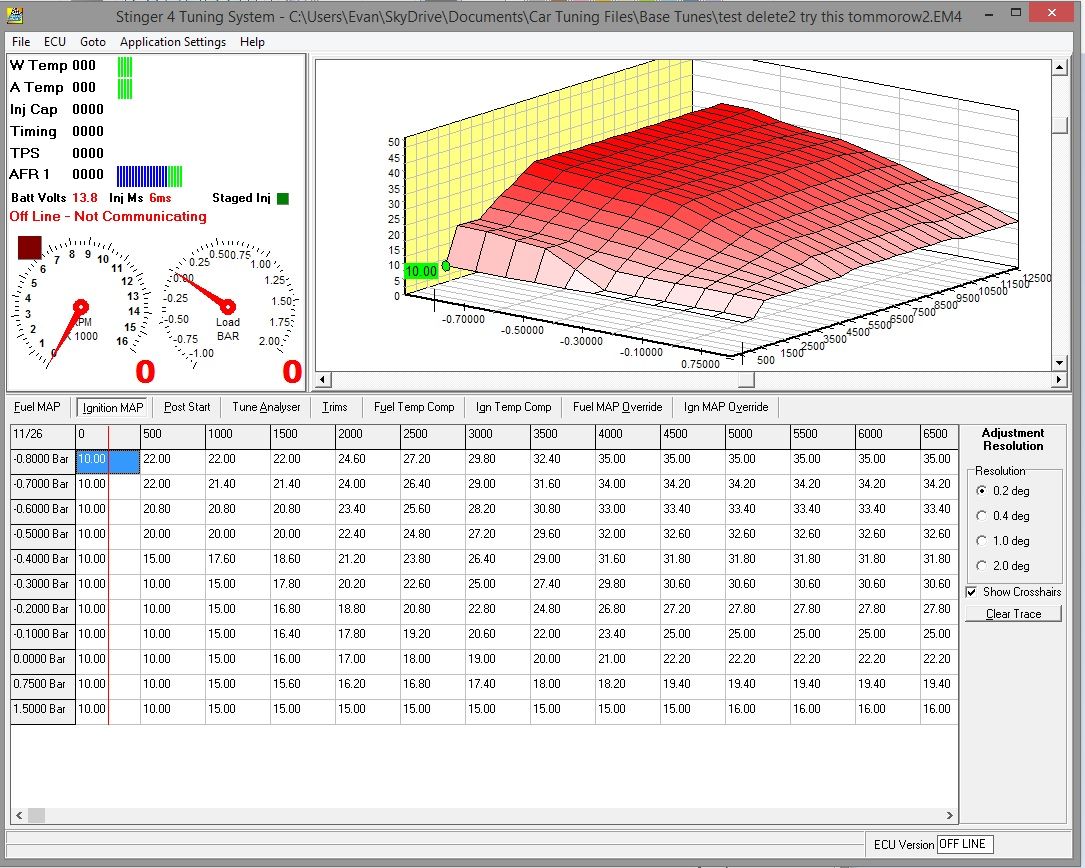 I’m still running the standard injectors so that I can switch back to standard computer during the week. 60 pound injectors will be installed soon; from what i have read the “injector scale” function on my ems will allow me to keep any tuning done with the standard injectors. This post pretty much catches up with the Sleepy Grey Ute's progress this far, i will endeavor to update as i continue the build in the future. I hope you enjoyed the read! |
|||
| Top | |
|||
| racedirector |
|
|||
Age: 65 Posts: 1584 Joined: 20th Mar 2005 Ride: EDL Fairmont Wagon/AU XR8 Ghia Location: Riverstone |
Outstanding work, really enjoying your thread!
_________________ =1994 ED Wagon GLi body/EL Fairmont spec with *ALL* EL running gear.= |
|||
| Top | |
|||
| street_xh |
|
|||
|
Cheers mate, i will hopefully have a big update to the thread after the long weekend!
|
|||
| Top | |
|||
| Who is online |
|---|
Users browsing this forum: No registered users and 0 guests |


