|
| SLO247 |
|
||
|
Damn. I got all excited thinking you had an update.
I bought a Heritage Green EF Fairmont last week too. Even have some ROH Reflex wheels here, not going to use them though. Update? |
||
| Top | |
||
| KWIKXR |
|
|||
|
fairmont1996 wrote: Hey Mate I just bought a steering wheel exactly the same, pretty much the same condition. How did you repair it?? How did you stain the blue part because its worn on the right hand side. Hey bud, I actually sent it out to a professional leather repair place to get it re-dyed. Cost like $120 from memory. I'm not sure on the process they use, but it held up quite nice for a while. After about a year or so, the dye started to wear out and now it's in need of repair again. Best method of repair would be the get it retrimmed, but that's some big $$ SLO247 wrote: Damn. I got all excited thinking you had an update. I bought a Heritage Green EF Fairmont last week too. Even have some ROH Reflex wheels here, not going to use them though. Update? Hahaha, this would be like the 10th e-series you've had now, yeah? Nah man, nothing to interesting to update on at all really Was planning to get it back to the drags in hopes of pulling a low 15 pass, but the last drag meet was cancelled due to rain. Not sure when the next event is, but I'm keen to put it down the 1/4 a few more times before I dig into the mods again. I have done a few little things since last time I updated, but nothing to major.. I picked up a Fairmont Ghia woodgrain shift surround and wrapped it carbon fiber film. Have been meaning to do it for a long time but just couldn't find a surround cheap enough. Looks heaps more classy with it. 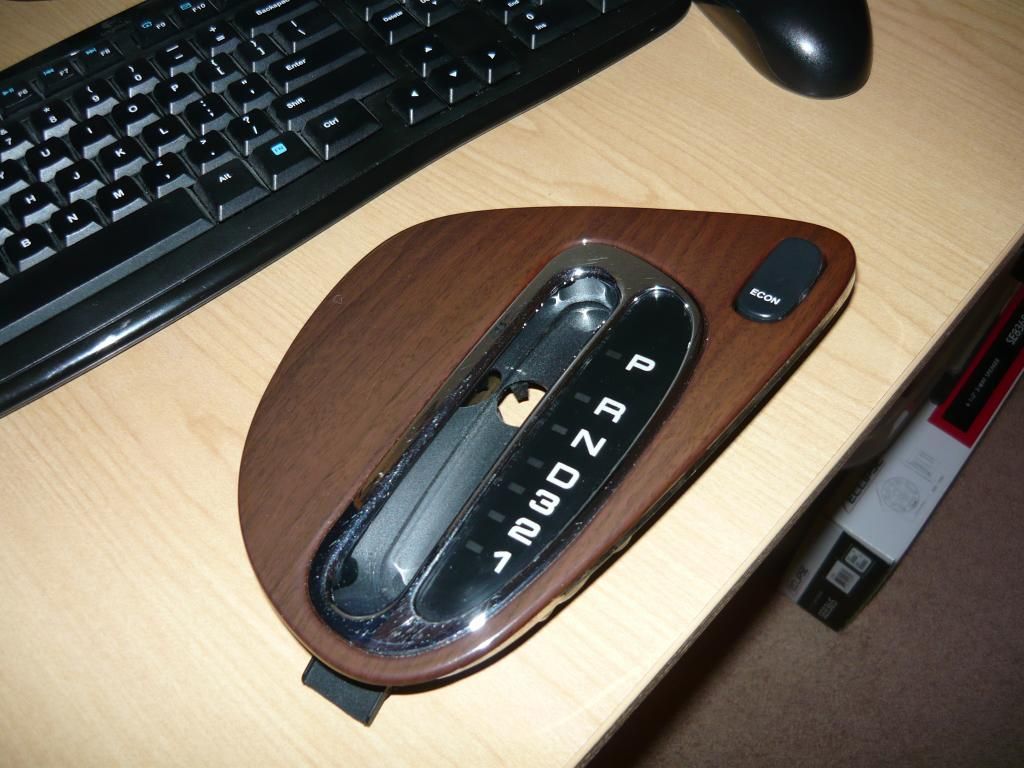  Just need to give the interior a good clean so I can try get a whole shot to show how the chrome/carbon fiber and satin black all tie in together. Here's the jist of it though.. 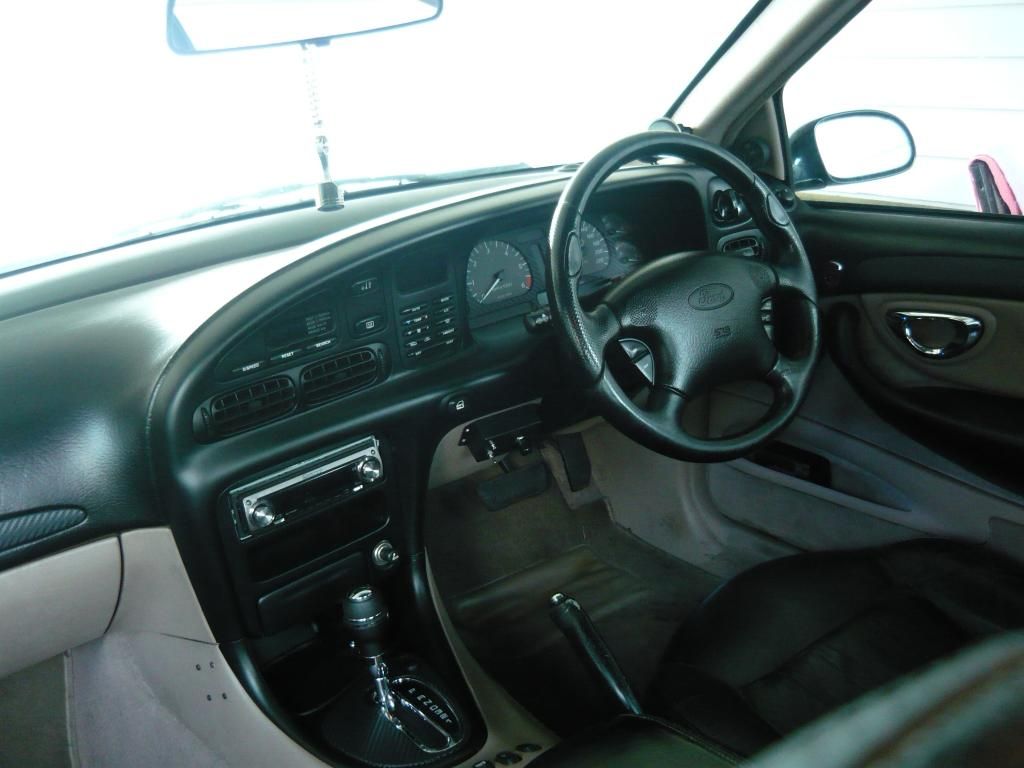 Picked up some Dobison superlow springs for the rear. I had the Fairmont on the hoist one time and noticed that one of the springs wasn't exactly trapped completely at full drop. Never had an issue with it falling out of place, it just became unseated so I thought I had better change the springs so I don't have any issue passing Warrant of Fitness checks. Spring comparison, Dobi on left and Pedders on right. Also comparison shot of the short stroke Bilstein's against a standard stroke Boge shock. 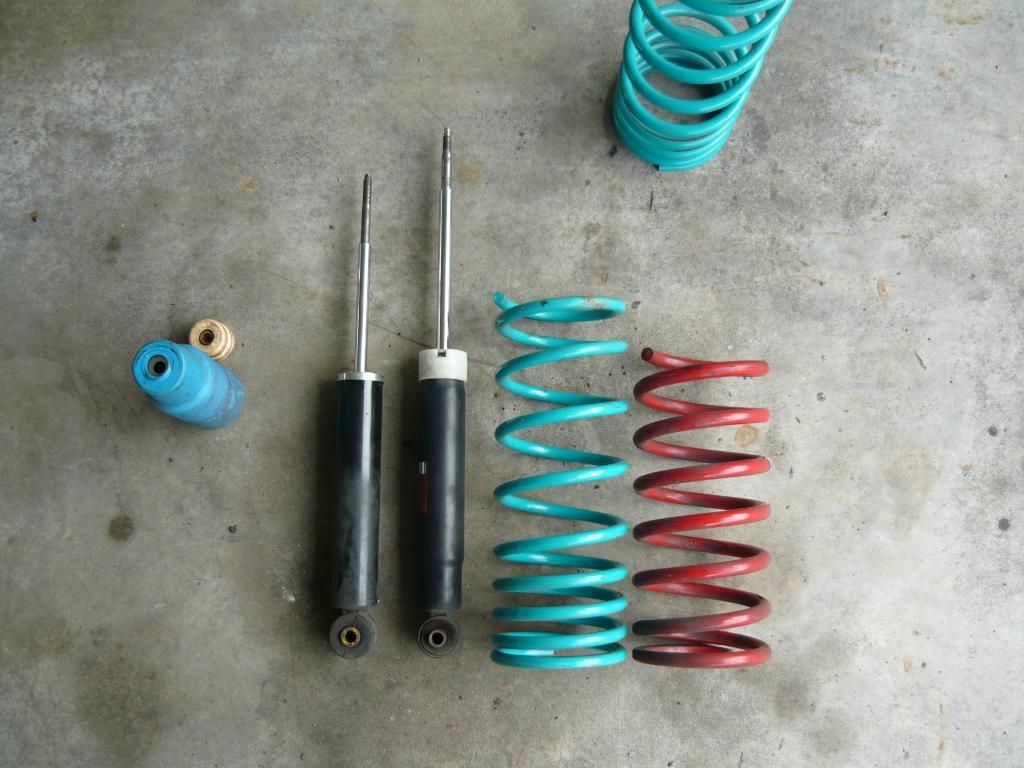 Swapping to the Dobi superlows dropped the rear end about 10-15mm so it sits a little nicer now. Still not perfect, but a lot better than before. The Dobi coils are heaps longer, but a fair bit thinner than the Pedders coils, and being progressive wound, it seems to have made the ride quality a little more comfortable. Rear end has softened up quite a bit with the Dobi springs. I picked up a Crow vernier adjustable cam gear, so once that arrives it'll be waiting to go in next time I work on the motor. Haven't touched the motor for a very long time, but it still goes quite hard. Still cops plenty of abuse and loves it. A week or 2 ago, I bought some matte black Plasti-dip to experiment with. It's basically a spray on rubber coating, best thing about it is it's very durable, but can be easily removed by piercing the coating and peeling it off. First experiment was with the wing mirrors. Both of my mirrors have suffered broken mounting points over time so therefore they have heaps of movement, even when idling at a set of lights with the cam lumping away, the mirror glass shakes around like mad. Had a decent laugh when I found my drivers side mirror was held on by one screw and some doubled sided tape because the other 2 mounts had snapped off completely. Went down to Pick a Part and picked up an aftermarket mirror that I found there for the drivers side, thankfully it had all 3 mounting points intact, yuusss! Was still in the generic black plastic finish and had a few scuff marks etc. Cleaned it up and gave it a coat of matte black Plasti-dip and this is how it turned out. I've never really like the colour coded mirrors on my Fairmont, makes the black plastic trim stand out too much for me, matte black lets it all blend in well together and goes with the tint and black wheels etc. 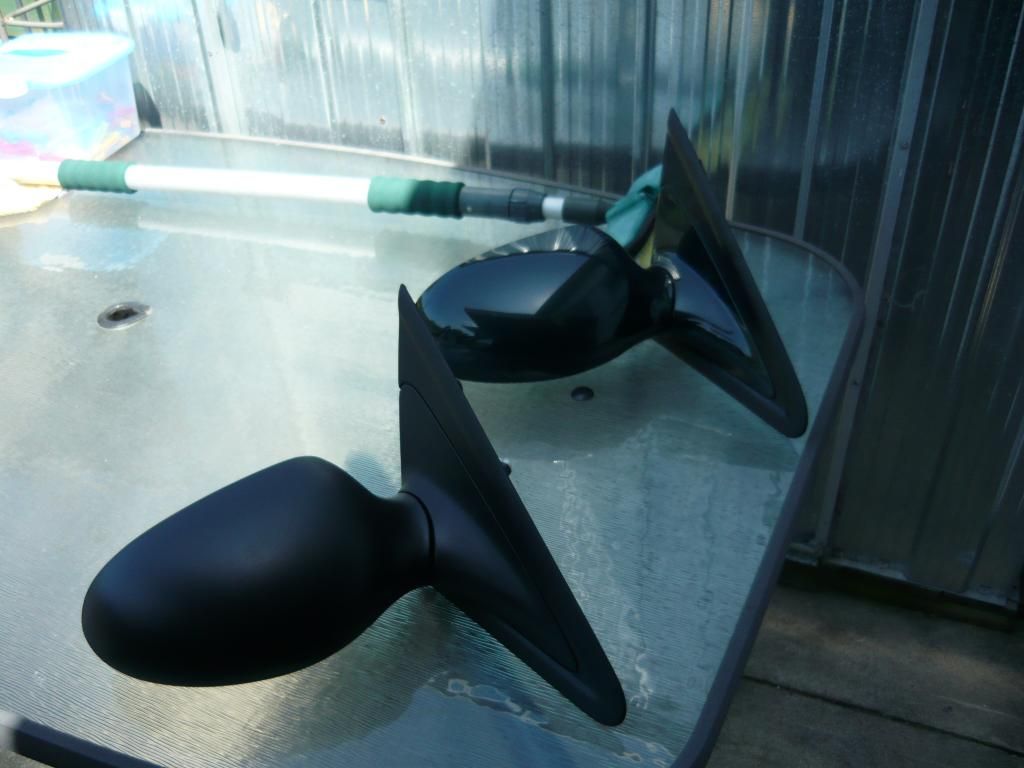 Just need to get another mirror for the passenger side and it'll receive the same treatment. Apart from the above, nothing else has changed really. Have a fair bit of maintenance work to do, such as engine and trans oil/filter changes, front wheel bearings need repacking and hub seals need replacing, busted a** transmission mount needs replacing, reco injectors, etc etc, the list goes on Anyways, to finish it off, a couple of exterior shots I got during the holidays. Need to get some later ones sometime soon when I can get out into some better scenery. 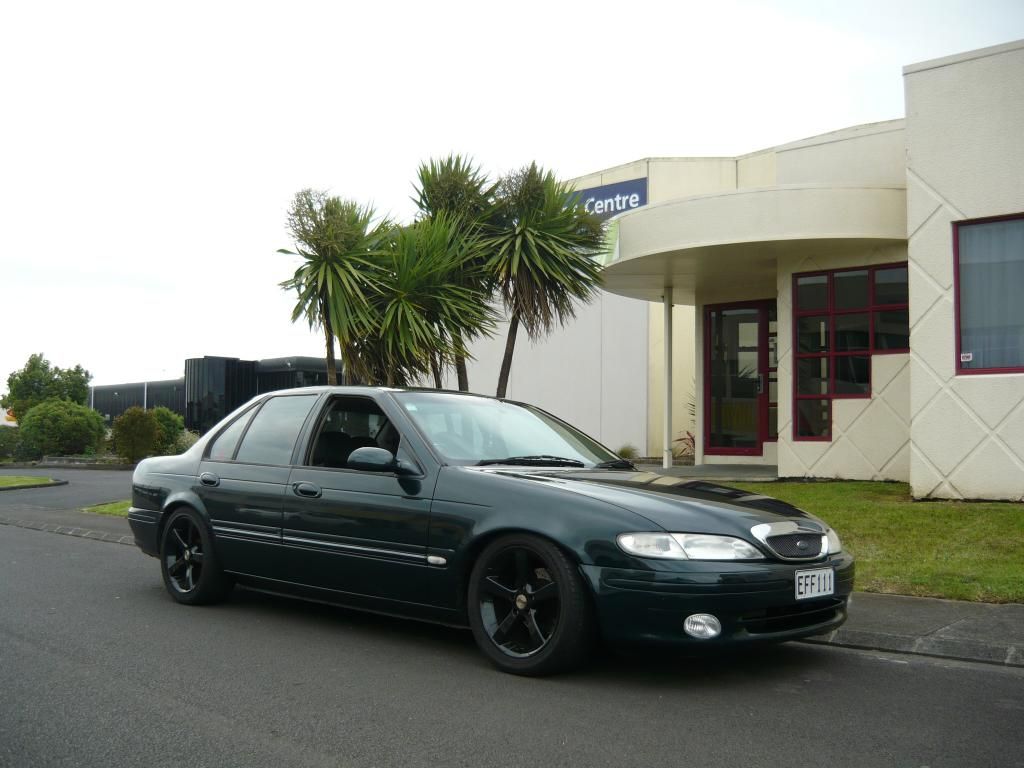 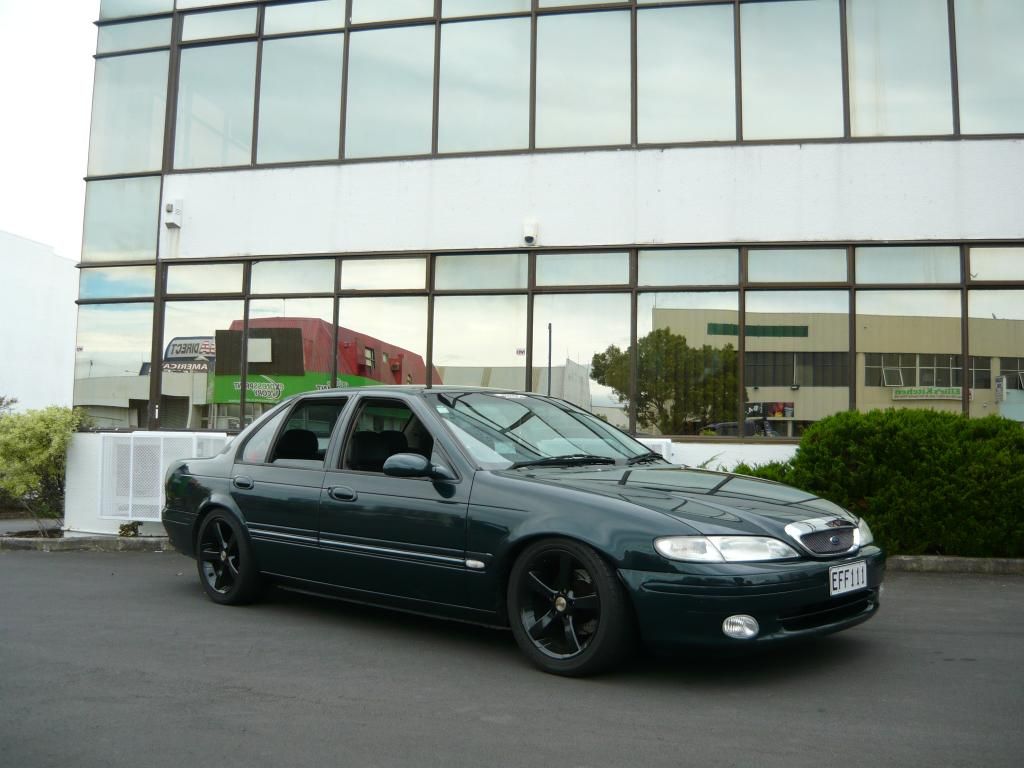
|
|||
| Top | |
|||
| SLO247 |
|
||
|
So good. It looks really mean on those wheels. That plasti dip stuff is really interesting, would be great for changing wheel colours. Be good to see how the black mirrors look. I have a good passenger one, post would kill though.
The carbon wrap is good. I'd like to see what a gloss black wrap would look like too. Hate that fake wood. Might be the 11th E Series. Some were just to pilfer though. Just bought it because it was cheap. So far I got it running and fitted FTRs. It has Pacemaker 4499s and a nice exhaust already. Will just lower and tint probably, and a small stereo. What can you tell me about getting reasonable sound from just 6" coaxials and no sub? Decent speakers, a 4 channel amp and some sound deadening/door sealing? How much does the deck affect it? I have a Pioneer DEH 5950IB to fit, and a dodgy Jensen 2ch amp and cheap Pioneer 2 ways. Probably will use the deck but not the amp or speakers. You have gotten pretty serious with yours! |
||
| Top | |
||
| KWIKXR |
|
|||
|
Cheers dude
I originally bought the plasti-dip to do another set of CSA Gladiators I have ready for to go on my Dad's EF XR6. Once I tried it on the mirrors, I didn't really think the finish would work well with the large flat spokes - the finish comes out almost textured, so works really well for blending the mirrors and the windows trims and surrounds, but I would want it on those wheels at all. Thin spokes might not look too bad though. Your EF sounds like a pretty good base to start with mate, already has some goodies fitted already too which is a bonus. Regarding the audio setup, sound deadening is a must. If you only want to be running coaxials, I'd be deadening the front doors and parcel shelf at least. That deck should be okay, I had a similar unit (judging by the spec sheet anyway) from an earlier range, and although it was fairly basic and it had some nice sound quality and a few good features with it. If the amp is in okay condition and still sounds okay, I'd use it to run the front speakers off it. I'd probably buy decent good coaxials for the front (something like this would probably do nicely as they have an adjustable tweeter mount) and try find a set of speakers for the rear to fill in a little more of the bass, I probably wouldn't spend as much on the rear as they are only for fill. Personally I have used the woofers out of a Jaycar reponse component set before for this and it worked quite well |
|||
| Top | |
|||
| SLO247 |
|
||
|
Bit of a shame it won't work well on the wheels. Still a cool product.
I had a look at the amp and speakers I have. They are 3 ways, ts or ta series, I looked them up and I think I'll try them and see how they go. Been thinking of the Response stuff, I'll check it out. Amp is 60W RMSx2 so if its working ok I'll use it, should be much better than the 16W or so off the deck! I'm hoping to put it under a front seat. What deadening can you get away with? Thanks for the advice. |
||
| Top | |
||
| KWIKXR |
|
|||
|
Sure is! One of the best things about it is it's fairly easy to peel off if you need to. In my case with the wing mirror, I didn't even mask up the actual glass mirror, lol. Just sprayed straight over the top of it, then once it was dry, grabbed a sharp needle to pierce the coating on the glass and it peel straight off
Seriously considering re-doing all the black window trims with this stuff after seeing how flexible it is. After 3 or so years now, the bumper paint I did it with is starting to look a bit aged, and is showing signs of cracks in a few sections. This plasti-dip stuff seems quite durable too so far, took it to those self serve car washes and sprayed the mirror with the high pressure hose for a while and it didn't budge at all - good enough for me Definitely give that amp a go, that's more than enough power for a set of speakers, so long as it's still pumping out clean power, it'll do just fine. For sound deadening I recommend Dynamat Xtreme, best stuff I have used hands down. Apparently Soundstream does a product called Deathmat, which is identical but is cheaper. So either or will do in this case. Pretty easy to apply as they both have a self-adhesive backing, so just clean the surface and then lay the deadening sheet over it and just press it down onto the surface as best you can. There's a proper rolling tool you can use, but it's easy enough to do it by hand I reckon. |
|||
| Top | |
|||
| KWIKXR |
|
|||
|
With Night Speed Drag Wars @ Meremere coming up this Friday 15th, I thought I better get stuck into getting the Fairmont ready just incase I do manage to get time to go down and have a few runs down 1/4 mile.
All of the above mentioned work I was supposed to do a while ago had not been done at all sadly lol, poor Fairmont hasn't been touched till today. Still didn't get much work done, but I got a few things sorted out finally. I bought a Crow billet vernier adjustable cam gear recently, was going to fit it today, but probably not worth the hassle just yet. I wanted to have some adjustment on the powerband of the cam which is where this comes in handy, a few degree's of cam timing advance should bring power on a few 100rpm earlier just for that little extra pull down low to help with the fairly long gearing and stock stall converter for the time being. Hopefully whenever I have a decent reason to pull the rocker cover off again, I'll swap it over at that time. 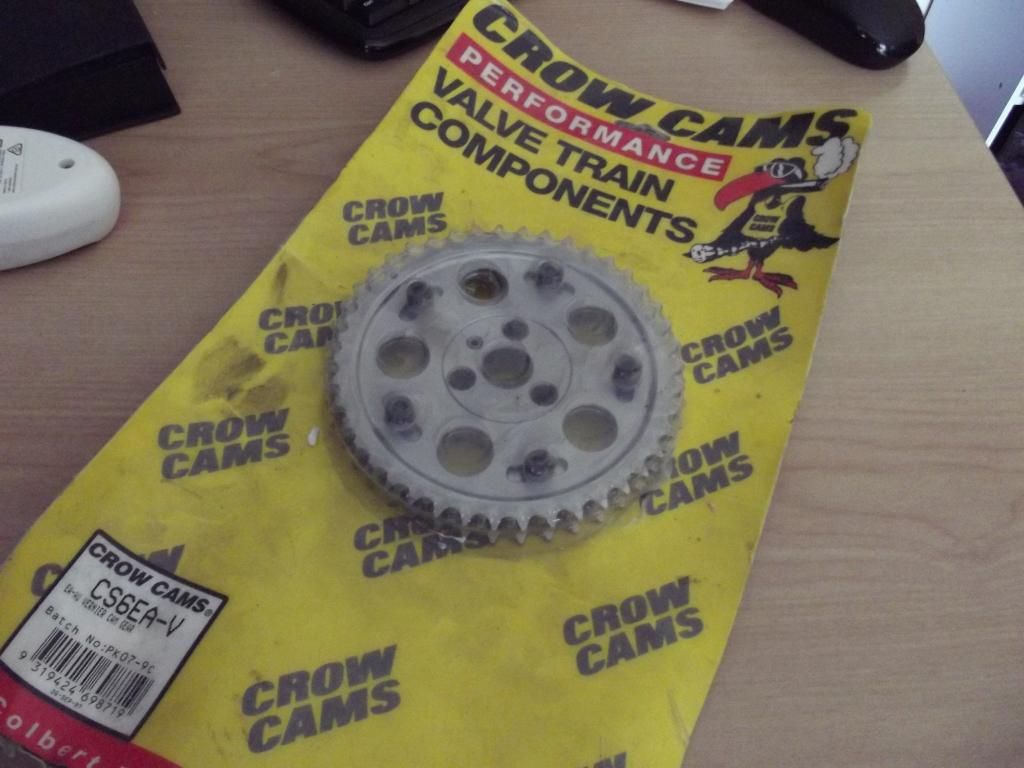 So back to what went down today.. Step 1: Replaced a blown brake light bulb Step 2: Fix up the passenger side mirror and give it the same matte black treatment as the drivers side mirror got. Looks much better now, and although colour coded wing mirrors look good, the matte black blends in with the windows trims much nicer overall. Step 3: Fit diff snout bump stop 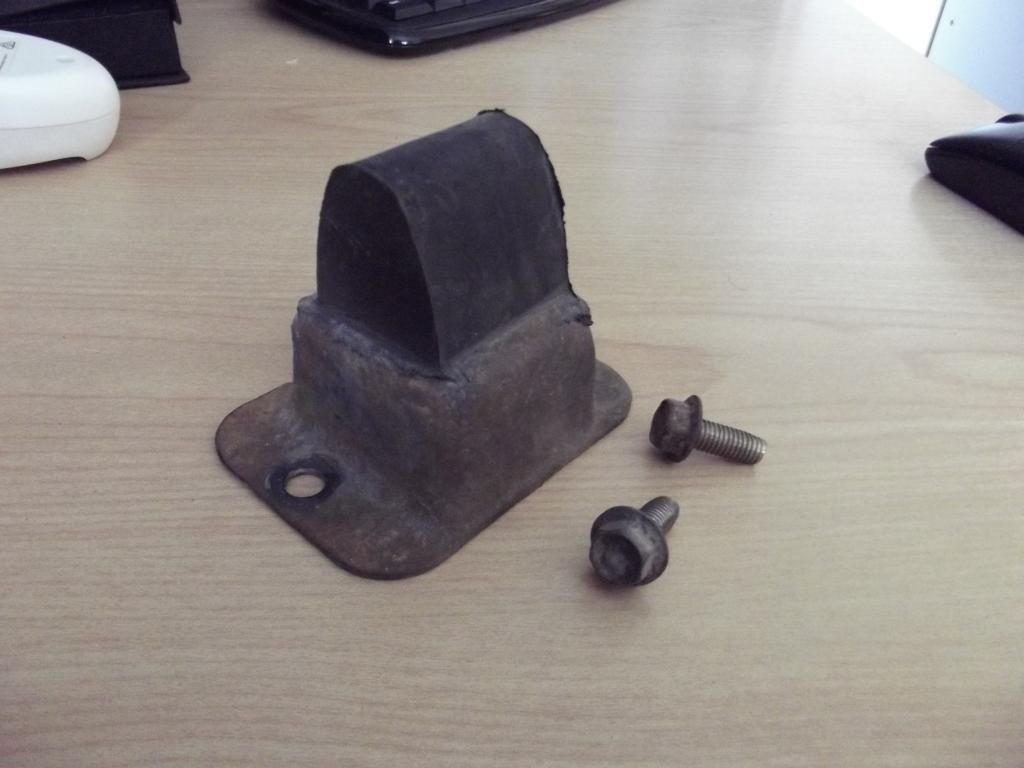 As it came without the bump stop fitted. 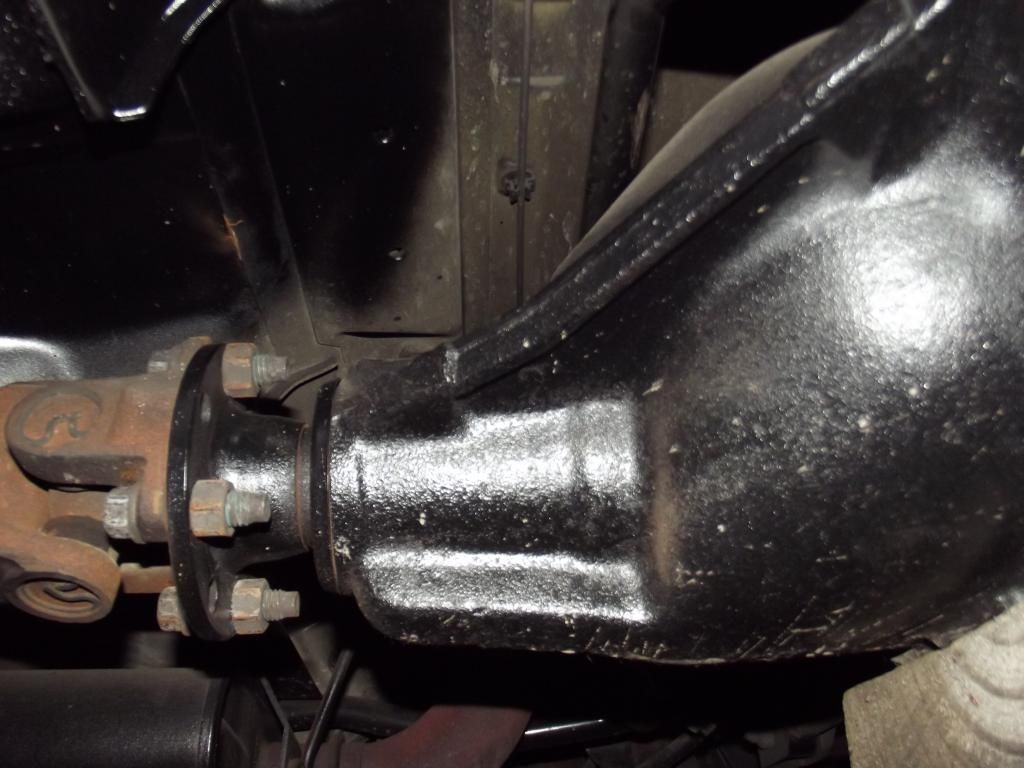 With the bumpstop fitted. Note the witness marks of the driveshaft balance weight hitting the tunnel, hopefully it should no longer be able to do this, lol 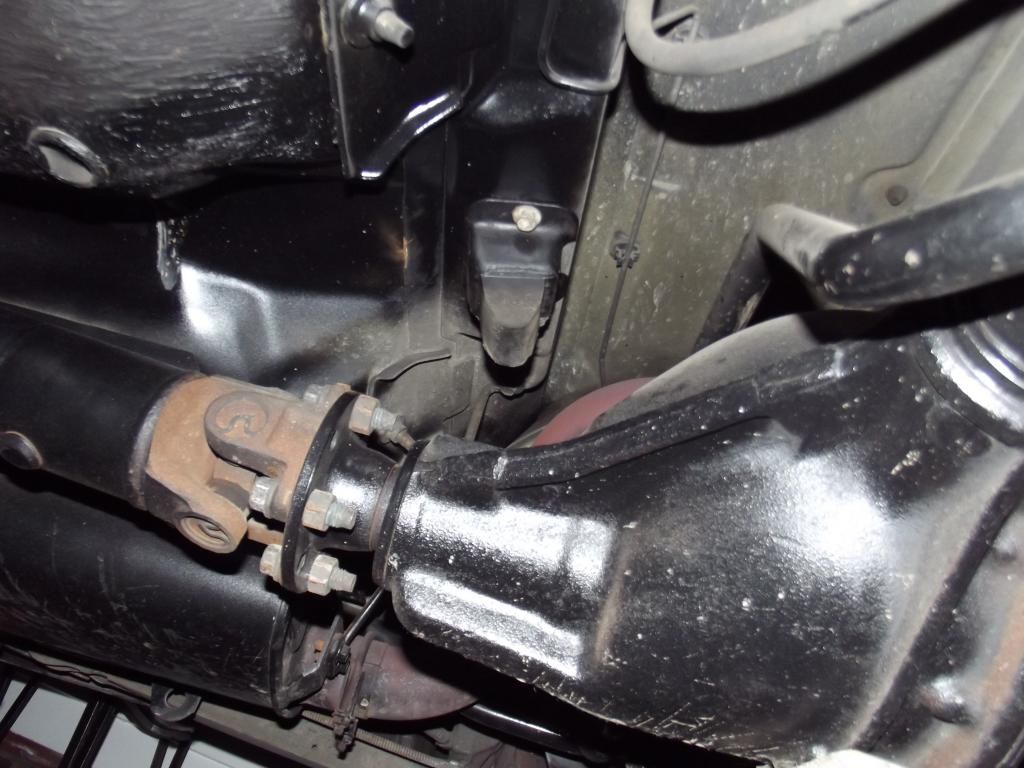 Had a bit of a play around with the plasti-dip and dipped the rear number plate surround panel for a different look. I colour coded the centre piece of it a while ago and left the outer edge chrome, unfortunately the colour coded section flaked off after it got some high-pressure hose action at the car wash a few months back. Ended up dipping the entire panel black which seems to look pretty cool now that there is less chrome on the rear. Also dipped the boot lock so it doesn't stand out as much. Starting to get pretty addicted to this plasti-dip stuff, pretty awesome to work with and best of all it can be peeled off fairly easy if need be. Will try to get pic's up during the week of the slightly changed look on the rear end. So that's as far as I got today haha. Doesn't help when you start working on the car at 7.30pm. Other things I want to do before Friday are change the engine oil and filter, which will most likely happen mid week. Clean up the engine bay, maybe try raise the rear of the bonnet if I can be bothered to try relieve a little engine bay heat and maybe play around with the intake setup, mainly to try reduce heatsoak. To finish it off, a few final adjustments with the tune (a long time coming, lol) and it should be all ready to go on Friday. Hoping for a low 15sec pass this time, should be able to get there with a cooler temp in the late arvo/early night, adjusting tyre pressures and some decent work from the driver. Will be keeping the same full weight as last time to keep things honest. To finish this off, a few photo's I got a couple weeks ago..  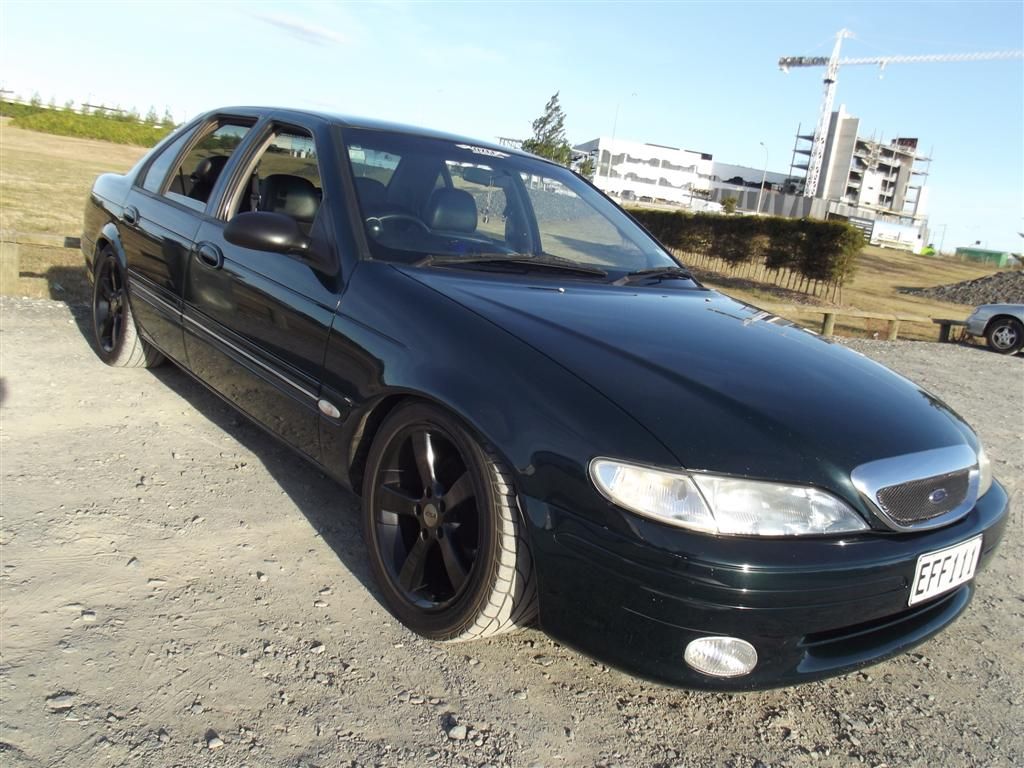 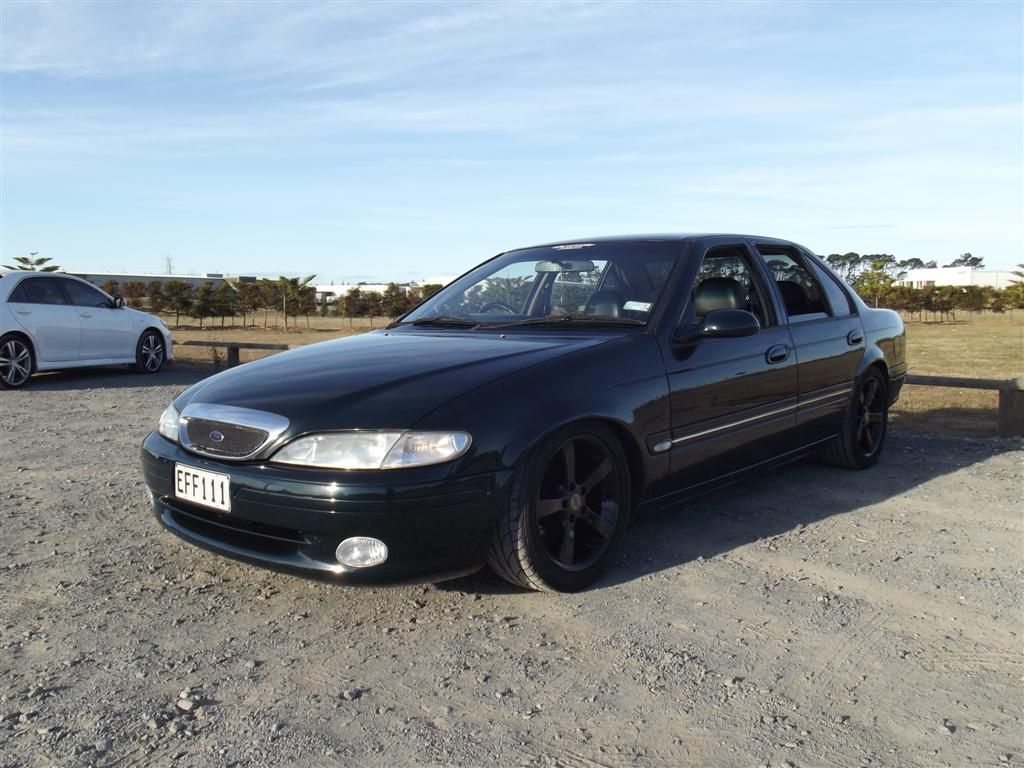 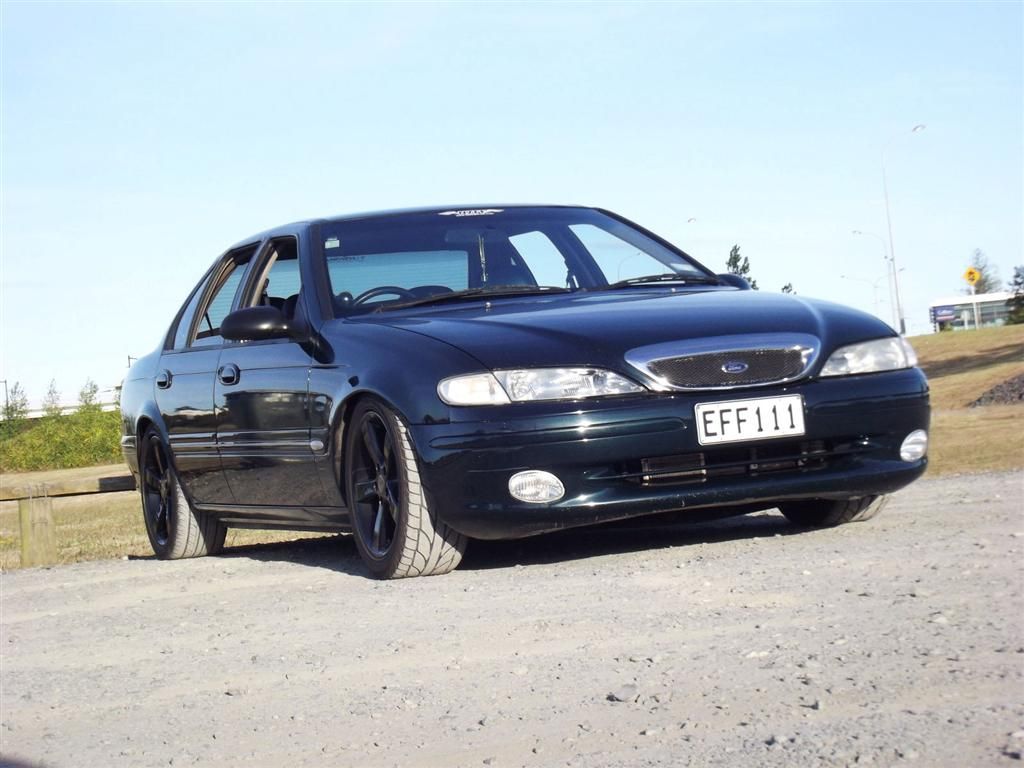
|
|||
| Top | |
|||
| fairmont1996 |
|
||
|
SHe's looking really god mate!
I'm having to get a little tiny bit of rust out of the drivers sil KWIKXR wrote: With Night Speed Drag Wars @ Meremere coming up this Friday 15th, I thought I better get stuck into getting the Fairmont ready just incase I do manage to get time to go down and have a few runs down 1/4 mile.
All of the above mentioned work I was supposed to do a while ago had not been done at all sadly lol, poor Fairmont hasn't been touched till today. Still didn't get much work done, but I got a few things sorted out finally. I bought a Crow billet vernier adjustable cam gear recently, was going to fit it today, but probably not worth the hassle just yet. I wanted to have some adjustment on the powerband of the cam which is where this comes in handy, a few degree's of cam timing advance should bring power on a few 100rpm earlier just for that little extra pull down low to help with the fairly long gearing and stock stall converter for the time being. Hopefully whenever I have a decent reason to pull the rocker cover off again, I'll swap it over at that time. So back to what went down today.. Step 1: Replaced a blown brake light bulb Step 2: Fix up the passenger side mirror and give it the same matte black treatment as the drivers side mirror got. Looks much better now, and although colour coded wing mirrors look good, the matte black blends in with the windows trims much nicer overall. Step 3: Fit diff snout bump stop As it came without the bump stop fitted. With the bumpstop fitted. Note the witness marks of the driveshaft balance weight hitting the tunnel, hopefully it should no longer be able to do this, lol Had a bit of a play around with the plasti-dip and dipped the rear number plate surround panel for a different look. I colour coded the centre piece of it a while ago and left the outer edge chrome, unfortunately the colour coded section flaked off after it got some high-pressure hose action at the car wash a few months back. Ended up dipping the entire panel black which seems to look pretty cool now that there is less chrome on the rear. Also dipped the boot lock so it doesn't stand out as much. Starting to get pretty addicted to this plasti-dip stuff, pretty awesome to work with and best of all it can be peeled off fairly easy if need be. Will try to get pic's up during the week of the slightly changed look on the rear end. So that's as far as I got today haha. Doesn't help when you start working on the car at 7.30pm. Other things I want to do before Friday are change the engine oil and filter, which will most likely happen mid week. Clean up the engine bay, maybe try raise the rear of the bonnet if I can be bothered to try relieve a little engine bay heat and maybe play around with the intake setup, mainly to try reduce heatsoak. To finish it off, a few final adjustments with the tune (a long time coming, lol) and it should be all ready to go on Friday. Hoping for a low 15sec pass this time, should be able to get there with a cooler temp in the late arvo/early night, adjusting tyre pressures and some decent work from the driver. Will be keeping the same full weight as last time to keep things honest. To finish this off, a few photo's I got a couple weeks ago..
_________________ I'de rather have it and not need it then need it and not have it |
||
| Top | |
||
| SLO247 |
|
||
|
How did I miss this? Looks fantastic, the wheel colour really works with the Green. Didn't think it would. Can you show us what the rear plate frame looks like?
Still planning out my stereo install. Those Jaycar 6.5" Coaxials with the swivel tweeter and the more basic ones both are too large to fit in the original speaker cutouts according to the measurements I found for EF/EL Doors. Do you know if they actually will fit? I was planning to run the better ones in the doors and the basic ones in the rear shelf. |
||
| Top | |
||
| Papa Smurf |
|
||
|
Definitely sits low.
|
||
| Top | |
||
| KWIKXR |
|
|||
|
SLO247 wrote: How did I miss this? Looks fantastic, the wheel colour really works with the Green. Didn't think it would. Can you show us what the rear plate frame looks like? Still planning out my stereo install. Those Jaycar 6.5" Coaxials with the swivel tweeter and the more basic ones both are too large to fit in the original speaker cutouts according to the measurements I found for EF/EL Doors. Do you know if they actually will fit? I was planning to run the better ones in the doors and the basic ones in the rear shelf. Cheers SLO Only managed to get some photo's today, in desperate need of a polish and wax, hasn't had one in a very long time. 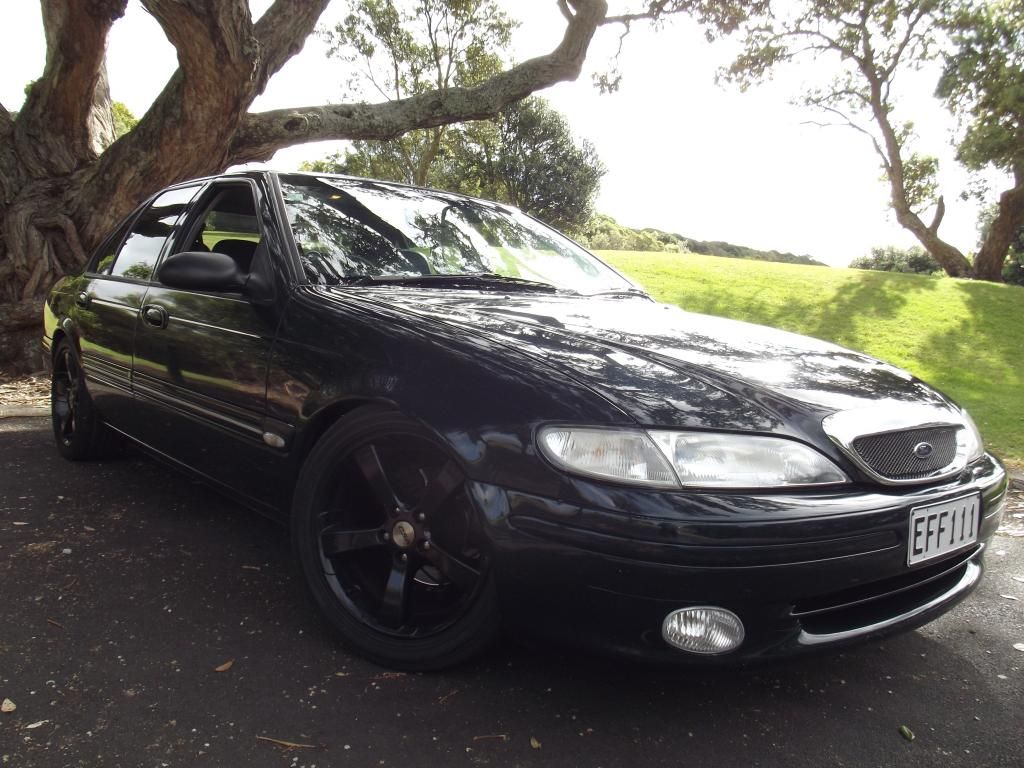 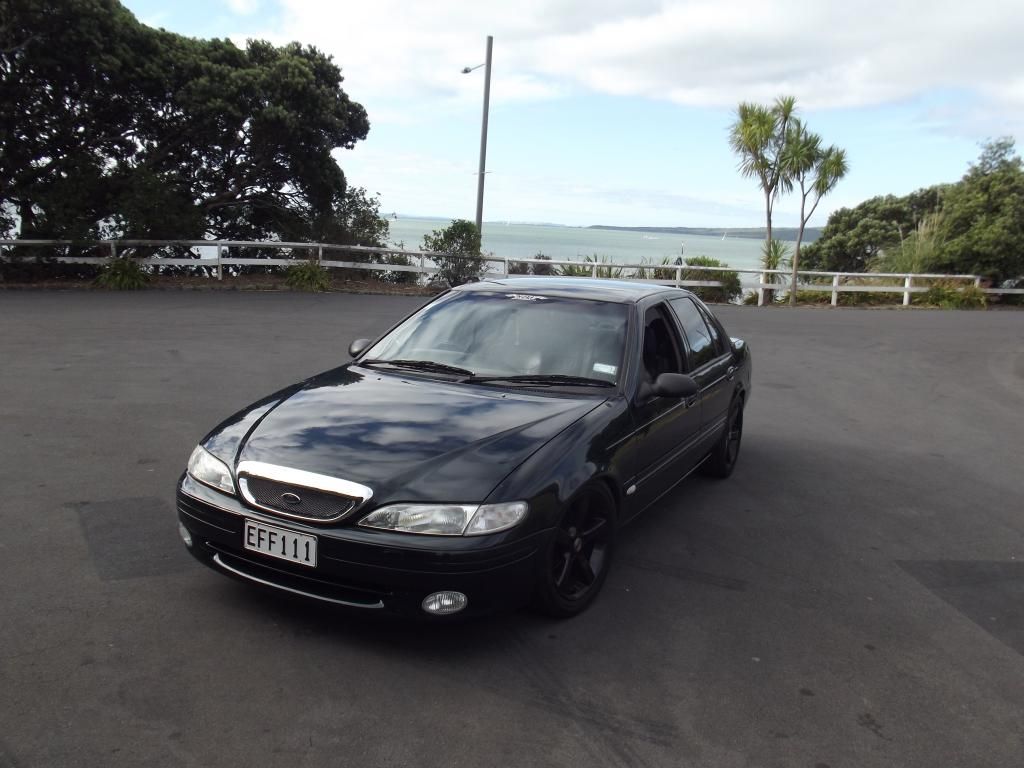 Here's some of the matte blacked-out number plate surround and boot keyhole. 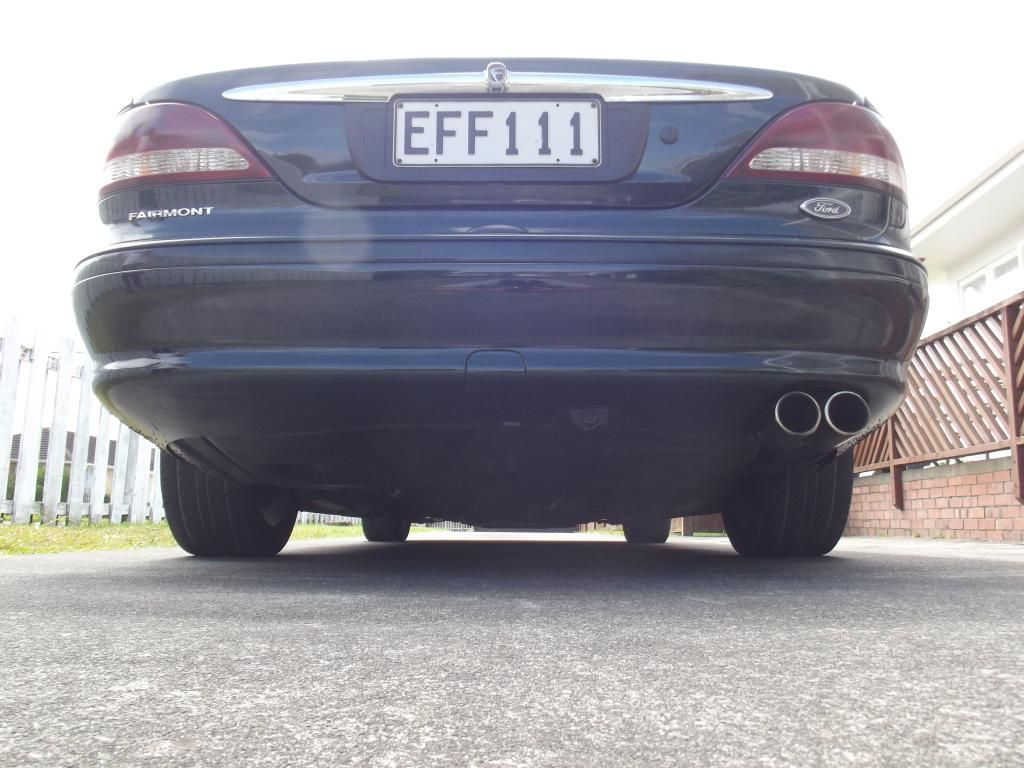   I can't for certain whether the 6.5" Jaycar speakers fit without modification, but the 6" Jaycar components I used to have went straight in perfectly as is. I now have 6.5's in the front doors, but needed to trim the hole out slightly with tin snips so that it sat in there flush. I guess you could achieve the same result with thin MDF spacer rings just so the speaker baskets don't foul on the cutouts. With the rear speakers, the cutouts are weirdly shaped, so pretty sure 6.5's won't be a straight drop in. My 6" Jaycar component woofers went straight in, but my Digital Designs 6.5's wouldn't at all. Needed to use MDF spacers to get them to fit. Only way to tell for sure would be to try each speaker in the door and parcel shelf cutouts - if you can, maybe remove your passenger door trim and speaker and one rear speaker, get down to a local Jaycar and ask if you can test fit one of their display models. That would be the only sure way of knowing whether it's a straight drop in or not. Sorry I can't be of much help on that one bud. Papa Smurf wrote: Definitely sits low. Haha, it's getting there mate, could still go much lower in the rear Anyways, went to the drags last night and had a pretty disappointing night to say the least. Made a few fuel changes to the tune and reset the ECU about 15 minutes before leaving for the drags, so the ECU was still learning pretty much the whole way there (was even trying to relearn it's idle this morning lol). Was acting up a bit off idle last night with this split second lean spot, seems to have slowly eased away over a decent drive today. Should have done the tune and ECU reset earlier in the week to give it time to settle Best I could manage out of 4 runs last night was a 15.7 @ 91mph. About .2 slower than my PB. The one thing that really let me down was engine bay temp's, I couldn't get the engine bay cool enough between runs, and was in a rush to get my 2 practice runs done before DYO elimination began, got there late so didn't have much of a chance really. Made it through to 2nd round of DIY before getting beat by a chick in a Beemer, lol. It bogged so hard out of the hole it wasn't funny. Basically felt like it had zero power until I got halfway through 1st gear once cool air was being forced through the engine bay. I think I'm going to have to either resort back to a better, fully sealed airbox so it's kept well away from the radiant heat, or move the filter out of the engine bay altogether. Bring on the next round of Night Speed Drag Wars, I want that low 15 |
|||
| Top | |
|||
| SLO247 |
|
||
|
The rear plate frame looks really good in the black, as does the lock. The black really goes with the heritage green. Very sinister looking now, the whole car really ties together.
The paint looks pretty nice from here, guessing its the typical E-Series "good from far but far from good"? Looks great in the photos at least. How did you do the grille mesh? Wrapped around the plastic centre or? I've got mine all sorted now and I've been driving it. Did Koni reds and k mac springs, cleaned it all and fixed up a bunch of little things. I bought an EF2 Ghia the other night for parts. Still has the xr running gear etc, and using the leather bits aside from the seats which are wrecked. I'll use the 3.45 LSD too. I'll have a read back and see, but did you use the xr arms with the diff? And the speedo sensor? How long until you to back to the drags? |
||
| Top | |
||
| Six |
|
|||
|
KWIKXR wrote: With Night Speed Drag Wars @ Meremere coming up this Friday 15th, I thought I better get stuck into getting the Fairmont ready just incase I do manage to get time to go down and have a few runs down 1/4 mile. All of the above mentioned work I was supposed to do a while ago had not been done at all sadly lol, poor Fairmont hasn't been touched till today. Still didn't get much work done, but I got a few things sorted out finally. I bought a Crow billet vernier adjustable cam gear recently, was going to fit it today, but probably not worth the hassle just yet. I wanted to have some adjustment on the powerband of the cam which is where this comes in handy, a few degree's of cam timing advance should bring power on a few 100rpm earlier just for that little extra pull down low to help with the fairly long gearing and stock stall converter for the time being. Hopefully whenever I have a decent reason to pull the rocker cover off again, I'll swap it over at that time. So back to what went down today.. Step 1: Replaced a blown brake light bulb Step 2: Fix up the passenger side mirror and give it the same matte black treatment as the drivers side mirror got. Looks much better now, and although colour coded wing mirrors look good, the matte black blends in with the windows trims much nicer overall. Step 3: Fit diff snout bump stop As it came without the bump stop fitted. With the bumpstop fitted. Note the witness marks of the driveshaft balance weight hitting the tunnel, hopefully it should no longer be able to do this, lol Had a bit of a play around with the plasti-dip and dipped the rear number plate surround panel for a different look. I colour coded the centre piece of it a while ago and left the outer edge chrome, unfortunately the colour coded section flaked off after it got some high-pressure hose action at the car wash a few months back. Ended up dipping the entire panel black which seems to look pretty cool now that there is less chrome on the rear. Also dipped the boot lock so it doesn't stand out as much. Starting to get pretty addicted to this plasti-dip stuff, pretty awesome to work with and best of all it can be peeled off fairly easy if need be. Will try to get pic's up during the week of the slightly changed look on the rear end. So that's as far as I got today haha. Doesn't help when you start working on the car at 7.30pm. Other things I want to do before Friday are change the engine oil and filter, which will most likely happen mid week. Clean up the engine bay, maybe try raise the rear of the bonnet if I can be bothered to try relieve a little engine bay heat and maybe play around with the intake setup, mainly to try reduce heatsoak. To finish it off, a few final adjustments with the tune (a long time coming, lol) and it should be all ready to go on Friday. Hoping for a low 15sec pass this time, should be able to get there with a cooler temp in the late arvo/early night, adjusting tyre pressures and some decent work from the driver. Will be keeping the same full weight as last time to keep things honest. To finish this off, a few photo's I got a couple weeks ago.. That looks wicked so slammed!!
_________________ MGW Short Throw Shifter, CVE Cam, CVE Head, SS Big Mouth Air Intake, Pacemaker Headers, 3" Exhaust, 3" Varex, 3" Cat, 19" Silver Agents, EMS Stinger 4424, 42lb Injectors and Walbro 255lb Fuel Pump |
|||
| Top | |
|||
| KWIKXR |
|
|||
|
SLO247 wrote: The rear plate frame looks really good in the black, as does the lock. The black really goes with the heritage green. Very sinister looking now, the whole car really ties together. The paint looks pretty nice from here, guessing its the typical E-Series "good from far but far from good"? Looks great in the photos at least. How did you do the grille mesh? Wrapped around the plastic centre or? I've got mine all sorted now and I've been driving it. Did Koni reds and k mac springs, cleaned it all and fixed up a bunch of little things. I bought an EF2 Ghia the other night for parts. Still has the xr running gear etc, and using the leather bits aside from the seats which are wrecked. I'll use the 3.45 LSD too. I'll have a read back and see, but did you use the xr arms with the diff? And the speedo sensor? How long until you to back to the drags? Cheers dude, yeah that was the idea of the blacked out parts, kind of give it a darker, meaner look. Seems to have worked pretty well, just wish the paint was gloss black instead of heritage green and it'd be perfect haha. The paint is definitely a case of "good from far but far from good". From say 5-10 metres away it can look pretty mint at times, but up close it has so many imperfections it's basically on the verge of really needing a complete respray. That'll come in time, just can't get over how much is costs to paint a car professionally. Might have to look into getting the paint and all the materials etc, setting up a booth, learn how to spray properly and DIY it The mesh in the grill is just wrapped around the plastic insert. Bit of a nuisance trying to do it that way but it works. New parts car sounds good mate, always good to have a decent parts car, especially a Ghia with all the goodies. When I swapped the XR diff in, I used the XR upper arms + their mounting brackets. The standard arms bolt straight to the body, the XR arms have a separate mounting bracket piece, so I unbolted that and fitted that along with the arms. I didn't bother changing the speedo gear, didn't think it would be 'out' enough to really bother changing from 3.23 to 3.45 gears. Moving up to shorter gearing makes the speedo read higher than the actual speed, so it's pretty safe anyway, lol. When I get hold of the correct speedo gear, I'll eventually swap it in. Have done 2 drag events since my last update (most recent of which was Friday night just gone), will update about the results below this. Will be heading back again on the 22nd March for the final round of the Night Speed Drag Wars series that is currently running and see how it goes then. Six wrote: That looks wicked so slammed!! Cheers man, still not quite slammed enough in the rear yet though ----------------------------------------------------------------------------------------------- Well, as above, have taken the Fairmont to 2 drag events since the last update. Made a few changes to the Fairmont before it went down. This time round, managed to raise the rear of the bonnet up with some spare 8mm thick bronze bushes I turned up at work on the lathe. Idea was to try let out a bit of heat which was a major problem last time. Didn't want to raise it up too high and make it look like something was extremely wrong with my bonnet, so started off small lol. Seems to have worked a little though, but not enough to really let out that hot radiant heat that's packed under there. It's only a subtle raise, so I may try raising it a little more again and see if that helps. 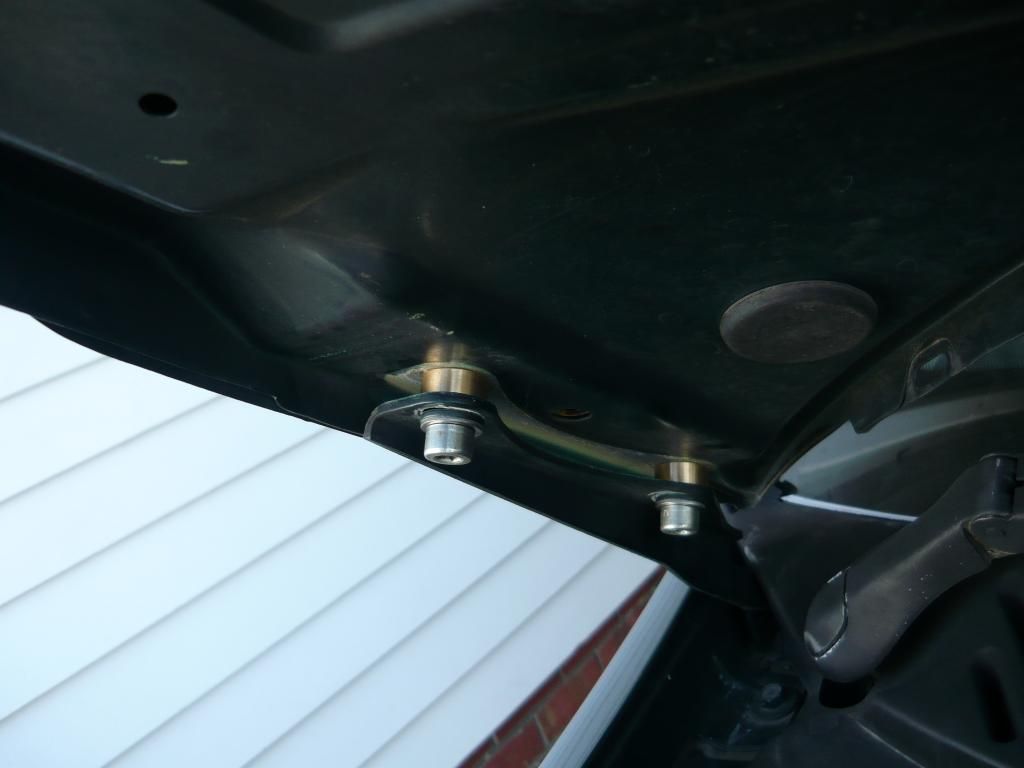 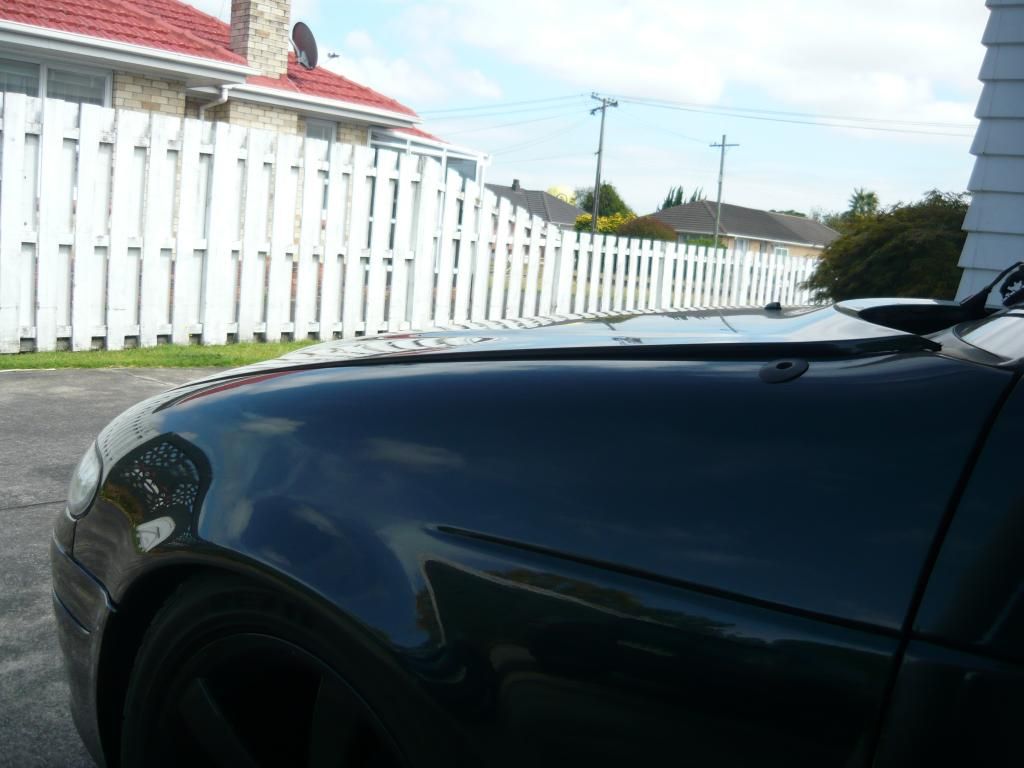 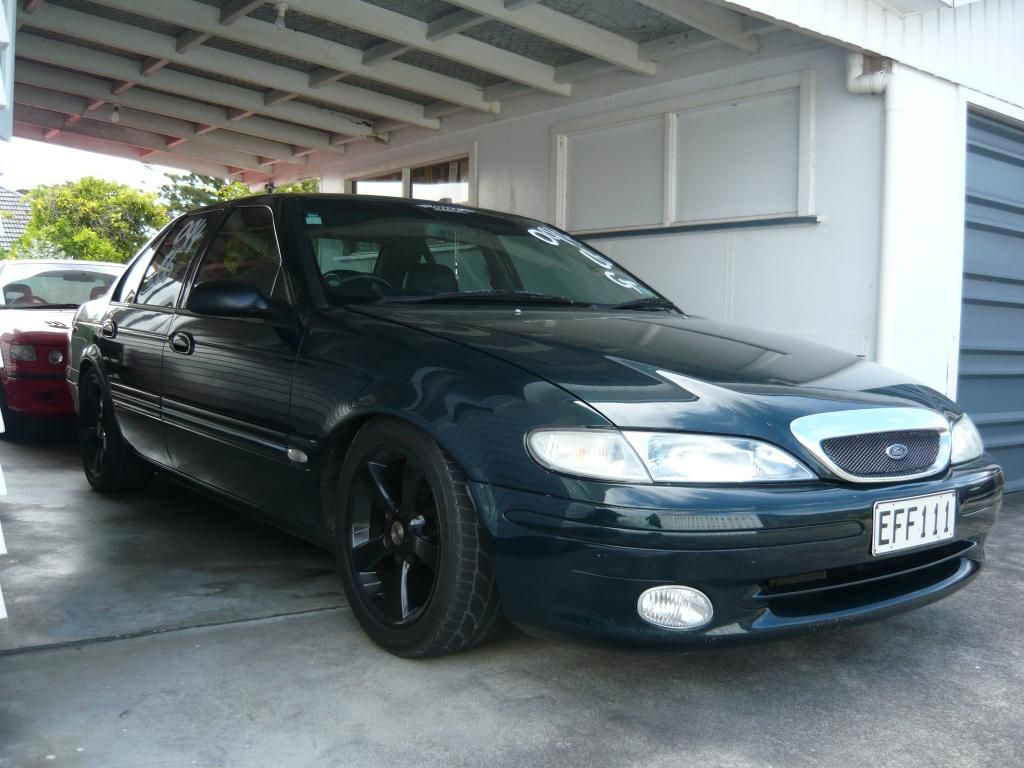 I even tried wrapping the alloy intake piping in heat reflective aluminium tape just to see if it did anything. Can honestly say it didn't do much at all, but make the polished piping look very ugly with all it's creases etc, so it's coming right back off. Also, routed a small 3" pod filter down inside the guard, behind the bumper just so it isn't sucking in hot air. Seems to have made the midrange pull a bit nicer, but the long intake length and the long ribbed flexibend joining the pod to the piping seems to be hurting throttle response a little bit. While I've got the airbox out, I'll make some changes with it and see if I can try keep the hot air away from it a bit better. Had to re-wrap the accelerator cable too as the loom tube I used previously must have got so brittle from the heat over the past 2 years, it just fell apart and melted on my exhaust heat shield the other day lol 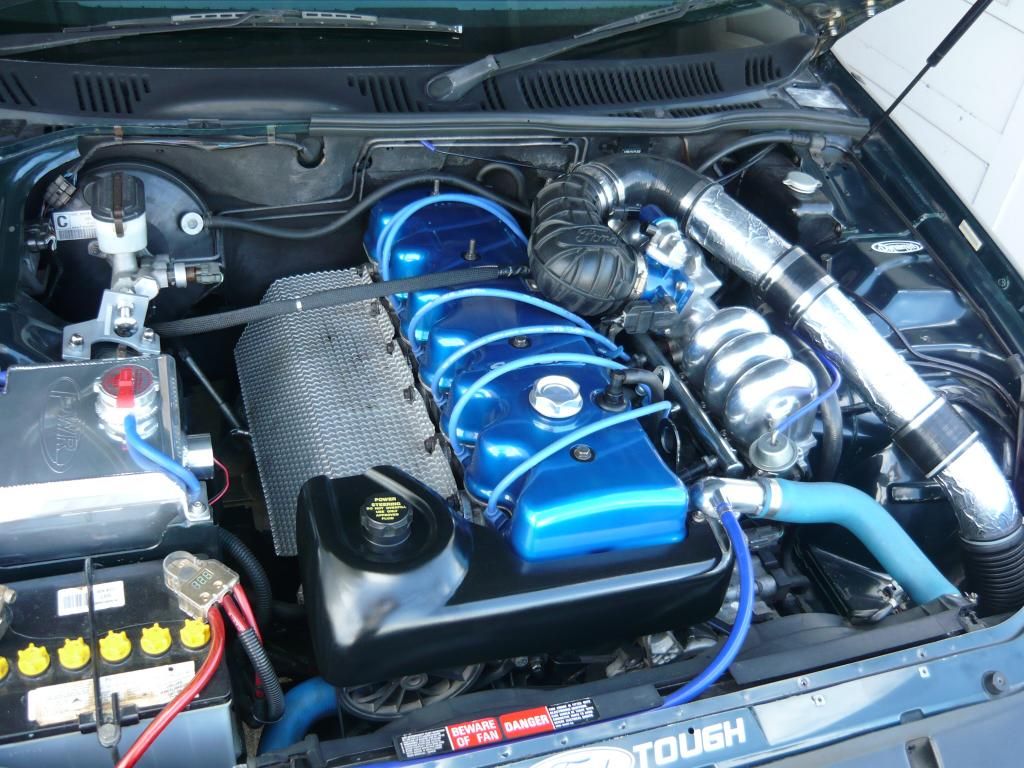 Went to the drags on the 15th February, and had an absolute, full-on, s**t night. Had a busy week and never got a chance to really get it fully ready for the Friday. Got home on Friday arvo and made a few changes with the tune, since the ECU was reset in doing so, it was still relearning everything on the way to the drags and even the following day, lol. Left home late, got to the track at nearly 8.30pm, almost missed race entry, wasn't a good start! Tried to get my 3 practice runs in so I could figure out a good time to dial in for DYO elimination, but there was so little time left in practice that I basically had to do a run, and jump straight back in line, without letting the engine cool down in between runs. Best of the night was a 15.7 @ 91mph, rest were within the 15.8 - 15.9 region at the same speed. Engine bay heat was a major problem, kept bogging down hard on take off so the 60' times were a shocker. Got 3 practice runs done, and made it to 2nd round of DYO elimination where I was beaten by a decent looking milf driving a BMW station wagon/small SUV looking thing lol, so parked up and started watching from the sideline for a bit, then went home. Last drag event I went to was just this past Friday night. Again had problems with engine bay heat, my 3 practice runs were in the 15.8-15.9 region. Got sick of the same results as last time so parked it up for a rest. Later on, I met up with a mate who wanted to race me in his BA XR6 with exhaust and intake mods. Pulled my best time of the night and beat him 15.6 vs 15.8. He had me off the line, but it was a pretty good feeling being able to reel in the later model XR6 on the change from 1st into 2nd, then started pulling away gradually from about half track on the way to a win. Still would have liked to have backed up the 15.49 I got last year, but so far I haven't been able to get that again. 60' times need to improve big time for me to get decent results at the other end. My best 60' time so far is a high 2.4, definitely needs a hi-stall to get the engine into it's powerband off the line. For now though, I'm planning to put the vernier cam gear in and advance the cam a few degrees to help out for the time being, then re-tune to suit as it'll most likely throw things out a little. Once a high stall is sorted out for this, I'll have a play again with the cam timing and see if I can find a good medium. Will be back again at the drags on the 22nd March and see how things turn out this time. Also got a dyno day planned with a few mates from the New Zealand Ford Forum, should be good to see what it's making at wheels on a different dyno. |
|||
| Top | |
|||
| Who is online |
|---|
Users browsing this forum: No registered users and 12 guests |

