|
| KWIKXR |
|
|||
|
More pics as promised with the Fairmont grill back on.. I think it looks better now
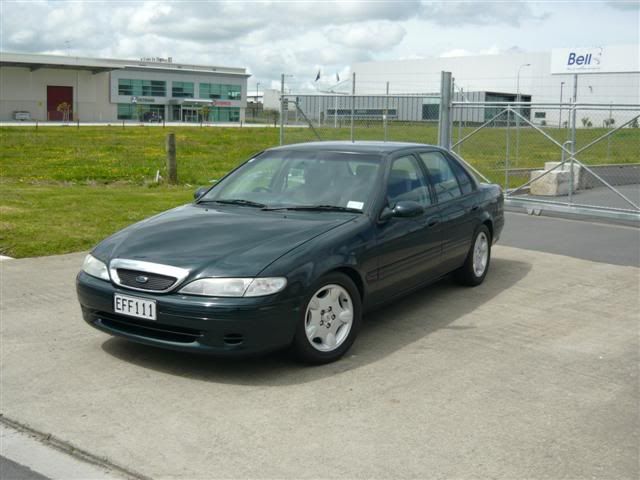 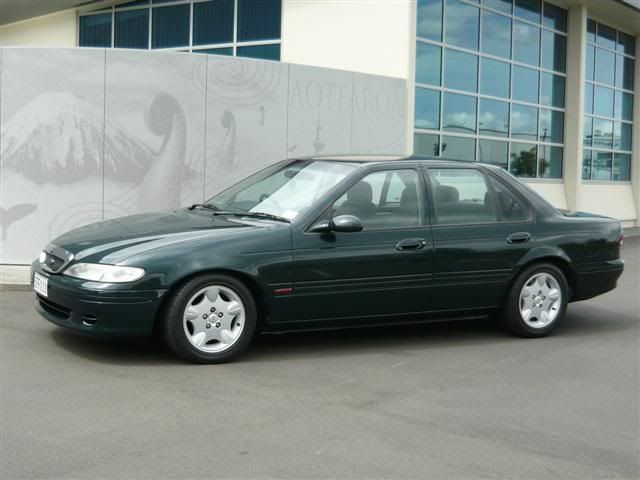 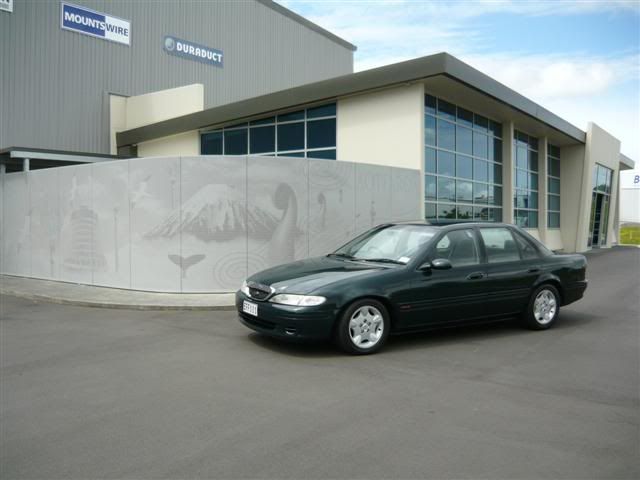 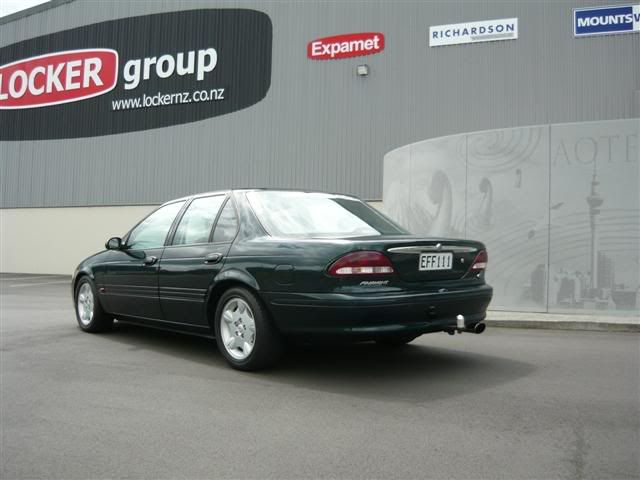 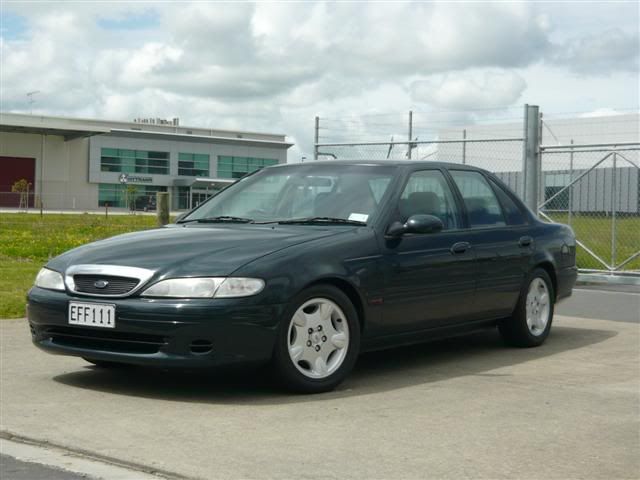 And a happy snap of something i just realised today from looking at the car side on from a distance, lol you can just get a glimpse of the secondaries on my extractors lol 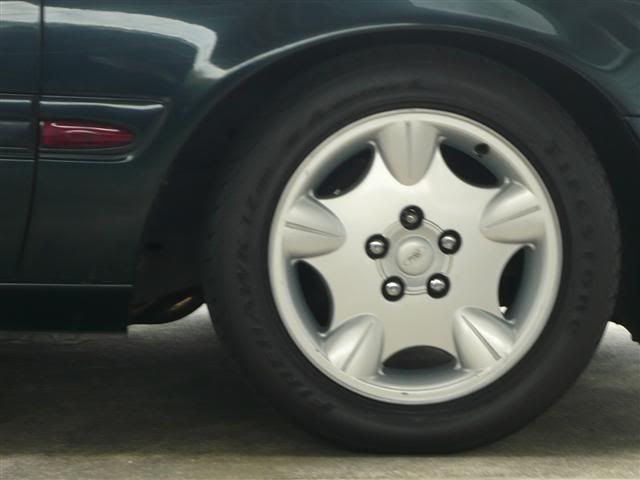 Now that i look at these photos, im reminded of what FordFairmont's EF used to look like, wonder where that guy ever got to |
|||
| Top | |
|||
| Mar55s |
|
|||
|
Looks great mate!
That's the grill u want def! |
|||
| Top | |
|||
| XR-Lane |
|
|||
|
Looking better with your fairmont grill mate.
|
|||
| Top | |
|||
| Froudey |
|
||
|
I love them rims.. I do wonder though about getting a set and getting the face machined would look like a sprint or svo rim...
Nice car mate
_________________ R.I.P Tobias my son. |
||
| Top | |
||
| facer01 |
|
||
Age: 32 Posts: 284 Joined: 27th Sep 2009 Ride: 1995 EF Ford Fairmont Location: Bundaberg, QLD |
very nice car mate!
|
||
| Top | |
||
| KWIKXR |
|
|||
|
Cheers guys, thank you very much for the kind words, appreciate it
Well heres a little bit of mucking around i did today. As some may already know i picked up an AU rocker cover a while ago which was going to be bolted on to give the engine bay a bit of a change, also had plans of modding my old throttlebody which i took off - anyways since its a long weekend this weekend, i have decided to put these plans into action. A while back when the red rocker cover went on, i painted up a spare throttlebody i had, and modded a little of the internal features, i.e streamlining the butterfly, smoothing out the entrance into the bore to remove the little "step" it has from factory and polishing it to a mirror finish - probably did stuff all i know even though it did feel a little more responsive but every little bit helps right.. But yeah i did a bit of work on it but nothing too much. Well i now have my old T/B sitting here which is now getting a bit more of a tickle while its apart getting ready to be sprayed. This one will be getting sprayed in gloss black to match the AU rocker cover which i will also be spraying gloss black with polished "4.0 Intec" lettering and lines. This time i am working a bit more on the inside of the T/B to try and get it to flow as good as possible while maintaining the stock size bore, obviously not gonna make a huge difference but i find it good fun mucking around with these things and a good experience overall. Have decided to port the opening as much as possible while still maintaining the factory size throttlebody bore and butterfly just to maintain air velocity for now, at the moment my engine is running a fairly mild cam so its not demanding a lot of air. Maybe sometime down the track when the engine becomes more "worked" i will take it out to get bored out a few more mm's (maybe like what FAST-XR has done with getting it bored to 68mm) and get a new butterfly machined to suit the bore. For now im working with what ive got |
|||
| Top | |
|||
| KWIKXR |
|
|||
|
This is just a little write-up for others who may be interested in giving this a go on a spare T/B etc for EF and EL models, not 100% if things are the same on other models but i imagine they would at least be similar. Tools i used for modding the T/B include: various files, air grinder or dremel or both with various grinding stones, cutting disks, buffing/polishing attachments etc, screwdrivers, circlip pliers, various grades of sandpaper, ranging from 100 grit up to 800 grit, a scribe for marking purposes, mini hacksaw, a drill with drill bits, autosol metal polish and lots of rags, bit of thin cardboard from a cereal box or similar to make up any new gaskets that may need to be renewed (T/B to plenum gasket, ISC gasket).. I have tried to get this as accurate as possible even though i have a pretty s**t memory and have tried to document every step with as much detail as i can with heaps of pics so if anything is unclear please let me know
So far this is what i have got up to.. First i cleaned the T/B out, and removed any components attached to it - in my case a spare ISC and the TPS. Since im going to be grinding out the entrance a fair bit and smoothing it so its basically a 1 angle instead of the 2 angle entrance with a bit of a step it has when stock, i took care of this first. I grabbed out the air grinder with a decent sized grinding stone, fired up the air compressor and started grinding away at the opening. The first part was concentrated on making the leading lip of the entrance almost "knife-edged" since the T/B opening sits inside the air intake piping, i wanted to make the easiest possible transition of air into the T/B by grinding this lip down so there isnt as much of a step now. The way i see it, air will flow into it much better if there isnt as much of a lip obstructing the flow so by grinding this lip down to an almost sharp edge and shaping it to blend into a constant angle into the bore, the air will flow into it smoothly. Here you can see the leading lip into the entrance, so imagine the lip that the air is bouncing off when entering the T/B.. 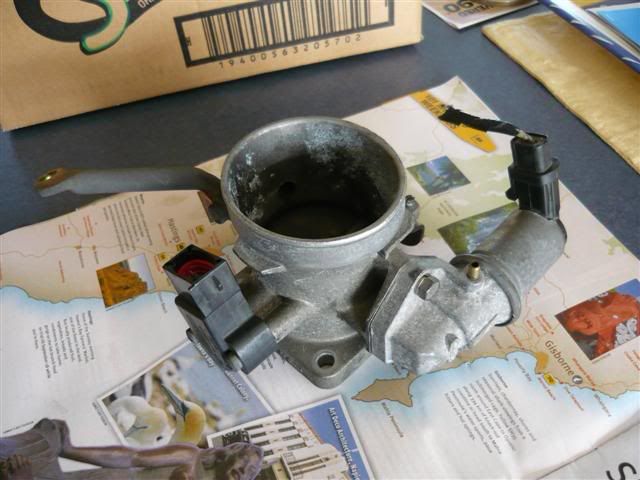 Heres is an after shot, after a bit of filing down and evening out with the grinder 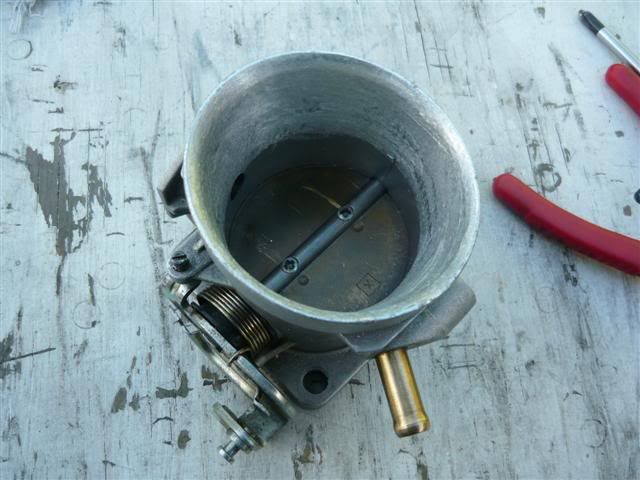 Anyway next step was to blend the opening into the bore - from factory the opening meets the bore at an angle so you want to smooth this down to blend into one angle for even smoother flow. NOTE: The important part here is to leave the butterfly in place in the T/B, do not remove it - reason for this is so that you do not get too trigger happy with the air grinder and start grinding the bore out where the butterfly sits, because once this happens you will be left with a slightly larger diameter, out of shape bore that the butterfly cannot completely block off when the throttle closes. This is bad because then the engine will be idling very high because in a way it will be like its at part throttle. Therefore you only want to smooth out the opening into the bore and up to where the butterfly sits, this ensures that only the entrance up to where the butterfly sits is enlarged and the area where the butterfly sits is not affected in anyway. What you can do here after shaping the entrance to a consistent angle is smooth it down with a few grades of sandpaper to make sure there isnt any bumps etc as there is usually a bit of a bump on the upper and lower areas of the opening. I started off with 150grit to grind it down as smooth as possible, then went to 240, 320, 600 and then topped it off with 800 and 1200 grit to get the suface ready for polishing. Now to smooth out the other end. As you can see from the exiting end of the throttlebody, there is a bit of a lip from where the bore which has been machined, meets the original casting. I took care off this using the dremel and a small cone shape grinding stone and ground the lip down so that it blended together nicely and became one with the bore, so now the air flow wont just drop off once it hits that area.. 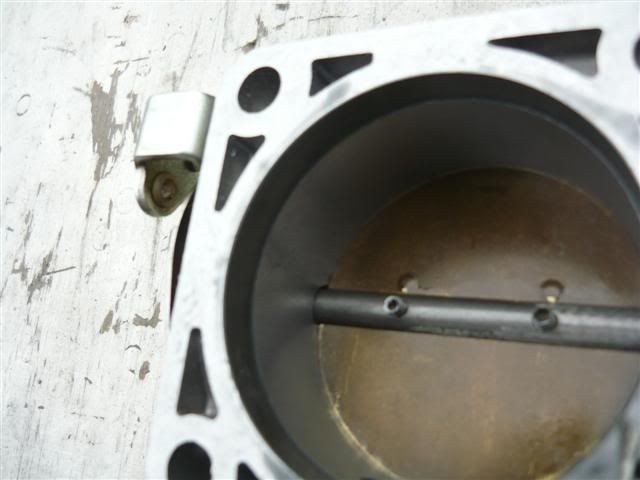 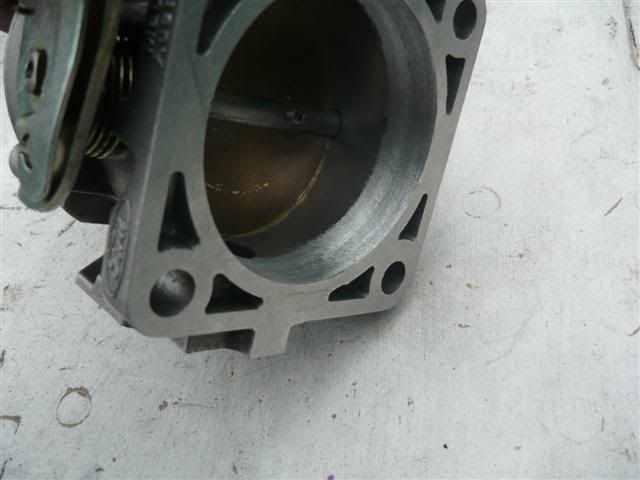 Once you have blended that lip, sand it down smooth following the above procedure with the different grades of sandpaper you have used for the opening. A pic comparing the a stock exiting end to the blended one.. 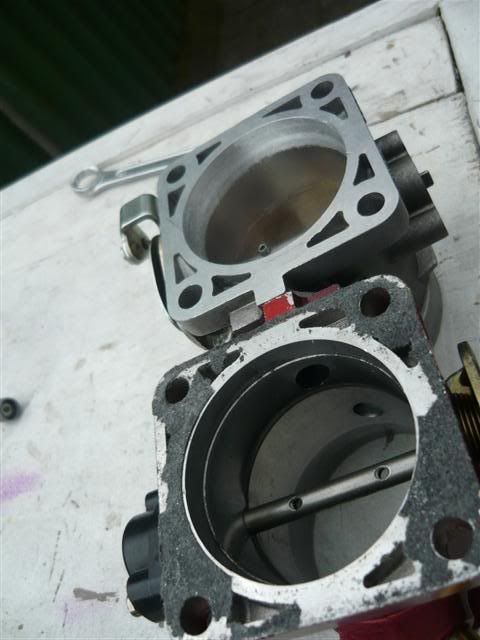 Next i moved onto removing the butterfly, there are 2 phillips head screws holding the butterfly plate to the shaft. Unscrew these, turn the throttle lever to fully open and slide the plate out through the opening - you may find that the plate is a bit difficult to slide out sometimes if it turns slightlyand if its anything like my one, it starts to get stuck against the bore as it slides out towards the opening leaving a bit of a scratch, but not to worry, you can sand these scratches out later when you begin the polishing stage. The key is to keep the plate in the same position in which it bolts to the shaft i.e try to line up the holes on the plate to the holes on the shaft as you slide it out and you shouldnt have a problem as this is the only way it can go in and out without touching the bore. Now with the butterfly plate you will see that the edges are pretty much a straight flat edge. What you want to do is grind or taper both faces of the leading edge to a point where it meets the edge of the plate, effectively making it a "knife edge" without altering the diameter of the plate - this allows the plate to kind of slice or cut through the air flow rather than having a blunt edge meeting the air flow. For this, you can lay down a sheet of course sand paper, hold the plate on a sharp angle and try to get the plate as close to being parallel to the sandpaper as possible so that the edge blends into the plate and to make sure you dont grind down the edge itself. Start moving the plate back and forth against the sandpaper to bring both faces of the plate to a point while. Or you could also use the sanding roll or grinding stone in a air grinder or dremel to do the same thing.. Once the leading edge is done, do the same thing to the trailing edge (in other words the other end) to ensure air flows off the rear of the plate just as well as it flows over it. Once again - NOTE: While doing this take care, and try not to grind down the actual edge itself, but rather grind down the face to meet the edge at a point. I didnt do this to the butterfly on this T/B as i have already done one which is currently residing in the T/B on my car now so here is a pic of that one. You can see both ends of the plate have been ground down. 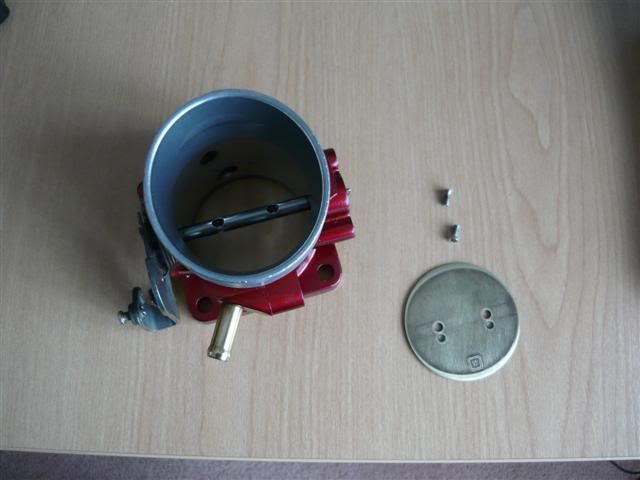 Then give both sides of the plate a smoothening over with a few grades of sandpaper, and if your keen, polish it to a mirror finish - but do this last. 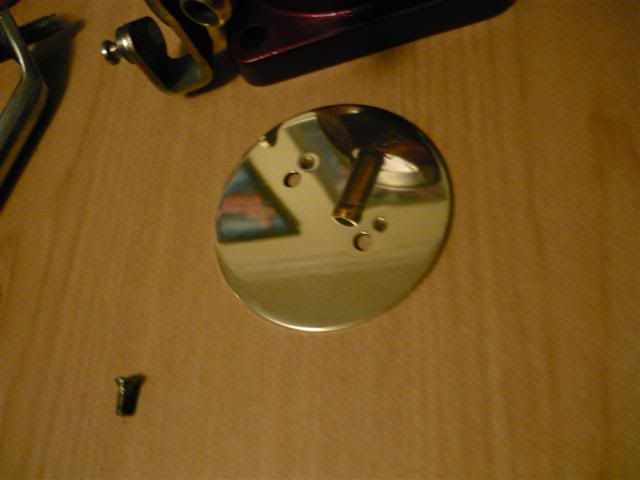 Once thats done and dusted, its time to modify the shaft. So the T/B should be left looking like this now.. 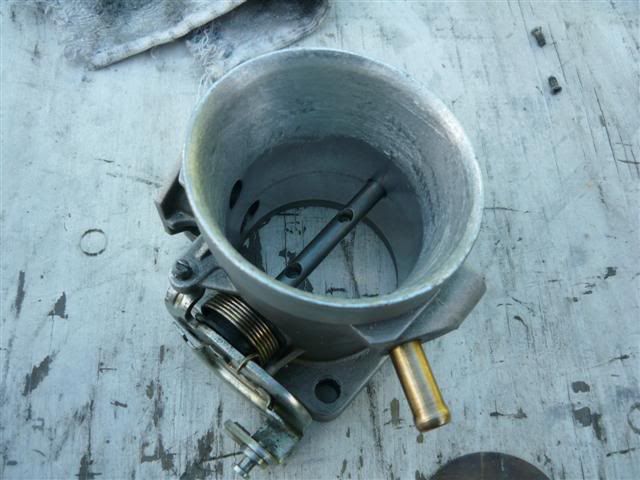 Time to remove the shaft. Before removing, get a scribe or a sharp nail or something similar and mark the ends of the shaft inside the throttlebody bore where the sits against the bore. Next, look at the side where the TPS is mounted and you'll see where to part of the shaft sticks out, which fits inside the mechanism on the TPS to show the throttles position. You will see a little black circlip around this end of the shaft with a little washer underneath it. Get your circlip pliers and remove the clip, now wriggle the throttle lever a bit and the entire shaft with the lever should slide straight out. Note where the washer is and the little black seats that sit where the throttle lever sits against the T/B housing and also the position of the lever spring. Its pretty simple but you can never be too careful. Now you should end up with this.. 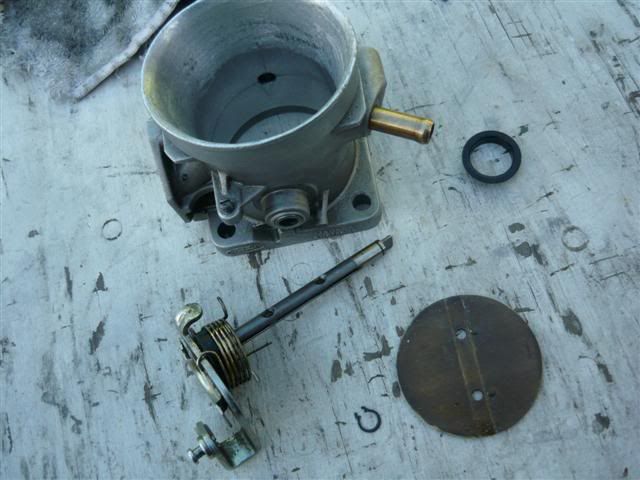  What you want to do now is cut the top half of the shaft off so it will become half shafted. NOTE: make sure its the top half you cut off i.e the half with the counter sunk holes, not the bottom half with the threaded holes as this is what the plate is bolted to. By doing this the air has a bit more area to flow and wont have the speed bump on top of the shaft to contend with. The marks you have made earlier are where you will cut to remove the top half off the shaft, so grab your dremel and cut off wheel or clamp the shaft to something so its secure and grab your mini hacksaw and start cutting where you've marked. Once this is done you should gone from this.. 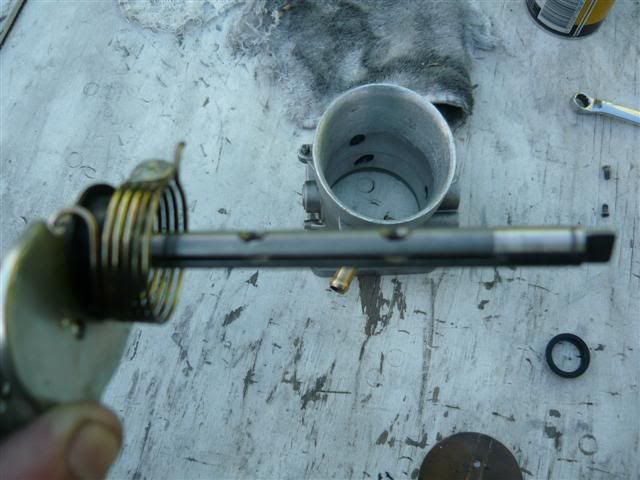 to ending with something like this..   Now deburr the edges where you have cut to ensure that the shaft does not get stuck when the throttle is operated. So you should now be able to slide the shaft back in, with all the above mentioned parts i suggested you make note of, refitted in the correct postion. Now bolt the plate back onto the shaft and check that the throttle lever can be operated smoothly and doesnt get stuck at any position. A few before and afters of the half shafting Before - Complete shaft at fully open position..  After - Half shaft at fully open position..  Before - Complete shaft at closed position.. After - New look with the half shaft at closed position..  Now this is where you can grind down the screws to the appropriate length so that they dont stick out like they do in the picture above. You can also countersink the holes on the plate a bit using a drill with a drill bit a few mm bigger the the hole so that the heads of the screws dont stick out as much either. Like i said before, every little bit helps, and if you are going to this extent, why not. Cant see it much here but here is my polished plate with countersunk holes.  In fact if you want, you could always buy a couple of screws with a flat heads rather than the rounded head so it sits inline with the plate, it isnt totally necessary but if you want to, go for it. Now before getting onto the next step, you want to clean the throttlebody of any dust and filings, either using an air gun which is by far the easier or a just a clean rag. Make sure that there isnt any crap inside the bearings where the shafts sits and clean out the ISC air paths and the pipe for the breather hose. Next step is polishing. With the butterfly and shaft removed, grab the Autosol and start polishing the throttlebody bore to a mirror finish, you can also start polishing the buttefly plate too if you havent already and if you want, polish the shaft while your at it.. 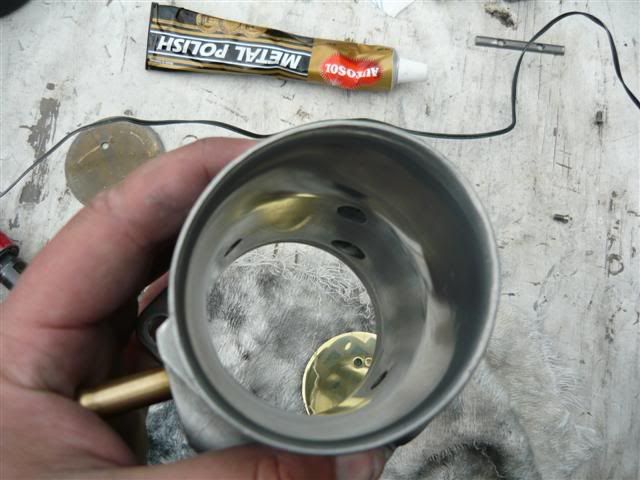 Once it is polished, clean out any excess metal polish that may be built up in any of the holes. Get yourself a tiny bit of grease and apply it to the bearings for the shaft to ensure they are properly lubed. Assemble all the parts of the throttlebody, check that the throttle lever operates as per normal, and fully opens and fully closes. 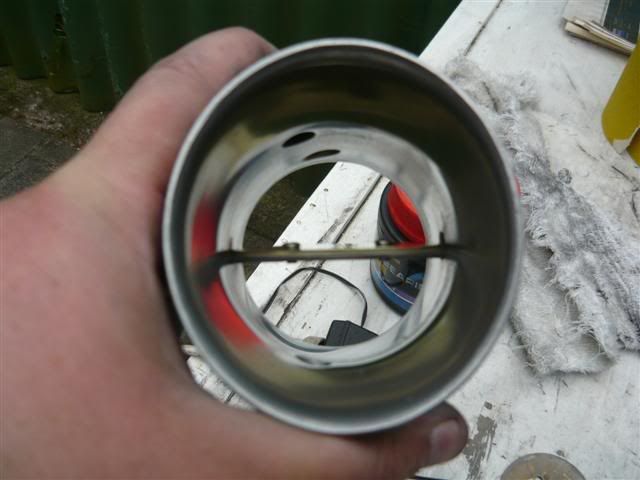 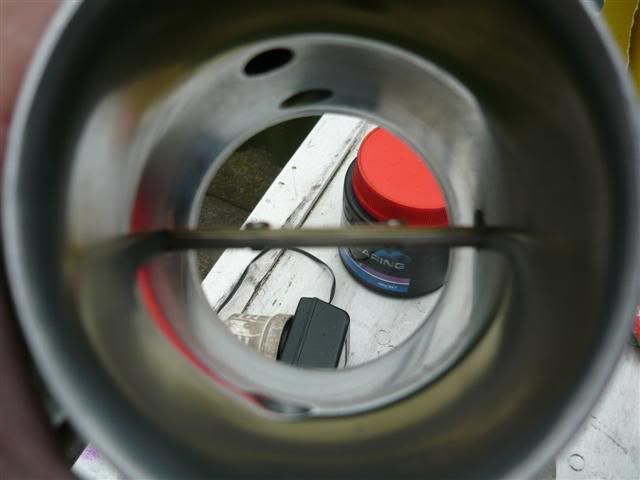 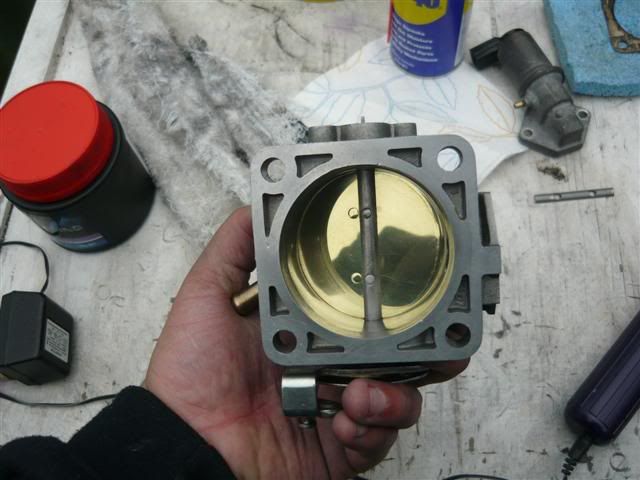 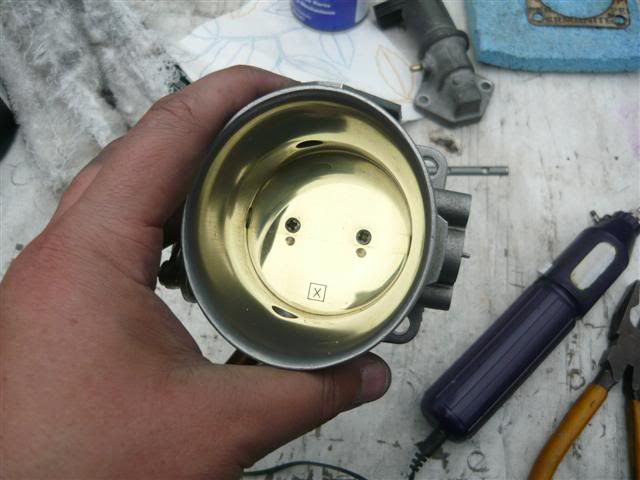 Stand back and admire what you have just done Now go and fit it back to the car with new gaskets (just make them out of thin cardboard, works just as well as a normal gasket), bolt everything back up, adjust the idle if need be, just incase you may have twisted the screw or something while working on it. Take it for a drive and enjoy Cheers. Last edited by KWIKXR on Mon Oct 26, 2009 1:12 pm, edited 1 time in total. |
|||
| Top | |
|||
| fiend |
|
|||
|
{USERNAME} wrote: Yeah your right mate, they like picking up people for noisy exhausts, or cars being too low mostly. Dont see how they could do me for having 20% tints when there is some Jap imports coming in with windows that are like 5% from factory so i may just go 20% now that you mention it.................................So unless the glass is completely flat, im not touching it In NZ there is a law regarding tints - If your vehicle is a trade or utility vehicle (van, bus, ute with canopy or even 4WD such as land cruiser) you are allowed much darker tints than passenger vehicles, and on more of the windows. A station wagon (even though it is mainly used as a trade vehicle) doesn't qualify until you get it in writing from a land transport agency. Some Subaru models come into the country with darker than legal tints from factory and they are exempt from the rules. Doesn't stop you getting pulled up mind you. Good work on the throttle body too. As a proud owner of a FAST-XR 86mm edition, I can see similar thought processes at work here. You seem to have missed any photos of the new rocker cover you talked of (!) You and your bloody rocker covers... Are you SURE you don't want me to send up my spare EL one for you to polish? |
|||
| Top | |
|||
| KWIKXR |
|
|||
|
{USERNAME} wrote: Good work on the throttle body too. As a proud owner of a FAST-XR 86mm edition, I can see similar thought processes at work here. You seem to have missed any photos of the new rocker cover you talked of (!) Cheers buddy, yeah have pretty much taken FAST-XR's concept but being on a budget, i have done it without any need to machine anything extra. In saying that, if i had the money id definately get one off FAST-XR, cause they look to be very well thought out and constructed. With mine i focussed most on getting the air into the throttlebody a bit smoother and working with what ive got while still maintaining factory bore diameter. Still havent started that AU rocker cover yet, will be getting done today if i dont have anything else to do. Good thing its already completely stripped, just needs to go through a few grades of sandpaper back to smooth then will get the groundcoat with a few coats of gloss black over the top. Still trying to suss out whether i should bother masking up the lines and lettering or just paint over the things and get a sanding block and rub it back to metal. Oh well, when it comes to that stage, i'll go from there. {USERNAME} wrote: You and your bloody rocker covers... Are you SURE you don't want me to send up my spare EL one for you to polish? Hmm, i'll get back to you on that front mate, this EF one i got on the car may be getting completely stripped back to metal. Depending on how good the casting is, i may polish this up seeing as i have a few attachments on the air grinder which could aid in getting the casting marks removed quickly. Too bad these attachments dont work equally as well on a BBM, the runners and tight curves are just a nightmare to work with. I think a high powered die grinder with tiny grinding bits may be better suited to this |
|||
| Top | |
|||
| KWIKXR |
|
|||
|
Okay, the T/B mod write-up is now complete.. Have any questions regarding any of it feel free to shoot them through to me.
Still havent fitted my T/B back to the car yet, as it is now in parts again in the middle of getting prepped for paint. Heres just a few pictures comparing a stock one to the one i modded this weekend. Stock on the left, modded on the right 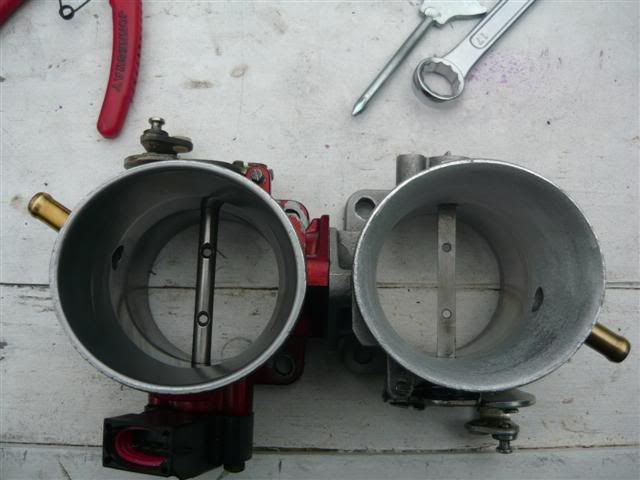 Stock opening 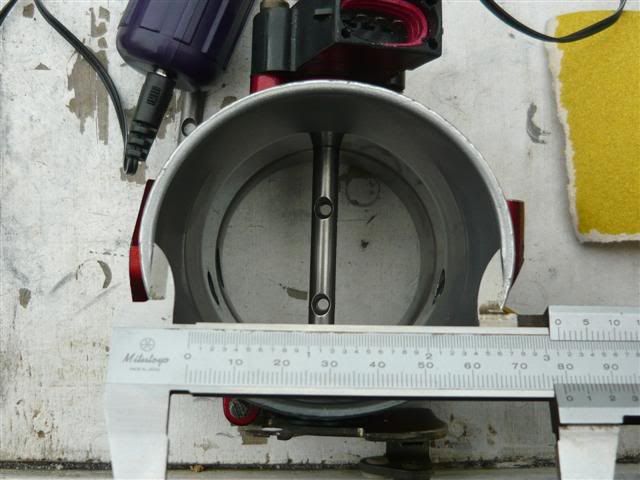 Modded opening (about 4mm bigger from top to bottom and around the same from left to right) 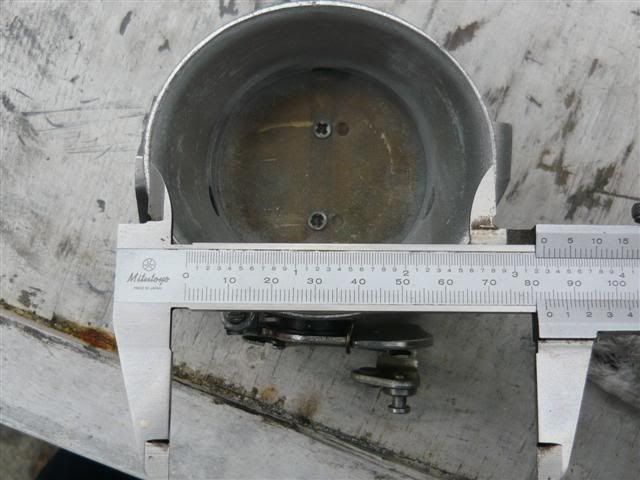 Havent got any measurements of the internal bore after the flared out opening up to the butterfly, as i dont have any calipers that will reach down that far, only had this vernier one on me today. But at a minimum it would be at least 3-4mm larger than stock overall till in starts tapering into where the butterfly sits, i spent quite a bit of time with the air grinder taking out as much as i could before the butterfly to get the flared opening to have a consistent curve all the way up to there. Dont think i'll have time to get the AU cover done today, its starting to rain now. I'll have pics of the finished throttlebody up tonight sometime |
|||
| Top | |
|||
| KWIKXR |
|
|||
|
{USERNAME} wrote: Good work man! Shall be interesting to hear the actual results of your work. When is the install planned for? Cheers Ash, hopefully will get it installed tonight and take it for a bit of a run since its been quite cool today, pity its raining because i usually use 1st and 2nd gear to gauge how much more responsive it is when i do things like this, and with wet roads i dont think i'll have much luck in the way of maintaining traction. Single spinners suck in the wet {USERNAME} wrote: Can ask what are the best bits to use? I want to have a crack at match porting some heads but don't want to buy every bit under the son to end up only using one or two. Good question lol, i was after answers for the exact same question when i started porting my spare falcon head. I am still a bit of a noob when it comes to porting but in my experience (which has only been alloy stuff so far) i usually stick to using carbide cutters to do the initial cutting/reshaping and then grinding stones to smooth everything out and give it a satin finish. You can use cartridge rolls, which is basically a roll with sandpaper wrapped around it, for smoothing down even more after grinding stone, but i get fed up with them constantly clogging up, therefore i usually just do a bit of wet sanding with normal fine grit sandpaper. So in general if you are trying to reshape, use proper carbide cutters, if you just want to smooth things out or grind something out a bit, use grinding stones. Then for polishing, either use cartridge rolls, or wet sand. What i have also found very good for polishing is a wire wheel attachment, weird as i only really throught these were good for stripping carbon and stuff like that but it works very well on alloy at a medium speed once it has been smoothened out and works without the need for polishing compound. I'll try to get pics up of the chambers on the falcon head im porting. I polished the chambers with a wire wheel attachment with my dremel, lol i was shocked at the finish to be honest, looks like i used autosol or something on them. Grinding stones are usually fairly cheap, i just picked up a cheap pack of 5 different shaped stones for $8 from supercheap, not the best quality stuff but if its only gonna be a one off job they will do just fine. If its quite a bit of cutting required i usually prefer to use carbide cutters as they can cut through the metal much faster and can be cleaned easily with compressed air if they get clogged up. Grinding stones on the other hand, clog up quickly if you are removing a fair bit of metal and even after trying to blow it all off with the air gun you still have s**t stuck all over them. Carbide cutters are usually costly though so if you know what work needs to be done on the ports just get a few different shaped cutters which you you think you will need and go from there. There is so many different shaped cutters out there, so i usually just look at what cutters are available, and get ones that i think will grind well against the port. Heres a few different shapes in this picture below, on rounded ports i usually just go for ones shaped like the first one. If you're going to need to get into tight corners, you'd be going for the ones that come to a point so i find its based on the shape of the port and what you plan on doing to it  One other tip i have, is to grab a can of WD-40 and spray the ports and bits every so often while porting, helps prevent the bits from clogging up quickly and makes the bits easier to clean when they do clog up. Also by keeping the port wet, the bits have a bit of lubrication so they dont bite into the metal too much or too fast. I also found it helps collect most of the filings so that they arent flying around everywhere, especially when it comes to using the stones. Hope that helps mate |
|||
| Top | |
|||
| BenJ |
|
||
|
Very interesting, and well written too.
Cheers BenJ
_________________ {DESCRIPTION} - Current Ride |
||
| Top | |
||
| SLO247 |
|
||
|
Looks perfect at that height with those wheels, I have wanted a set for mine for ages. Good work.
|
||
| Top | |
||
| Papa Smurf |
|
||
|
Great job Kwik, you should consider making it into a How To and have it setup in Technical Documents.
Like BenJ said, it is WELL written. |
||
| Top | |
||
| KWIKXR |
|
|||
|
{USERNAME} wrote: Very interesting, and well written too. Cheers BenJ Thanks BenJ, havent yet read through the whole thing as it was quite a bit to type so im hoping i covered everything. {USERNAME} wrote: Looks perfect at that height with those wheels, I have wanted a set for mine for ages. Good work. Cheers Slo, thanks for the kind words. Im with ya mate, loving the combo of the fairly even height and the look of the rims. Makes it look kinda sleek {USERNAME} wrote: Mate, that was extremely helpful!! Thanks for going into quite a lot of depth. Next time I'm over at the tool shop I'll suss out what they have. Now at least I know what to ask for. Cheers man!! Now I have to pick out some heads and find the time to give it a crack Glad i could help mate, sounds like your doing a couple of V8 ones?? Make sure you get some pics up of the heads you work on mate, would be good to see how others go about porting {USERNAME} wrote: Great job Kwik, you should consider making it into a How To and have it setup in Technical Documents. Like BenJ said, it is WELL written. Thanks Papa Smurf, by the sounds of things, it seems i did an okay job at explaining things which is usually not my strong point Definately considering it now that you mention it mate. Just how would i go about getting it made into a tech doco?? Would probably involve contacting one of the mod's or something to organize it hey? >>>>>>>>>>>>>>>>>>>>>>>>>>>>>>>>>>>>>>>>>>>>>>>>>>>>>>>>>>>>>>>>>>>>>>>> Anyways.. Finished spraying the throttlebody and resprayed the ISC while it was off in VHT high temp gloss black - good stuff. Didnt get round to taking the car for a run tonight, still havent even started her up yet, but its all fitted bar the intake pipe as i need to reset the idle since i removed the idle screw prior to painting. Decided to give the neighbours a good nights rest, seeing as ive been making a hell of a racket these last few days, all started with regrinding the lips on the Concordes mid last week with the air compressor going every day since then, bloody air grinders going full pelt for countless hours as well with the occasional blast every so often with the air gun, the neighbours would of just about had it with me So as its 10pm now, i'll leave it for tomorrow. I'll get up first thing in the morning at 7am and get back to my usual racket seeing as i need to fire up the air compressor again and clean out my pod filter, the joys of having a intake duct from your front bar - the pod filter is basically now a magnet for all kinds of s**t. So will get the car started up, adjust the idle and blip the throttle a few times to make sure there isnt any rev hang. Then take it for a few quick laps to see how she runs and i'll report back Well heres a few pics of the items painted up, dont mind my BBQ workbench lol.. 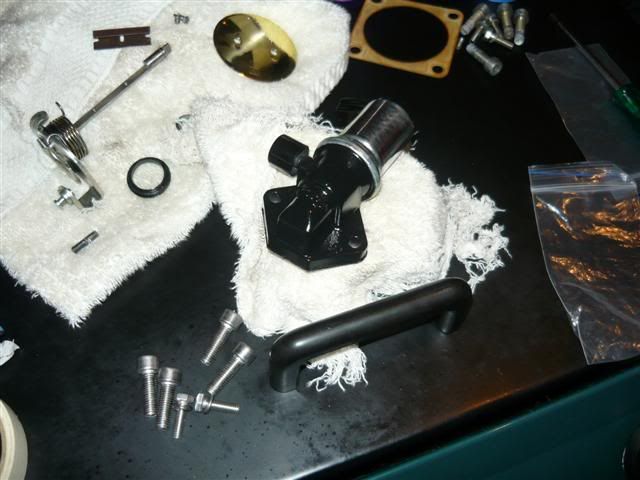 Amazing what a little bit of spray paint and polishing can do for small parts in the engine bay 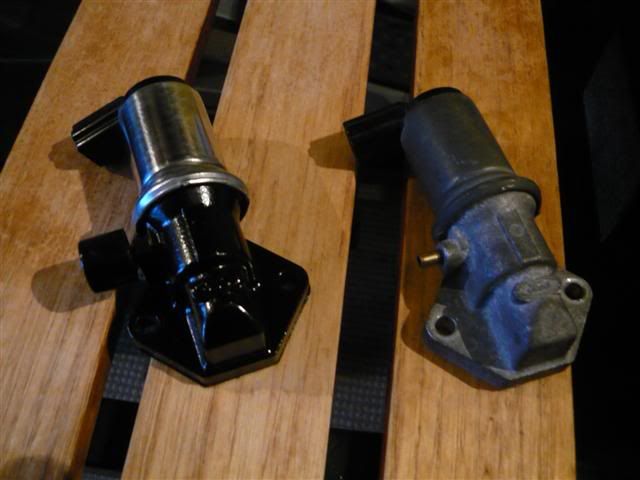 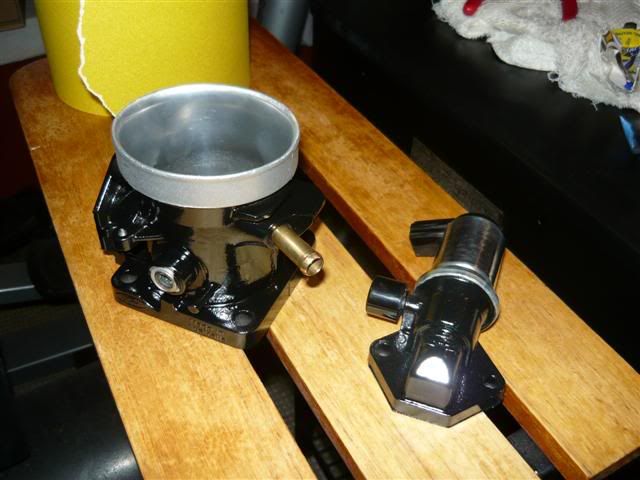 All fitted back on with new 316 stainless bolts. 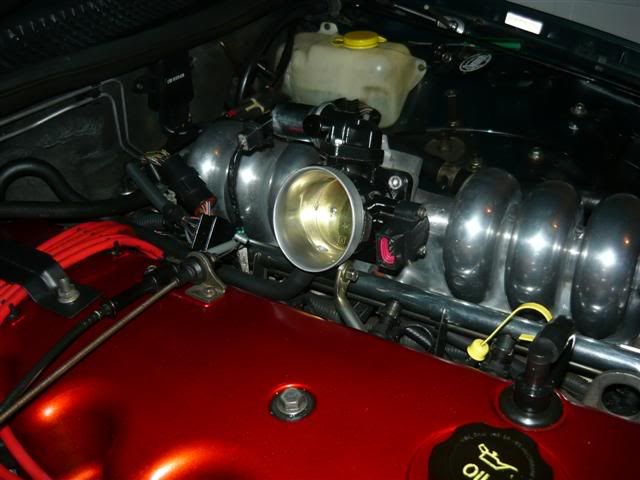 And a few of the intake while its off, easy to remove one piece unit lol, loosen one screw, unclip 3 clips on the airbox and it pops straight off 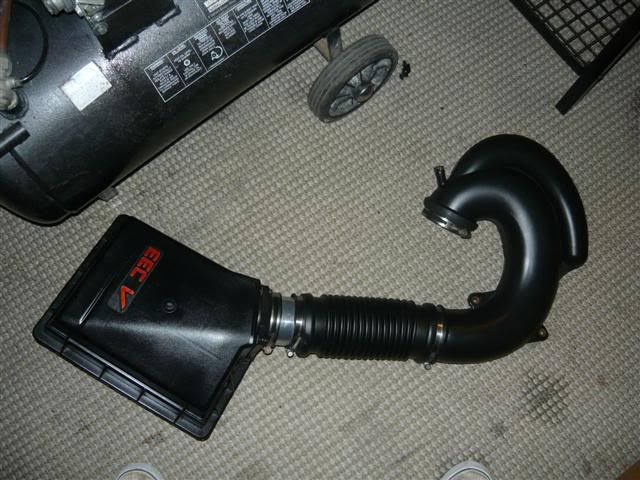 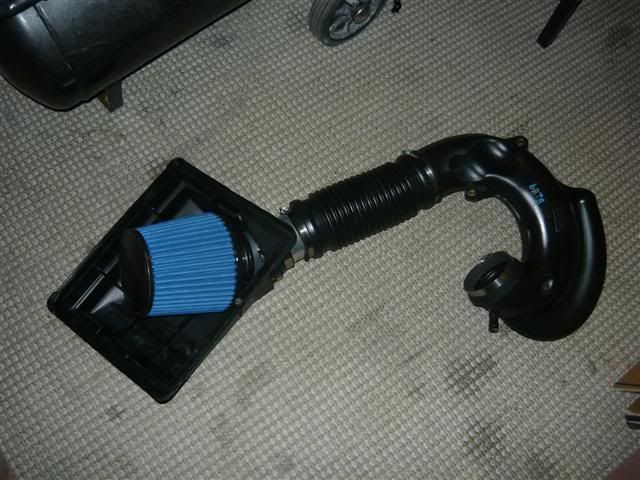 Maybe sometime this week, i'll have a gloss black AU rocker cover bolted on to match |
|||
| Top | |
|||
| Who is online |
|---|
Users browsing this forum: No registered users and 0 guests |


